
The best part of Vue.js is its components. In fact, they allow us to create a modern app by reusing parts of the code. Effectively, they enable us to create plug-and-play pieces of the app. In this Vue tutorial, we will see in details what Vue components are, and how to use them.
To get the most out of this tutorial, you should have a general understanding of Vue and JavaScript. On top of that, it’s better if you have vue.js installed on your PC, so that you can try things out. In case you don’t, you can start with Vue from here, or with JavaScript from here.
What are Vue.js Components?
In Vue.js, a component is a piece of your page, much like a widget on a smartphone. It shows something on the page, and have some logic behind to perform actions dynamically. However, some components may have only one of the two-part: they may show something without dynamic interactions, or they may do something without showing anything.
If you remember the previous tutorial, we saw that to define a component you have to create a .vue file. In this file, you will have to define everything about your component, from the logic to the appearance.
Once you define your component, you can use it inside your page, or even inside other components. To visualize it, think about a weather widget that can shows you the weather for multiple locations.
For each location, you want to have an icon showing the weather, and some information right below that: such as temperature and location name. Yet, the entire widget has multiple instances of that, because you may add multiple locations. As such, you can create two components: WeatherWidget.vue, and WeatherWidgetLocation.vue. Obviously, you nest the location inside the widget and not the other way around.

With the same logic and many more components, you can create complex and advanced web pages.
Create Your Vue.js Component
Now that the logic is clear, we can go on and see how to create Vue.js components step-by-step.
Naming Your Component
Often overlooked, the very first thing you have to do is give a name to your component. This may seem like a trivial task, but as the number of components you have grows, their names will become crucial.
This is even more important if you nest components one into the other, and they rely on that. For example, thinking about the Weather Widget example, the component WeatherWidgetLocation.vue would have no reason to exist outside WeatherWidget.vue. This is something you need to consider when giving names.
The Basics of Naming
The first rule is simple: you need to use Pascal Case in JavaScript file, but you may use Kebab Case inside of HTML when referencing the component. As such, when defining the component inside JavaScript, and when naming the file, we use a syntax like WeatherWidgetLocation. Instead, when we import in HTML we should use weather-widget-location.
Another important rule is to create a components folder inside your project. Here you will store all your components, without hierarchy. In other words, you should not create subfolders out of this one. Actually, you might in case you have hundreds of components, but that are advanced design choices. No matter how big you think your application is going to be, place all your components in /src/components when you start.
So, now all the components will be in that specific folder. Even more, that folder will contain nothing but components. As such, you don’t add the word “component” in the name. WeatherWidget is a good name, WeatherWidgetComponent is a bad name. A horrible one!
How to Pick a Name
To avoid conflict at HTML-level, all component names must have at least two words.
In addition to that, you want to make some special considerations for child components: components that make sense only inside their parent, and are not to be used “on their own”. For those, always prefix them with the name of their root component: much like WeatherWidgetLocation is the result of WeatherWidget + Location.
When you do that, in the prefix use the name of the first parent. If you have multi-level hierarchies, use always the name of what is at the top. So, if the Location widget contains the sub-component “Cloudy” to represent a cloudy day, you should name it WeatherWidgetCloudy, and not WeatherWidgetLocationCloudy. This will prevent you from having too long names.
Finally, you should sacrifice some English Grammar in favor of alphabetical order. You want to have all your components ordered in a way that makes sense inside their folder. So, imagine you have a Weather Widget and a reduced version of it, a Mobile Weather Widget. If you were to call it MobileWeatherWidget, it would not list close to the weather widget. Instead, move around the words so that a hierarchy can be respected: WeatherWidgetMobile.
In case you want to learn more about naming, and how to write proper Vue code, you should check the official Vue style guide. I highly recommend it.
Scaffolding Your Component
At this point, you decide a name for your component and you just have to create the file Let’s say, WeatherWidget.vue. In that, using HTML tags, you want to create three sections: one for the logic (script), one for the layout (template), and one for the style (style).
<script>
</script>

<template>
</template>

<style>
</style>
We can focus on the <script></script> section, where all the logic is located. In here, you need to ensure you have an export default statement so that this file can be imported into other files. You export a JavaScript object that represents the component itself, and as such you should give it a name with the name property. For that, use the same name as the file.
<script>
export default {
  name: 'WeatherWidget',
};
</script>
The next thing you want to do is to create a root element inside your template. It can be something like a <div></div>, or any other HTML element. Another component, even.
<template>
  <div></div>
</template>
This is it, we have now a working component that does not do anything.
Data
Our component can have a data function. That is simply a function that returns a set of variables that are then available to be used in the component. The function is called when the component is created so that all those variables are created. You can then read them and change their values, even inside the HTML template.
We can define this function as part of what we are exporting inside our component.
export default {
  name: 'WeatherWidget',
  data() {
    return {
      title: 'My Weather',
      locations: [
        { name: 'New York', temp: '8 °C', },
        { name: 'London', temp: '14 °C', },
      ],
    };
  },
};
Now, we can access this data inside the template by using double curly brackets notation and by indicating the variable name: {{ name }}. For example, {{ title }} will return “My Weather”, while {{ locations[0].name }} will return “New York”.
<template>
  <div>{{ title }}</div>
</template>
Events
So far, everything has been so static! We can change that because events allow us to listen to user input. Particularly, we can know when the user clicks on something, types some text, and more.
Interestingly enough, we can listen to events on any component. To do that, in the HTML we can use v-on: or @, followed by the event name. For example, if we want to do something when the user clicks on a button, we can use @click. After that, we provide some JavaScript code in the same way we provide the value of an HTML property.
Imagine you have a variable in data named counter, and you want to increase it by one when clicking a button. You can do like that:
<template>
  <div>
    Counter is: {{ counter }}
    <button @click="counter += 1">Increase</button>
  </div>
</template>
Not only you will increase the value for the variable, this will also appear immediately in the template because the mapping you do with the curly brackets is dynamic. Whenever the variable changes value, you get the new one to show up.
Computed Properties
Sometimes, you want to process and enrich the data before it is displayed to the user in the template. This is precisely where computed properties are useful. They are methods that return a value, generally derivating it from data, so that you can use it in your template more conveniently.
You define them with the computed object inside your export, which contains a set of functions.
export default {
  name: 'ExampleWidget',
  data() {
    return {
      firstName: 'John',
      lastName: 'Doe',
    };
  },
  // Computed properties
  computed: {
    fullName() {
      return this.firstName + this.lastName;
    },
  },
};
Note that you have to use this when referencing data. For the records, you can even reference other computed properties inside computed properties. Treat them like properties, not like function (e.g. this.fullName is good, while this.fullName() is not).
Now, you can use it inside your template like it was a normal data variable.
<template>
  <div>{{ fullName }}</div>
</template>
Methods
Much like computed properties, you can create methods that actually do something inside the methods object. Those are normal functions and have access to this just like computed properties. They may or may not take parameters.
export default {
  name: 'ExampleWidget',
  data() {
    return {
      counter: 0,
    };
  },
  // Methods
  methods: {
    increaseCounter(val) {
      this.counter += val;
    },
  },
};
Then, you can reference those methods inside your template.
<template>
  <div>
    Counter is: {{ counter }}
    <button @click="increaseCounter(1)">Increase</button>
  </div>
</template>
Props
So far, we talked much about what is happening inside the component with data, computed properties, and methods. Yet, one of the most powerful features of components is props. Those are properties that you can define when instantiating the component.
In fact, so far we saw only how to create the component, but not how to place it inside our app. When we do it, we can use props to create the component in a way we like. You define props before data, and each prop should be an object defining its type and default value.
export default {
  name: 'ExampleWidget',
  props: {
    value: {
      type: Object,
      default: () => null,
    },
    readonly: {
      type: Boolean,
      default: false,
    },
    name: {
      type: String,
      default: '',
    },
  },
  data() {
    return {
      counter: 0,
    };
  },
};
You can then reference them inside your template. However, unlike data, you cannot change the value of props, not from the template and not from methods. You can only read them.
<template>
  <div>{{ readonly }}</div>
</template>
You can also use them in computed properties and methods by using this (e.g. this.readonly).
Just one remark, with the default property on the prop you define its default value. You can provide a default value for simple types, but for advanced types like objects, you have to create a function that returns the desired default value.
Wiring Components Together
Now you know how to create a basic component, but with just that you won’t go far. You need to understand how to integrate it with other components, and how to include them in your page.
Importing a Component
The first thing you want to do is import an existing component into your component. Suppose we have already created WeatherWidgetLocation, and that now we want to add it inside WeatherWidget.
We first have to import it into the JavaScript and register it as a component. Registering the component means making it available inside the template. To do that registration, we simply need to list the imported component inside the components section of our parent component.
// Import
import WeatherWidgetLocation from './WeatherWidgetLocation.vue';

export default {
  name: 'WeatherWidget',
  components: {
    // Registration
    WeatherWidgetLocation,
  },
};
Now we can use it inside our template by using kebab-case.
<template>
  <div>
    <weather-widget-location/>
  </div>
</template>
This will effectively place the template from our WeatherWidgetLocation inside our WeatherWidget, and carry all its logic and style with it. We need to import and register the component only once, and then we can use as many instances as we want inside the template.
Providing Props
When we discussed props, we said that we can use them to provide values when instantiating the component. That is, we can pass some data to our component when we place it inside the template of another component.
We do that like simple HTML properties. For example, in the snippet below we provide two props: loc and temperature. Obviously, we expect those to be defined inside WeatherWidgetLocation (in the props object).
<template>
  <div>
    <weather-widget-location loc="New York" temperature="18 °C" />
  </div>
</template>
By default, you provide plain text to properties. In most cases, you want to be able to put JavaScript in there, for example, to pass a boolean value, object, or array. If that’s the, prefix the value of the property with a colon (:). In the following example, readonly prop does just that.
<template>
  <div>
    <weather-widget-location
      loc="New York"
      temperature="18 °C"
      :readonly="true"
    />
  </div>
</template>
Two-Way Mapping with v-model
We know that whenever we update the value of data (or computed properties), the new value automatically shows up in the template. In other words, we map what appears on the template with our data.
What if we want a two-way mapping: when things are updated in the HTML, our data in JavaScript gets updated as well. We can easily do that, for example with text fields.
We need to pass the value prop to set the initial value, and then we need to listen to the input event. When that happens, we will receive an event object, and we want to extract the target value from the event and set it back to our original value.
<template>
  <input
    :value="value"
    @input="value = $event.target.value"
  />
</template>
We have a more convenient shortcut that combines both statements, and that is v-model. That is a two-way binding, which means that whenever we receive an input from the child component, we update the value. Effectively, the following snippet is equivalent to the one above.
<template>
  <input v-model="value" />
</template>
Just like events, we do not need to prefix with colon because for v-model we expect a JavaScript piece of code by default. In fact, you cannot provide a static string because it cannot be updated, but only a variable.
If you want your component to support v-model, they need to have the value prop and they need to emit the input event. How do that? Keep on reading.
Emitting Events
Inside your methods, on any component, you can emit an event that other parts of the application can listen to. This is quite useful if your component modifies data and you want parts of the application outside the component to do something about the update.
To do that, you have to use the syntax this.$emit(eventName, eventValue). For example:
export default {
  name: 'WeatherWidgetLocation',
  data() {
    return {
      temperature: 0,
    };
  },
  methods: {
    changeTemperature() {
      this.$emit('changeTemperature', this.temperature);
    }
  },
};
Then, when you reference the component you can use the @ syntax.
<template>
  <weather-widget-location @changeTemperature="doSomething()" />
</template>
If your component has a value prop and emits an input event, you can use v-model on it.
Render Features
Quite powerful huh? Well, the power of Vue.js does not stop there. You can do much more, and here you can see three useful tools you can use to enhance what you display.
Conditional Render with v-if
With v-if, you can check a condition inside the template, and render the content inside of it only if that condition is true. This is useful, for example, if you want to show some parts of the component only in specific cases.
<template>
  <div>
    <div v-if="dialogOpen">
      <h1>Dialog open</h1>
      <p>This dialog is now open and you will be able to see it...</p>
      <button @click="dialogOpen = false">Close</button>
    </div>
    <button @click="dialogOpen = true">Open Dialog</button>
  </div>
</template>
In addition to that, you can also have a v-else to show something if the first block was not shown. In effect, we do not need the button to open the dialog if the dialog is already open, so we can edit the previous example as follows.
<template>
  <div>
    <div v-if="dialogOpen">
      <h1>Dialog open</h1>
      <p>This dialog is now open and you will be able to see it...</p>
      <button @click="dialogOpen = false">Close</button>
    </div>
    <button v-else @click="dialogOpen = true">Open Dialog</button>
  </div>
</template>
For v-else to work, it must be placed on the component directly after the component that contains the v-if.
v-show
An alternative to v-if is v-show. Unlike v-if, you cannot have a v-else attached to it, but that is not the only difference.
<template>
  <div>
    <div v-show="dialogOpen">
      <h1>Dialog open</h1>
      <p>This dialog is now open and you will be able to see it...</p>
      <button @click="dialogOpen = false">Close</button>
    </div>
    <button @click="dialogOpen = true">Open Dialog</button>
  </div>
</template>
With v-if, the content of the block is rendered only when the condition is true. Then, if the condition becomes false, we destroy the content, and when it goes back to true we do all it over again. In other words, it is faster to load the first time, but every state change is more expensive.
On the other hand, v-show always pre-render the content, and only keeps it hidden. This means it has to load it right from the start and makes loading a little slower. However, then it is free to change state as many times and as quickly as possible, without impacting performance that much.
As such, prefer v-if in case you expect rare state changes, otherwise v-show.
v-for
Conditional rendering can go way beyond if-else constructs. With v-for, we can construct loops, much like we would do with normal JavaScript. With it, we need to identify the variable to iterate over, a name to give to the individual item extracted from the list, and a name to give to the variable that will store the index of the item.
This will create as many instances of the components as they are items in the list. In addition, we need to use the key special property to define a unique value within the list that each component has. In most cases, you can simply use the index there.
<template>
  <ul>
    <li v-for="(item, index) in items" :key="index">
      {{ item }}
    </li>
  </ul>
</ul>
The example above iterates over the items property (that we may have in data for example).
Using the index as a key is a good strategy as long as the order of items does not change. If you are doing some sort of list where the user can update, delete, or even reorder items, then the index is not a good key. That is because even if you change the value of the item in position, say, number 5, the index 5 will not change, and thus no new computation will be triggered.
Instead, you should embed some of the unique values from the item. You need to decide carefully so that your key is as short as possible while being unique and truly representing your data. Yet, the dirty trick is to use the entire object and its index as a key, thanks to JSON.stringify().
<template>
  <ul>
    <li v-for="(item, index) in items" :key="index + JSON.stringify(item)">
      <input v-model="items[index]"/>
    </li>
  </ul>
</ul>
Using Components Inside the App
When you create a new app with Vue create, you will see an App.vue file. You can import your components right there, but I do not recommend doing that. Instead, you should create a folder for the views (/src/views).
Views are components that represent an entire page, and they are little to no logic, effectively just representing a collage of other components. In your app, you should import only views from /src/views, and nothing from /src/components.
Vue Components for Full Stack Developers
If you have been with ictshore.com for a while, you know that we like to try things out. That is simply the best way to learn. Well, this Vue tutorial is no exception, so we are going to get our hands dirty also there.
In fact, this tutorial is part of a larger (and free) Full Stack Development course, during which we are trying to build a pretend bakery store website. We built the website with plain JavaScript, now we are building it again with Vue.js. In case you are curious, you can check the project on GitHub.com at alessandromaggio/full-stack-course.
The Assignment
To put all the good stuff into practice, we will create the order page of our bakery store. On this page, we should be able to add baguettes, croissants, and pain au chocolat using three dedicated buttons, and then edit the quantity of each. In addition to that, we need to be able to remove every single line that we add, with a dedicated “X” button.
Since our app is empty at the moment, we will need also to take care of implementing a basic header and footer. In the end, our final result should look something like this:
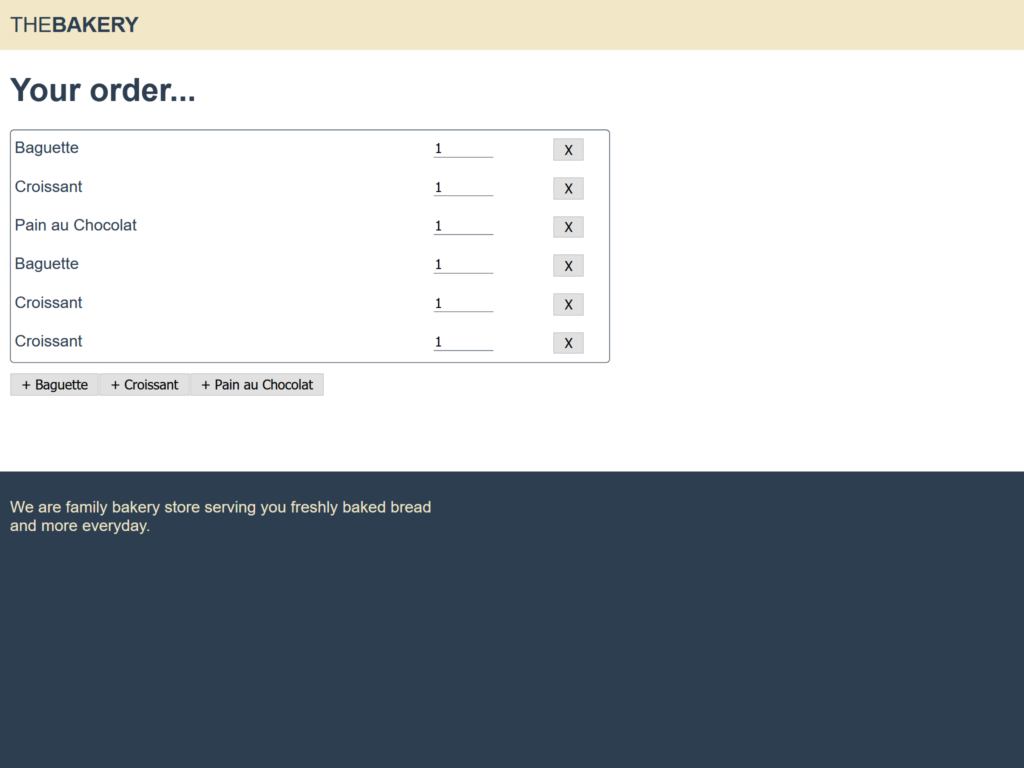
To accomplish all of this, we will need to use four components: the app header, the app footer, the order form, and the item of the order form. For the moment, you can place them directly in App.vue.
For styling, we will need to use BEM (tutorial on CSS BEM here). If you are looking for the colors, the light yellow is #F2E7C7 while the dark bluish gray is #2C3E50. We are using the Avenir font.
Try creating all this on your own before checking the solution. It is the act of trying that will help you fix all those concepts inside your brain.
The Solution
Before reading this solution, be sure to have tried on your own. Stay tuned, because you will see how we solved this assignment from the very next paragraph.
First, we need to discuss which component we have created. As anticipated in the assignment, we created four components: AppFooter.vue, AppHeader.vue, OrderFormItem.vue, and OrderForm.vue. Note the naming for the order form and its item, so that they are always together in the list. Instead, since <header> and <footer> are already existing HTML keyword, we resorted to prefix them with “App” in the component name.
To avoid unwanted padding, we had also to add style="margin: 0; padding:0" to the <body> inside public/index.html.
Now we can focus on the logic of the order form. Simply put, we want to track a list of items in the data, and have the possibility to add an item, or remove one. We do that with two methods: addProduct() and removeItem().
import OrderFormItem from './OderFormItem';

export default {
  name: 'OrderForm',
  components: {
    OrderFormItem,
  },
  data () {
    return {
      items: [],
    };
  },
  methods: {
    addProduct(name) {
      this.items.push({
        name,
        qty: 1,
      });
    },
    removeItem(index) {
      this.items.splice(index, 1);
    },
  },
};
Inside the template instead, we have to use a v-for to map every item to a new OrderFormItem component. Note that we use a strong key to ensure uniqueness. For the deletion, whenever the item triggers a delete (yet to be implemented), we remove the item.
<template>
  <div class="b-order-form">
    <h1>Your order...</h1>
    <div v-show="items.length === 0">
      Your order is empty, please add something with the buttons below.
    </div>
    <div class="b-order-form__items" v-show="items.length > 0">
      <order-form-item
        v-for="(item, index) in items" :key="index + JSON.stringify(item)"
        v-model="items[index]"
        @delete="removeItem(index)"
      >
      </order-form-item>
    </div>
    <button class="b-order-form__button" @click="addProduct('Baguette')">+ Baguette</button>
    <button class="b-order-form__button" @click="addProduct('Croissant')">+ Croissant</button>
    <button class="b-order-form__button" @click="addProduct('Pain au Chocolat')">+ Pain au Chocolat</button>
  </div>
</template>
The implementation inside OrderItem is much simpler:
export default {
  name: 'OrderFormItem',
  props: {
    value: {
      type: Object,
      default () {
        return {
          name: '',
          qty: 1,
        }
      }
    }
  }
};
And this is the related template:
<template>
  <div class="b-order-form-item">
    <div class="b-order-form-item__field b-order-form-item__field--name">{{ value.name }}</div>
    <div class="b-order-form-item__field b-order-form-item__field--qty">
      <input
        class="b-order-form-item__qty-input"
        v-model="value.qty" @input="$emit('input', value)"
      />
    </div>
    <div class="b-order-form-item__field b-order-form-item__field--actions">
      <button @click="$emit('delete')">X</button>
    </div>
  </div>
</template>
Finally, we will need to wire all inside App.vue so that everything loads correctly.
Check Out the Full Solution
In case you want to see the full code, including the CSS, you should head to GitHub.com and look at this commit. Specifically, here are some useful links for you:
- public/index.html
- src/App.vue
- src/components/AppFooter.vue
- src/components/AppHeader.vue
- src/components/OrderFormItem.vue
- src/components/OrderForm.vue
Browse the files and you will be able to see how we implemented everything and why. You can also consider cloning the repository and tweaking it at your will.
In Conclusion
With this longer Vue.js tutorial, we were able to see almost everything you need to know about Vue components. With what you learn here, you will be able to create complex and scalable applications. Even better, with those suggestions about naming and project structure, you can start to work like a senior developer even if you are still a junior.
We can now proceed with our dive into vue.js with routers, state management, preprocessor, and more. Yet, if you want to learn more about components I encourage you to read about the component’s lifecycle before proceeding.

