
Leaving JavaScript all by itself is no use. Instead, what most developers want is for it to interact with the HTML. We want to dynamically modify the page, at elements, create pop-ups, and more. In other words, we want to use JavaScript to manipulate the HTML (or the CSS) of the page. In this JavaScript tutorial, we see how to do exactly that.
This tutorial assumes that you are already familiar with JavaScript, and in case you are not we have the right getting started guide for you.
Introducing the DOM
If you started reading something about JavaScript and HTML, you may have encountered the word “DOM”. We will explain what this is in a second, but before that, we should focus on understanding why.
Our goal is to manipulate the HTML of the page, and this means adding some HTML tags, removing some other, or changing them (in content or in style). Obviously, to do that we need to access the HTML code from the JavaScript code. So, we need to have a way inside JavaScript to reference the HTML code. That way is the DOM.
The DOM is the Document Object Model, which is a fancy word to say that it is an Object representation (aka Model) of the Document (aka the HTML page). With object representation, we mean that we have an actual JavaScript object that represents the HTML page. (In case you need to know more about objects in JavaScript, read this).
As we will see later in the implementation, the name of the object is document. By calling the methods and the properties of this object, we can access every single part of our page. In fact, the document itself represents the entire page (everything between the <html>...</html> tags).
How to Use the DOM to Manipulate HTML
Now that we know what the DOM is, we need to know how to use it. In fact, we can use it to change the content of our HTML page as we please, for example by changing styles, adding and removing elements, changing the content, or changing CSS properties.
The Basics
When learning about JS Objects, we found out that we need to instantiate them. However, we don’t need to do with the DOM. In fact, it comes already instantiated, it is like pre-loaded with the page.
We can clearly see an example if we try to log it to the console.
console.log(document);This will produce huge output, that is even bigger if your page is full of content (since we are effectively logging that content). As you can see in the picture below, we are not logging the actual HTML code. Instead, just a representation of it.
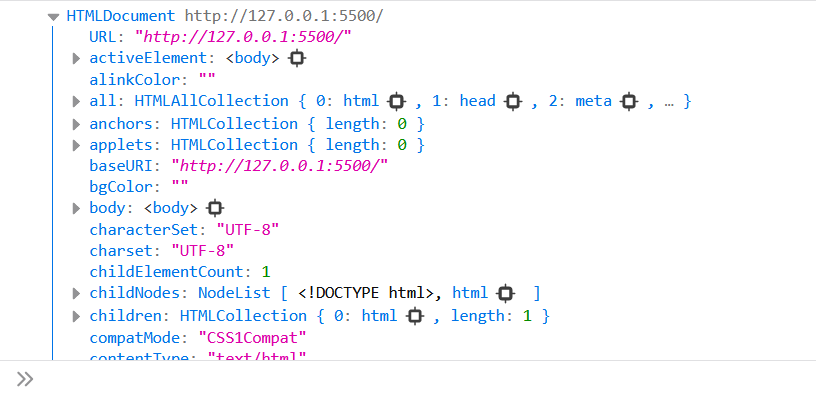
Everything that you see here is a property that you can actually reference in JavaScript. For example:
console.log(document.URL); // http://127.0.0.1:5500/
console.log(document.characterSet); // UTF-8
This is nice, but we can do much more than just that with the DOM.
Referencing HTML Elements by ID
Referencing the entire page (the document) is very limiting since we want to work with individual elements. We want to modify that very paragraph, load that very image, and so on. However, even if the document represents the entire page, it does not mean we cannot access the parts of that page or the other HTML elements.
The most common way to do that is to reference an element by its id in the HTML. This will give you an object that contains everything you know and can do on that HTML element. The function to extrapolate that object is getElementById(), and of course, it wants to know the ID we are looking for. Since the ID can be any text, we need to provide it as a string.
var element = document.getElementById("top");
console.log(element);
For this to work, obviously, we need to have an element that has an ID of top in our HTML page. In our case, we have imagined the following.
<h1 id="top">Bakery store</h1>
But having the element is not enough. We need to be sure that we load the element before running the JavaScript code. This is easily done by loading our JavaScript code at the very end of the page. In other words, our <script> tag must be at the end of the page, right before we close the </body>.
The important (and most useful) part of getting an element by ID is that we are sure we get just one element because ID must be unique. As such, we can easily manipulate that object.
How To Manipulate an HTML Element
After we fetch an element with getElementById, we can start to manipulate. One of the most common ways to do it is to change its HTML content. We can do that by working with the innerHTML property.
var element = document.getElementById('top');
console.log(element.innerHTML); // Bakery Store
However, we don’t necessarily need to assign a new variable for the object. We can reference it directly from the document, as below:
console.log(document.getElementById('top').innerHTML); // Bakery Store
We can do more than just logging a property, we can also modify it as we please.
// Example 1
document.getElementById('top').innerHTML = 'A new value';

// Example 2
document.getElementById('top').innerHTML = 'A <i>new</i> value';
As you can see, since we are talking about the contained HTML code (inner HTML), we can use HTML code when setting the value.
Changing the Style of an Element
The next thing you may want to do is changing the style of an object. This means modifying its CSS properties. One popular way this feature is used is to create pop-ups. You create an HTML element with display: none, so that it is not visible. Then, on the click of a button, you set the display property to block (or any other value you want). This will cause the element to appear.
To do that, you need to use element.style.<property> = <new value>. Obviously, you need to replace <property> with the actual name of the property (in this case display) and <new value> with the actual value of the property (in this example block). So here’s the example.
var element = document.getElementById("top");
element.style.display = 'block';
Of course, you can do way more than that. You can modify any CSS property in the way you want it, and you can also read properties that are already set.
Remember that JavaScript is camel-cased. Thus, properties that are kebab-cased in CSS (because they have multiple words) will be rendered as camel-cased in JavaScript. For instance, background-color will be backgroundColor. So, if we were to set it, we would use element.style.backgroundColor = 'red‘.
Setting attributes
When modifying the style of an object, we were effectively setting the style attribute (element.style). You can do much more than that, modifying virtually any attribute. To do that, just replace style with the actual attribute you are trying to edit or read.
Just to give you an idea, you could go with element.className or element.colspan (the latter only for tables).
Alternatively, we have a more traditional way to go, which is with the setAttribute() function. This wants to know the name of the attribute, as we would write it in the HTML, and the value to give to it. For example, we can go with element.setAttribute('class', 'my-class').
Adding HTML Tags Dynamically
Create a New Element
Sometimes, manipulating existing HTML elements is not enough. You may want to add new ones. This is a two-step process: we create the object while it remains unseen, and once we finish we can add it to the actual document.
To create a new element, we need to use the document.createElement() function. This function wants one parameter, the name of the HTML tag we want to create. For example, to create a div we can use document.createElement('div').
Since we are creating something new, now it is very convenient that we store this element in a variable, so that we can edit the element and tweak with it. For example, we can set its content or its style.
var newParagraph = document.createElement('p');
newParagraph.innerHTML = 'This new text is added by JavaScript';
newParagraph.style.backgroundColor = 'red';
However, this paragraph we just created is in a limbo. It doesn’t appear anywhere on the page, because we haven’t defined where we want it to be. Effectively, it is not part of the page just yet.
To add an element we created into the page, we need to add it as a child of an element that is already on the page.
Adding a New Element
The function to add an element to an existing one is fairly simple. We are talking about appendChild(), which wants the element that we want to add as a parameter.
By calling this function, the new element will be added as the very last child of the element where we call the function on. Suppose we gave our body an ID of body. Now, we can add our new paragraph at the end of the body as described below.
document.getElementById('body').appendChild(newParagraph);
As simple as that, the new paragraph will appear at the end of the page.
Removing an Existing Element
The opposite of adding, of course, is removing. We can do that as well with JavaScript, by removing a direct child of an element. We need to identify the parent element, the one from which we will remove the child. Obviously, we also need to identify what element to remove.
The function that allows us to do it is removeChild(), and wants to know the child to be removed as the only parameter.
Take a look at the following HTML code.
<ul id="list">
  <li id="first">First</li>
  <li id="second">Second</li>
  <li id="third">Third</li>
</ul>
To remove the second element, we can do the following.
document.getElementById('list').removeChild(document.getElementById('second'));
As simple as that, the second element is gone!
Replacing an Existing Element
We know how to add, we know how to remove, but do you know we can do both at the same time? That’s right, we also have a replaceChild() function. That function wants two parameters: the old element (that will be removed), and the new element to add.
Considering our previous example of the list, we could do the following instead.
var newLi = document.createElement('li');
newLi.innerHTML = '2nd';
newLi.id = '2nd';

document.getElementById('list').replaceChild(document.getElementById('second'), newLi);
And boom, we have instantly replaced the previous element with the new one.
Working with Multiple Elements
So far, we worked with a single element only, since IDs must be unique. That’s not the only way to do it, as we can work with multiple elements at once. In this section, we will see how to do just that.
Query Selector
The most useful way to select an element is to use the querySelectorAll() function. This function wants to know a CSS selector that identifies our element or elements that we want. Just to remind you, we can combine the following selectors in a CSS selector.
- Just text for a tag name (e.g.
div) - Pound sign for an ID (e.g.
#my-id) - Dot for a class name (e.g.
.my-class) - Attribute equals to desired value within square brackets for a specific attribute-value pairing (e.g.
[type=input]).
We can combine those to create complex references and target a very specific element or elements. For example, we could do body > div.main form.comment > input[type=submit]. Should you feel the need, here’s a great refresher on CSS selectors.
As you can imagine by now, the querySelectorAll() function wants to know our selector as a parameter. It will always return an array of elements, even if our selector selects just one. Why? Because JavaScript has no way to know in advance if we are going to get one or more.
var paragraphs = document.querySelectorAll('p');

for(let i = 0; i < paragraphs.length; i++) {
  console.log(paragraphs[i].innerHTML);
}
The code in the previous example will simply fetch all the paragraphs that are in the body, and print to the console their text. Potentially, we could use our loop to modifications as well.
If instead, we know in advance that our selector is going to always select just one element, we can all querySelector() and not querySelectorAll(). This will fetch only the first element.
var myElement = document.querySelector('p.only-one-p-with-this-class');
Legacy Functions
Just for your awareness, you could also use some legacy functions such as getElementByTagName() or getElementByClassName(). However, since querySelectorAll() allows you to select by tag name, by class name, and more, there is no point in using those (even if they are slightly faster).
Just know they are there, particularly in case you find them in other people’s code, but don’t use them when building from scratch.
Sub-Elements
So far, we fetched and modified object exclusively from the DOM (document). That’s not the only way to go. In fact, the DOM is just a special type of HTML element, an element that is the parent of the entire page.
This allows us to think about any other element in a different way. In fact, virtually all the functions that you can call on the DOM will apply to individual elements as well.
A good example is the querySelectorAll() function. You may use it to select an element, and then later to select and work with some specific elements inside that element (and not on the entire page).
var content = document.querySelectorAll('div.content')[0];

// Some more code later ...
var paragraphs = content.querySelectorAll('p'); // Only Ps inside content
This allows you to build complex structures and manipulate your HTML code in a very neat way.
JavaScript HTML Manipulation for Full Stack Developers
This JavaScript tutorial on HTML manipulation is part of something bigger. In fact, it is part of a complete and free course on how to become a Full Stack Developer. And we know from experience that the best way to do that is not just to study, but to practice.
This is why below you can find an assignment to test what you learned. The assignment is part of a broader project of a pretend Bakery Store website that you can find on GitHub.com at alessandromaggio/full-stack-course. Nonetheless, even if you are not following the entire course, try to do the assignment – this will really help you interiorize the concepts from this tutorial.
The Assignment
At the moment, in the order.html page we have a table when the user can select up to 4 items to order. It looks something like this.
<table>
  <thead>
    <tr>
      <th></th>
      <th>Product</th>
      <th>Quantity</th>
    </tr>
  </thead>
  <tbody>
    <tr>
      <td>Item #1</td>
      <td>
        <select name="item-1">
          <option value="None">Please select...</option>
          <option value="baguette">Baguette</option>
          <option value="croissant-empty">Croissant (no fill)</option>
          <option value="croissant-choco">Croissant Chocolate</option>
          <option value="croissant-berry">Croissant Strawberry</option>
          <option value="pizza">Handmade pizza</option>
        </select>
      </td>
      <td>
        <input name="qty-1" id="qty-1" type="number"><label for="qty-1">g</label>
      </td>
    </tr>
    <!-- Items 2 to 4 should be here -->
  </tbody>
</table>
We want to do something better, enabling the user to add as many items as he or she wants. So, our assignment is to create a function (you can name it addOrderItem) that will add to the tbody a new item. This function will want to know the item number everywhere, from the text to the value (e.g. input names). You may add sub-functions to make the code cleaner.
In addition to that, we want to create another function (getOrderItemsCount()) that will give us the total number of items in the order.
Finally, we want to remove all the HTML code from the body of the table so that it starts emtpy, but we call addOrderItem() when the script loads, so that it adds one item automatically.
Just a hint, you can give your table an id of order-table.
Try to work on this assignment on your own before checking the solution!
The Solution
Okay, here we go with the solution. Be sure you tried on your own before continuing.
In case you want to see the full solution for yourself and compare the files, you should take a look at this commit on GitHub.com. Otherwise, just keep reading for the explanation.
So, the first thing we did in the order.html page was to empty out the table body and add. We also added at the end of the body (the page body this time) the reference to load script.js. Then, we jumped into JavaScript.
We decided to separate the function to add our item from the function that actually creates the item. As such, our function to add the item is extremely simple, as you can see below.
function addOrderItem(n) {
  document.getElementById('order-table')
    .querySelector('tbody')
    .appendChild(createOrderItem(n));
}
However, this function references another one, createOrderItem(n). What is this about? We need to define that as well. That is the function that effectively creates the tr element, which we also de-compose into several functions as you will see.
Our createOrderItem() function will create the tr, its td‘s, the name of the row, and the label for the quantity. Everything else (particularly the two input fields) are delegated to two other functions: createProductSelector() and createQtyInput().
function createOrderItem(n) {
  let tr = document.createElement('tr');
  let td1 = document.createElement('td');
  td1.innerHTML = 'Item #' + n;
  let td2 = document.createElement('td');
  td2.appendChild(createProductSelector(n));
  let qty = createQtyInput(n);
  let td3 = document.createElement('td');
  td3.appendChild(qty);
  let label = document.createElement('label');
  label.setAttribute('for', qty.id);
  label.innerHTML = 'g';
  td3.appendChild(label);
  tr.appendChild(td1);
  tr.appendChild(td2);
  tr.appendChild(td3);
  return tr;
}
And here below you can find the two functions we are leveraging to keep also the createOrderItem(n) as clean as possible.
Note how we leverage an array of objects to create our options in a much simpler and cleaner way.
function createProductSelector(n) {
  let select = document.createElement('select');
  select.name = 'item-' + n;
  let options = [
    { value: 'None', label: 'Please select...' },
    { value: 'baguette', label: 'Baguette' },
    { value: 'croissant-empty', label: 'Croissant (no fill)' },
    { value: 'croissant-choco', label: 'Croissant Chocolate' },
    { value: 'croissant-berry', label: 'Croissant Strawberry' },
    { value: 'pizza', label: 'Handmade pizza' }
  ]
  for(let i = 0; i < options.length; i++) {
    let option = document.createElement('option');
    option.value = options[i].value;
    option.innerHTML = options[i].label;
    select.appendChild(option);
  }
  return select;
}

function createQtyInput(n) {
  let qty = document.createElement('input');
  qty.name = 'qty-' + n;
  qty.id = 'qty-' + n;
  qty.type = 'number';
  return qty;
}
Then, we need to create a function that counts existing items in the order. That is, we need to count how many tr the tbody contains. And here we go:
function getOrderItemsCount() {
  return document.querySelectorAll('#order-table tbody > tr').length;
}
And, finally, we need to add an item to the body of the table. We can do that with just one line of JavaScript, as below.
addOrderItem(getOrderItemsCount() + 1);
In Conclusion
This JavaScript tutorial may have been intense, but it told you everything you needed to manipulate HTML with JavaScript. Effectively, you now have the tool to create complex and advanced behaviors and animation. With the knowledge you have, you can really create advanced and customized applications.
Yet, JavaScript does not end there. The great part comes when we are able to trigger specific functions and manipulate our HTML at will, for example on the click of a button. That’s what you should focus on next, and what you will find continuing on our Full Stack Development Course.

