
Often times, developers focus only on code. While focusing on code is good, it is not enough. Code is about creating your app, but it will be worthless if people don’t use it. Hence, it is crucial that you have a viable, practical, and fast way to deliver the app to your user. This tutorial addresses specifically that: how to publish a Vue.js app.
In this tutorial, we assume you already have a Vue.js app. If you don’t, you can start here instead. Oh, and while we focus on Vue.js for this tutorial, the same concepts apply to all JavaScript frameworks, such as React or Angular.
Publish Your Vue.js App
Publishing your app has two major parts: the build and the actual publishing. Building your app is relatively simple and fast, while publishing can be a challenge if not done properly. But let’s proceed with order.
Build Your Vue.js App
The first step for getting your app in front of the users is to actually have something to put in front of the users. Our source code does not fit this role, with all its .vue file and complex components. No, no: we want something that can run smoothly in the browser.
Luckily, creating this browser-ready version of our app is a walk in the park. If you set up your app with the Vue CLI, your package.json file will contain a build command. You can simply run it to create the browser-friendly code.
npm run buildIn a few seconds up to a couple of minutes, the Vue CLI service will prepare your app. In doing so, it will create a new folder at the root of your project, the dist folder. That folder is your browser-friendly app. In other words, it is the code we will have to ship to the user. Remember about this, because it will be the focus for our following steps.
An extra tip: sometimes, you may not have the build command inside your package.json file. In that case, you can add it or run directly the Vue CLI service. The command to do so is vue-cli-service build --mode production.
Serving Your Vue.js App
Now that we have an app (the dist folder) to serve, we need to actually serve it. Yet, what does serving the app mean? We know that Vue.js is a frontend app, thus running on our users’ computers. The thing is, users’ computers do not come with our app prepackaged. They need to download it from somewhere, typically when browsing a website.
So, you need to have a website – your website – that contains all your app folder, so that when users browse to it they will receive your application. The concept is simple: you need to upload your app onto a website.
We have different options to go about it:
- Copy the files into the
public_htmlfolder of your backend server. This works well if you already have a server, commonly running Apache or nginx, and you have full control over it. It works well if you have an actual server or VM, but can be a limitation if you have a container. - Embed your frontend code into your backend application. If you have a backend framework such as Laravel (PHP) or Django (Python), you have a folder where you can put static files. You could put your app there. Technically, you can do that with Express.js as well, but it hasn’t the best performance when serving static files.
- Run a static website on a cloud provider. This is the quickest option and keeps your frontend completely independent from your backend. It can be integrated very well into your DevOps pipelines, and it is scalable and cheap. You will have to tweak DNS settings, but that is definitely manageable.
The first two are somewhat custom-tailored, so we will focus on the latter.
Serving Vue.js as a Static Website
This is the way I personally recommend and use. We have our dist folder, and we decided we should run a static website on a cloud provider. In this section, we will see how to do exactly that.
Which Cloud Provider is Best?
This is a common question, but it will never get a definitive answer. The only answer we can give is the classic “It depends”. Indeed, it depends on many factors, but for what we are trying to accomplish AWS, Azure, and Google Cloud can all get the job done.
Personally, I have been sticking with Azure for a couple of years now, because it provided wonderful integration with its own Source Control (git) system and Kanban boards. When I had to decide where to put my cloud efforts, back in 2018, Azure had an edge on other cloud providers if you were interested in similar features. At the time of writing this article, Dec 2020, AWS has quickly caught up on those.
In fact, at the time of writing, AWS has some slightly better options specifically to serve static websites. However, my recommendation is to stick with the cloud provider you are already familiar with and already use.
Since I am already on Azure for most of my projects, I will show you how to do this on Azure, but the same concepts apply everywhere.
A Place to Store Your App…
The first thing you have to do is to store your app in the cloud. In Azure, we do this with Storage Accounts, while on AWS we do this with S3 buckets. Once more: the concepts are always the same.
However, if your repository is hosted on GitHub.com, you may want to use Static Web Apps instead of a Storage Account. A Static Web App is basically everything that we are doing in this tutorial, pre-configured, and we slightly more features. The disadvantage is that it only supports code hosted on GitHub.com at the moment.
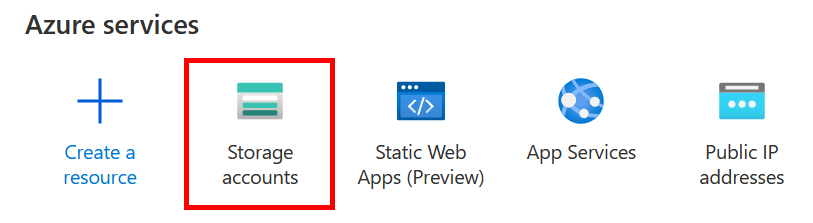
Inside the Azure Portal, search for Storage accounts. I already have among the recently used services, if you don’t you can always hit the search bar on top.
On the page, click on add to create a new one. You will have to fill in some information. If you want, you can learn more about all these fields in the Azure documentation. Yet, the important things you want to consider are:
- Resource group. It is a logical collection of resources in Azure, so that when you delete the group all resources in it gets deleted. Good to have one for each project.
- Location. Where to physically host your app – the closer to your users the better.
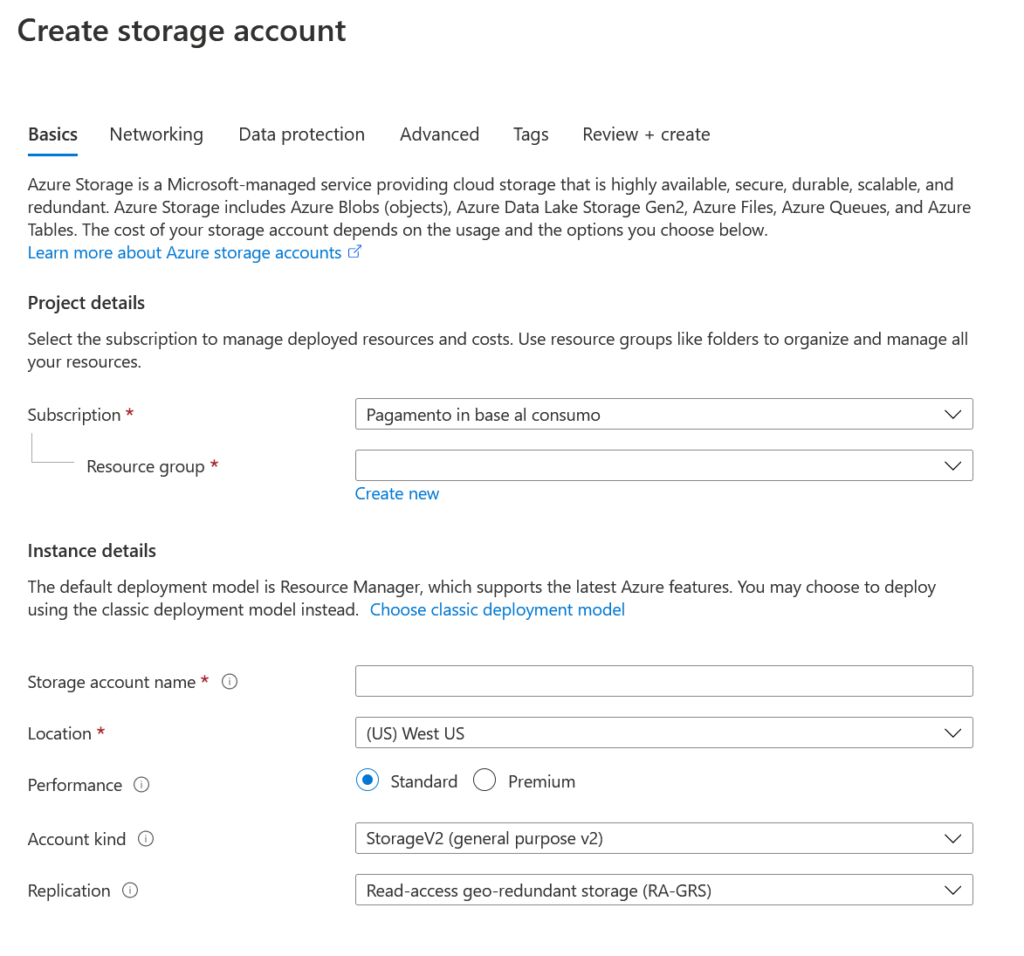
You can leave all other sections at default. Move through the various tabs with next-next, until you actually create your storage account.
Creating the Static Website
By default, the storage account is just a place to store files. It is not necessarily a static website, so we need to enable this feature.
Open the storage account you created, select Static Website from the various menu options, and flag Enabled. This will enable the static website, and most importantly create a folder where we can place our app.
To be more specific, it creates a blob container, which is much like a virtual disk. The blob container that gets created as part of the static website is $web, and we should put our app inside here.
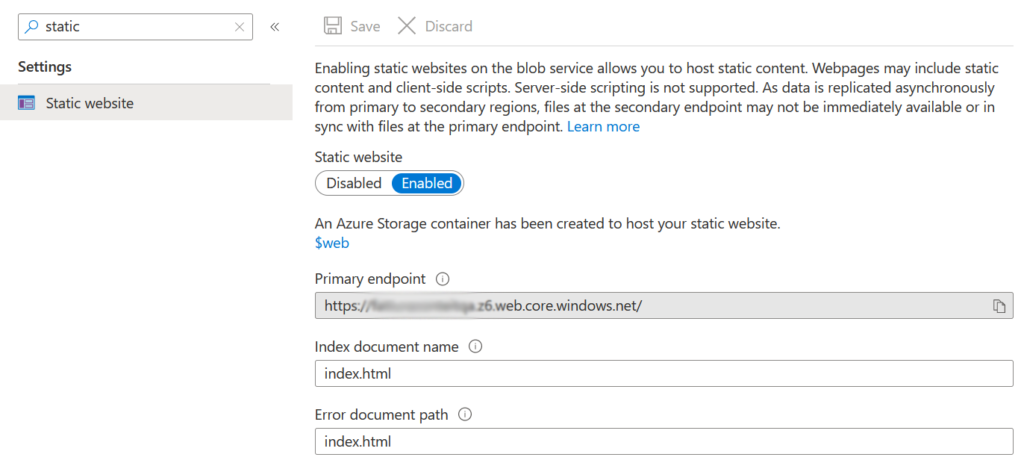
After we created the static website, we also added Index document name and Error document path. As you can see, they both reference our index.html file.
This is important if you have a SPA – that is, if you are using the Vue router, which is almost always the case. When you use the Vue router, your backend server must always return your index.html page in all cases, because the routing is managed inside Vue.js – not inside the backend. Hence, any document that is not found (error path), will appear as index.html. We have a little caveat on this topic, and we will address it later. For now, just know why we did this.
You can see your website by going to your Primary endpoint in the browser, but for now, you will not see anything. In fact, we still need to upload our app.
Uploading Your App into Azure
It is time to finally upload our app. However, we cannot do that from the web interface, but instead, we need a dedicated client. It is the Azure Storage Explorer, an important tool for any cloud developer or administrator. It is free, and you can download it from here.
Once you have gone through the no-brainer next-next installer, you can actually open it and connect to your Azure account. In fact, the first thing it will ask you are your Azure credentials.
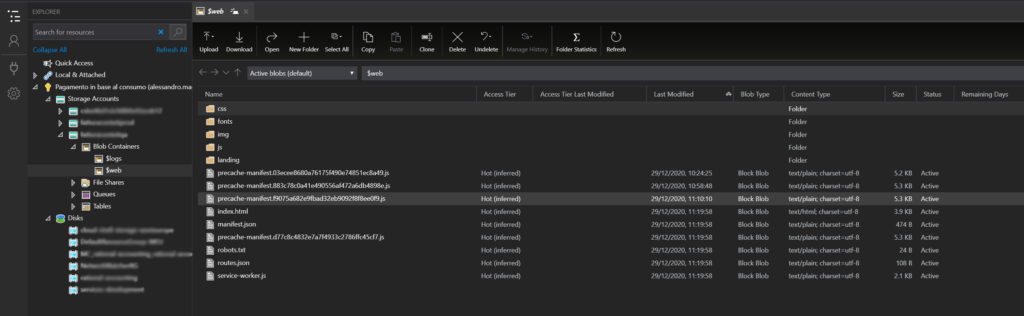
From there, you can use the left menu to browse to the storage account you created, then the $web container, and then use the Upload button on the right panel. You can – and should – upload an entire folder at once. Hence, upload the dist folder so that the content of the dist folder will appear in the root of your container, like in the picture.
Now, we can finally browse to our Primary Endpoint and see our website. All done? Not quite: we need to enhance performance and add our custom domain through a CDN.
Adding the CDN
CDN stands for Content Delivery Network, and it is a way to enhance the performance of our website by having many caches of it around the world. If you are interested in the logic, we have a good read on CDNs. However, today it is not just about performance, but also about practical utilities.
In fact, exposing a static website on its own has some limits, particularly in terms of combining a custom domain with an SSL certificate for HTTPS. Since we likely need both the SSL certificate and the custom domain, we need the CDN. Basically, users will contact the CDN, and the CDN will contact our website once in a while to copy its content. Don’t worry, it is smart enough to detect when your website has changed.
If you are on Azure, you will work with Azure CDN. On AWS, the product to do so is Cloudfront. Now back to the cloud!
Inside our storage account, we can look for Azure CDN inside the Blob Service tab. From there, we can create a new CDN endpoint – a new instance of CDN. As part of that, we will also create a new CDN profile, that gives some settings to your CDN.
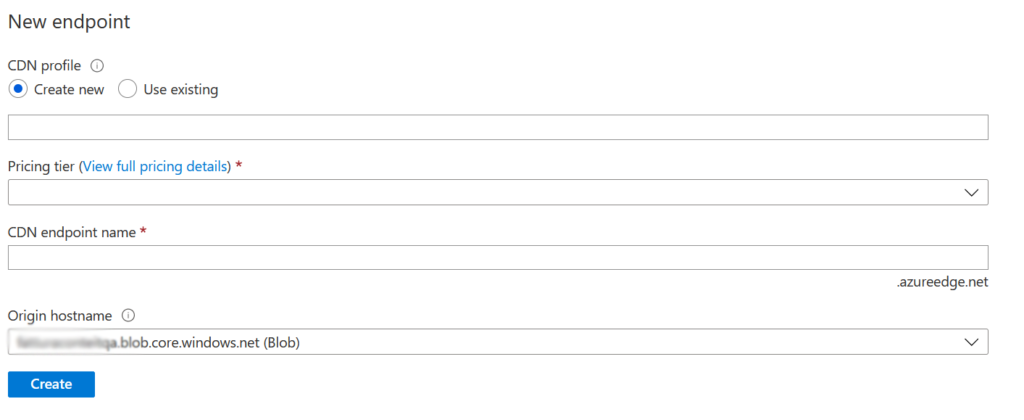
As origin hostname, you should use <storage account name>.blob.core.windows.net, which is the default. It will automatically detect the $web container among other blobs.
The best practice to name your CDN endpoint is to use the domain you want to use for your website, replacing dots with dashes. So, if you want to host www.example.com, you can name your endpoint www-example-com. However, to sort endpoints alphabetically (hence grouping them by project), I prefer to reverse the order to com-example-www.
Adding a Custom Domain to the CDN
Click on the CDN endpoint you created. This will open the CDN Endpoint resource, and you will have a left menu with different options. Among those, you will find custom domains. Here, you will see the Endpoint hostname and a custom domain that you have to fill.
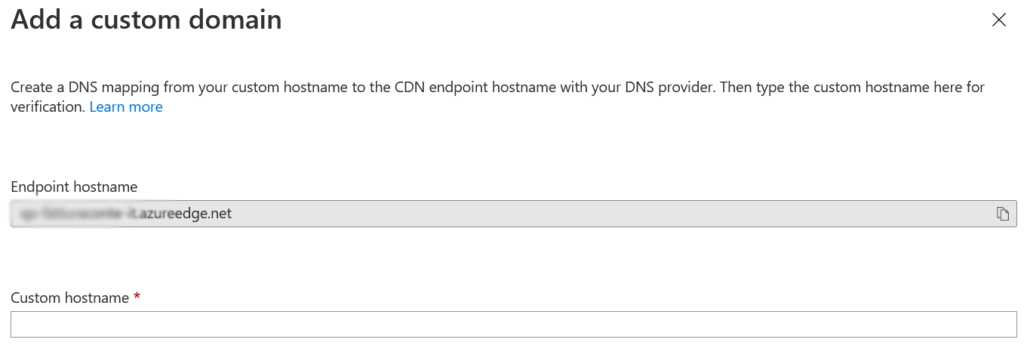
Before we can type in our custom domain, however, we need to tweak our DNS settings. Go to your DNS or domain provider where you are hosting your domain, for example, GoDaddy, EuroDNS, AWS Route53, and so on. In here, you need to create a CNAME record that points toward the Endpoint hostname you see inside Azure.
For example, if you want to use (and own) www.example.com, you can edit the DNS settings for example.com and create a CNAME record for www that points to com-example-www.azureedge.net (in case your endpoint is named in this way).
Important remark: CNAME records are not supported on second-level domains such as example.com, it is a DNS specification you cannot circumvent. Hence, pick a domain such as www.example.com or app.example.com.
Once you added the CNAME record, you can proceed to insert the name in Azure. Then, it will ask if you want to use HTTPS, and if so if it should generate its own certificate (for free), or if you want to bring your own.
This is it! You now have your app running in the cloud, you have published your Vue.js app!
Caveats
Content-Type for JS Files
Your app may not work fine unless you provide a valid HTTP Content-Type for your various file. That is, depending on your source file, you should tell Azure to specify a different Content-Type in the HTTP header. This is important for .js files, otherwise, the browser will not be able to process them correctly.
To do that, inside your CDN endpoint, navigate to the Rules Engine. This is a powerful tool to do some basic tweaking to the HTTP requests and responses. Here, you can create a rule that says: for all the requests ending in .js, set Content-Type to text/javascript;charset=UTF-8.
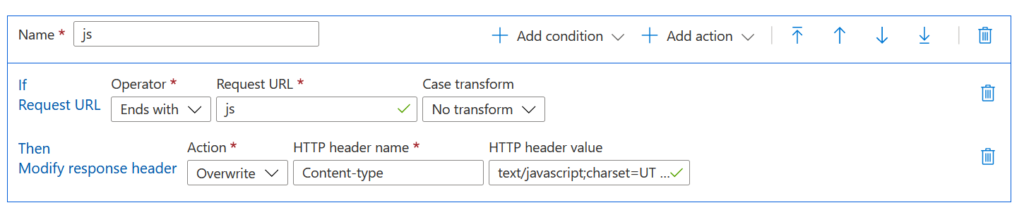
Note that we are using the Overwrite action so that we change whatever Content-Type might be present.
HTTP to HTTPS Redirect
Thanks to the Rules engine, we can also implement a redirect from HTTP to HTTPS, so that all pages are served securely. Since we plan to do no serving in HTTP, this rule should always be placed first in the list. In this way, other rules will not be processed for nothing in the HTTP request, but they will be processed only when the request is made via HTTPS (after the redirect).
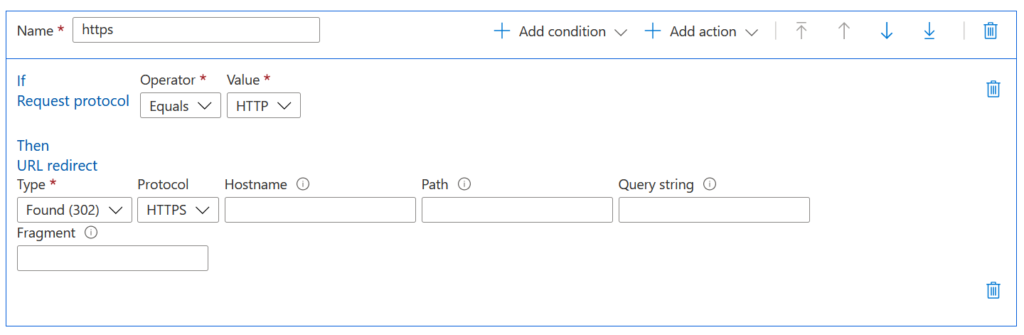
Note that we only change the protocol, and we do not provide any other field. In this way, everything is preserved but the protocol.
Single-Page Applications (SPAs) and Vue Router on Azure Static Website
Most modern Vue.js application are SPAs, meaning that they all load from a single page, typically index.html. However, from a user-experience perspective, they do have multiple pages: it is the frontend itself to manage them.
This means that any page we browse to on the backend must always return index.html. At the very beginning of this tutorial, we configured that by setting index.html as the error document, and this works fine in 99% of the cases.
The big caveat here is that, while we are always returning index.html, we are returning it with a 404 Not Found status code. This generally works fine in the browser, but it does not work well with crawlers such as Google Search Console. If you plan to redirect some Ads traffic to your shiny app page, you just can’t because Google will see a 404 error and stop there.
A solution to this is to migrate to Azure Static Web Apps and configure a routes.json file. However, at the time of writing, this only supports GitHub repositories. I did not have my repository on GitHub for my project, so I had to implement a workaround.
I followed jon-on‘s suggestions on this stackoverflow.com thread. My pad was /landing/free-user-v1, so I created a /landing folder, and a free-user-v1 file in it (without extension). In this file, I copied my index.html file as defined in the dist. Then, I had to use a rule in the Rules Engine to force the Content-Type to text/html; charset=UTF-8. It worked like a charm,
In AWS this is not a problem, as you have more granular control on responses and you can enforce a 200 status code. That’s why I told you that at the moment AWS is slightly taking the lead.
In Conlusion
Publishing a Vue.js app can literally take minutes if you know what you are doing. Furthermore, having it on a strong and reliable Cloud infrastructure from one of the leading companies in the world is definitely a good way to sleep well at night.
You now know how to deliver your frontend to the users, it is time to understand how to deliver the backend. Most importantly, you should spend a little bit to learn DevOps, so that you know how to automate and speed up the build and publish workflows for your application. No worries, we got you covered in the coming articles.

