
Modern networks must be fast, and they must dynamically recognize events and act accordingly. If a path is down, traffic must flow immediately to a secondary path so that we don’t lose information. With this in mind, manually updating the routing table of our routers is no longer enough. If we automate this, every time we attach a new LAN segment to a router, all other routers will know about it. Furthermore, in case a link goes down, the network must automagically route all the traffic onto other links. We are not talking about magic, we are talking about Dynamic Routing. The simplest routing protocol we can use is RIP, and it is perfect to introduce you to dynamic routing. Let’s get started!
This article comes with a Cisco Packet Tracer lab. You can download it for free by using the link below. Once you do so, just open the packet tracer and follow the instructions in this article to set up your first RIP network.

Once you are ready with the Packet Tracer, just continue reading the article.
RIP Dynamic Routing Lab Intro
The Topology
For this lab, we are going to work with six routers. We created a few paths between them, as you can see from the picture below.
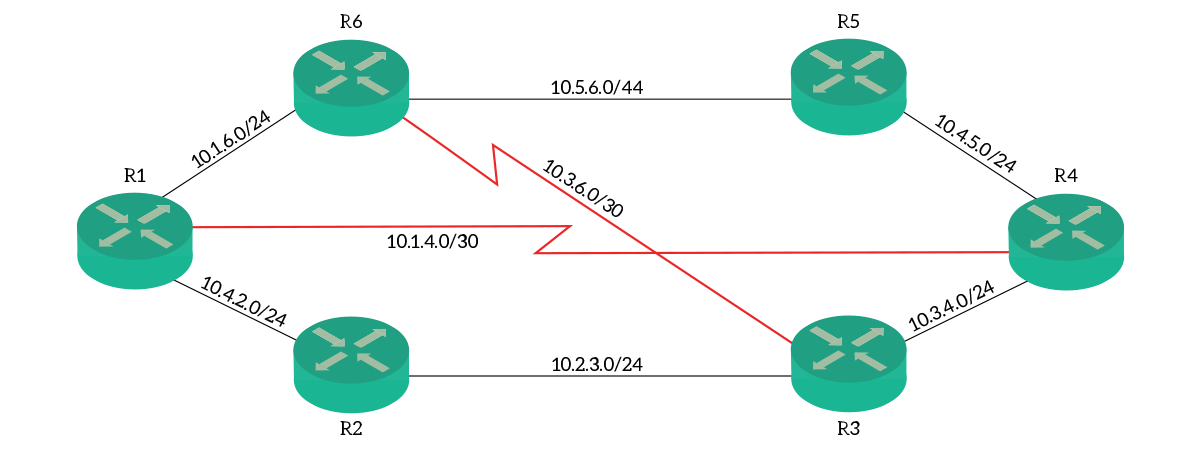
We created a ring of routers using Ethernet cross cables, then we connected directly R1 with R4, and R3 with R6 with serial links (red). Furthermore, each router comes with the loopback 0 interface configured to emulate a LAN. We pre-configured all IP addresses so that we can focus on the RIP part.
The Addressing Plan
For this lab, we adopted a very intuitive addressing plan. To do that, we leveraged two concepts: first, each router has its unique number; second, each link interconnects two routers. With these concepts in mind, we created an addressing plan from 10.0.0.0/8, structured in 10.X.Y.Z/24 subnets. Here’s the meaning:
X– The number of the lowest router in the linkY– The number of the highest router in the linkZ– The number of the local router
As a result, the IP address of R4 in the link with R3 will be 10.3.4.4. Instead, the IP address of R3 on the same link will be 10.3.4.3. However, we have to make an exception for serial links. On those connections, we used /30 subnet masks, so we have only two IP addresses on each. Therefore, the value for Z is .1 for the router with the lowest number, and .2 for the other. As an example, in the link between R1 and R4, R1 is 10.1.4.1 and R4 is 10.1.4.2.
Finally, the loopback interface on each router has the IP address of 10.0.Z.1/24, where Z is the number of the local router. As an example, Router 5 will be 10.0.5.1/24, and Router 6 10.0.6.1/24.
The Requirements
Our task for this lab is simple: we need to propagate all routes using RIP. This means that each router must know about all other networks and links, via RIP. Before we jump to the configuration part, we will explain the basic concepts of RIP. With this theory in mind, we will be ready to complete this lab in a few minutes.
If you struggle when reading this article, you may need a refresh about basic routing concepts. We have two awesome articles for that, so feel free to review how the routing table works or how to implement static routing.
Understanding RIP
What is RIP?
RIP is one of the oldest dynamic routing protocols. Routing Information Protocol was originally designed in 1988, as from the RFC 1058, and updated in 1993 to support classless routing. RIP is a distance-vector routing protocol, because each RIP router sends routes to the other, associated with a distance (metric). Routing Information Protocol has several limitations that keep it very simple. For that reason, it is rarely used in production environments. However, for the same reason, it is a great introduction to dynamic routing for learning purposes.
The default administrative distance for RIP on Cisco routers is 120.
When all the routers in the network have up-to-date routes, the network is converged. Instead, the network is converging when the routers are trying to find out what are the best routes out there. Obviously, the desired state is the state of convergence.
The way RIP works
Route advertisement
As soon as you enable RIP on a router, it will start to broadcast its routing table to all connected neighbors. This is what we call route advertisement because the router is telling other routers what are the routes it knows about. Route advertisement happens periodically, by default every 30 seconds. This is a one-way process, with no mechanism for retransmission. If an update is lost, then we just have to wait 30 seconds to get the same update again.
Routers wait for advertisements from neighbors to update their own routing table. On top of that, they send their own advertisements periodically, no matter what updates they received.
Furthermore, when a router comes online it asks for an advertisement with a Request Message in broadcast. Route advertisements are sent using Response Messages.
The Metric
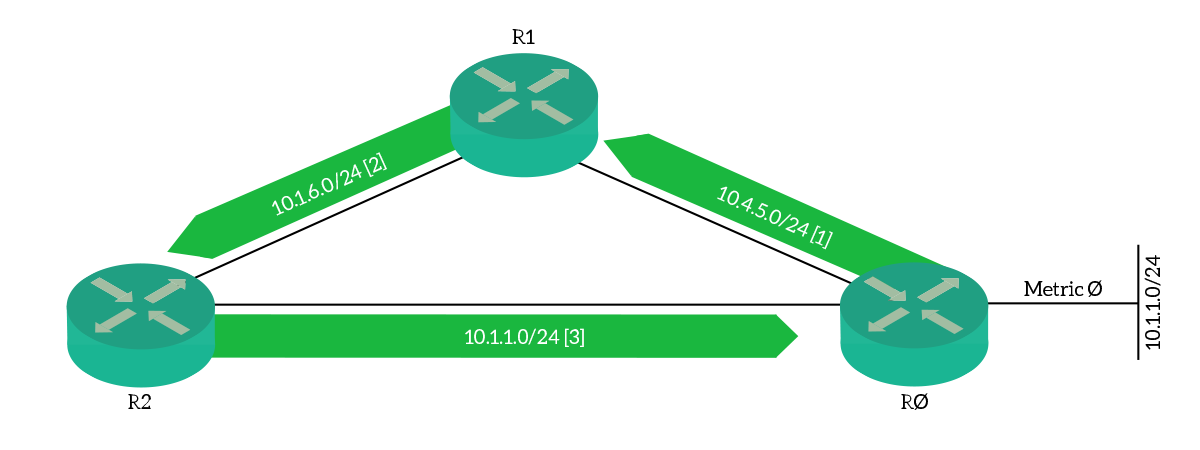
Each routing protocol has its own metric. This metric represents how good a route is, and the router can use this value to prefer a path over another. RIP adopts a very simple metric, the number of routers in the path to the distance network. This value is known as hop-count and can go from 1 to 16.
Before sending out its own routing table, a router increments the metric of each route by one. This means that the router is adding itself as a hop in the path. Connected routes start with a metric of 0 on the router of the same segment. Remember that is the router sending the update to increment the metric, not the one receiving it.

In the picture above, a simple propagation of the route to the LAN segment on the far left. Each router is incrementing the metric. As you can see, the lowest the metric, the better the route (because it is “closer”).
In case some links goes down, and a route is removed from the routing table, then the router can consider other routes with higher metrics. As a result, the router can dynamically send traffic to the best available path.
Since we simply use the number of routers in the path, the metric does not consider link speed or quality. This can be a serious limitation if you have different types of links in your network.
Basic Loop Prevention with Metric
Each routing protocol must have some kind of loop prevention mechanisms. This is to avoid routing loops, situations where the traffic is sent on the same path over and over, creating a loop. Traffic entering a loop will never reach its destination and will consume a lot of network resources, potentially causing a major outage. We have a routing loop if traffic pass twice on the same router, so we don’t want that.
While with static routing we need to implement routes carefully to avoid loops, dynamic routing protocols take care of that for us. RIP uses its metric as a loop prevention mechanism. When a router receives two gratuitous Response Messages for the same route, it only considers the one with the lowest metric.
As you can see in the picture above, the router receives a Response Message from the same subnet it generates the update for. However, since the connected route has a metric of 0, the router discards the message.
Route Poisoning and Split Horizon
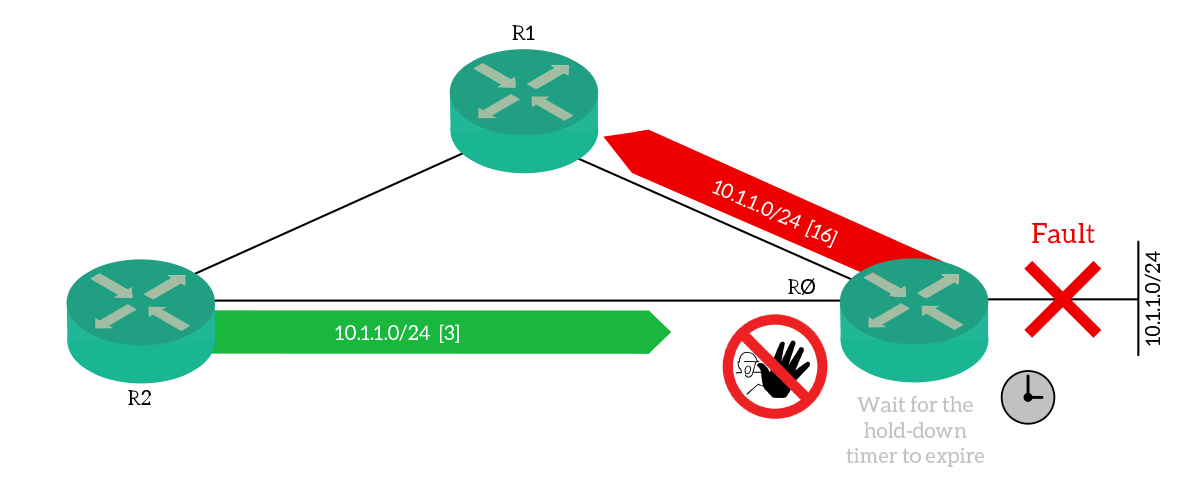
Another mechanism to prevent loops is Route Poisoning. A route with a metric of 16 tells the receiving router to discard that route, and it is a way to quickly tell neighbors about a fault. Only the router connected to the segment that went down generates this message, and neighbors remove that route from the routing table. We will see that in just a bit.
Probably the most famous mechanism for loop prevention is Split Horizon. With this technique, when a router sends its routing table to a neighbor, it purposefully omit the routes learnt from that neighbor. This way, we ensure we won’t create a loop between two routers. This has been slightly enhanced in Split Horizon with Poison Reverse. In this specific implementation, routes are not omitted, but presented with an infinite metric (which is 16).
Loop prevention does not stop here. What if the local LAN on R0 fails, and soon after that, we receive an update for the same LAN from R2? In those cases, R0 should believe that it has a secondary path to the LAN with a metric of 3, and use it. However, this is not a real path! This advertisement from R2 is based on the information generated from R0 and passed to R1. If we allow that, we will create routing loops because each router will believe that the route is valid.
RIP can handle that too, by using three timers: invalid timer, hold-down timer, and flush timer. Furthermore, we have a fourth timer called “update timer”.
RIP Timers and Loop Prevention
Each router sends a gratuitous Response Message (Route advertisement) every 30 seconds. This is not hardcoded in the Cisco software, it is the value of the update timer. This value is important when we want to calculate the value for other timers.
The invalid timer defines how much time the router can consider a route valid without having updates on it. Every time the router receives an update, this timer is re-set. If this timer reaches zero, then the route is considered invalid. Cisco recommends to keep it at least three times the update timer so that we consider a route invalid if we miss three advertisements. The default for this timer is 180 seconds.
If the invalid timer reaches zero for a route, then the hold-down timer is triggered (for that route). For the time defined by this timer, any update about this route is discarded (technical term: suppressed). In other words, the router won’t listen for any update about it. This is very important for loop prevention, as we avoid getting a fake advertisement as described earlier. With this timer, instead, we ensure to wait enough time so that all routers in the network know about the segment that went down. Cisco recommends setting it equal to or higher than the invalid timer. The default value is 180 seconds. Note that this is not a standard timer defined in the RFC, and it only appears in the Cisco implementations.
Finally, we have the flush timer to define after how many seconds completely forget about a route. If the hold-down timer is expired, but the flush timer isn’t, the router accepts a secondary path with different metric. Once this timer expires, any update about this route will be treated as the discovery of a new route. Default value is 240 seconds.
These timers work together, as in the picture below.
Changing the value of timers is something you might want to do to customize RIP behavior. However, this is not CCNA stuff, and we won’t go deeper on that in this article. If you are interested, you can check this command reference on the Cisco website.
Improvements in Version 2
Alright, let’s face it: RIP version 1 cannot be used anymore. This is because it can’t handle the concept of CIDR, being a classful routing protocol. In other words, with RIPv1 any route for a subnet from a major will be considered the major itself. As a result, if you have a route to 10.0.1.0/24, RIP will think you have a route to the entire 10.0.0.0/8.
The redesign of 1993 resulted in a new version: RIPv2. With this version, RIP can handle classless routing as a modern network requires. Furthermore, with the RFC 2453, they added some minor improvements, such as multicast traffic to 224.0.0.9 instead of broadcasts. RIPv2 is backward compatible with RIP version 1.
Configuring RIP
Router Configuration Prompt
When configuring any routing protocol for IPv4, you need to use a specific prompt. Specifically, we use the router configuration command to enter the Router(config-router)# prompt. We use the “router” command to enter the configuration portion specific to a given routing protocol. Since we are working with RIP, we need to type router rip in order to configure this protocol.
By default, Cisco works with RIP version 1 (with some enhancements). We want to change that immediately, as this will prevent our routing to work. In fact, with version 1, all our routes will be considered “possibly down” as they all come from 10.0.0.0/8. To switch to the second version, from the config-router prompt we can simply type version 2.
Auto-Summary
RIP and EIGRP implement “Auto-Summary”. At first glance, it might sound like something good, since it’s automatic. However, this is something we don’t want at all! Auto-Summary is a feature that automatically performs route summarization to classful networks. If your router receives a route for 10.0.1.0/24, it will believe to have a route for 10.0.0.0/8. If you think about it, this is the same behavior we had with RIP version 1.
Therefore, RIP version 2 can work with a classless network, but won’t as long as auto-summary is active. We need to quickly deactivate it by using the no auto-summary command in the router configuration prompt.
The Network Command
Now that our router is ready for RIP, we need to define where to use it. We do it by using the network command from the router configuration prompt. This command expects a major network as an argument, and will tell the router to use RIP on all subnets from that network. For example, the router 10.0.0.0 will turn on RIP on all the subnets coming from 10.0.0.0/8 on the router. You can see clearly that this command comes from the classful networks’ world, as doesn’t want a network mask as argument.
Okay, but what does “turning RIP on” means? Simple: the router will send messages and listen for updates. Effectively, the router will speak RIP for that subnet. In practice, when you enter the network command, the router looks for all its interface child of that major network. Then, start speaking RIP on those interfaces.
Note that if the router receives a route for a network that is not in its network statement, this is not a problem. This command tells the router where to speak and which subnets to self-source. It doesn’t pose any limit to the re-advertisement of received routes.
With the commands reported below, we can turn on RIP for all the subnets of this lab for all the routers. That’s right, these exact commands are the ones that we are going to apply to all the routers, with no difference.
router rip
 version 2
 no auto-summary
 network 10.0.0.0
Once you apply this command to all six routers, you’ll see your Packet Tracer score going to 100%. However, there are some more things we need to do today. Now that you configured the routers, we will analyze the topology using the tools that Cisco offers.
Verifying RIP
Verification commands
Are routes installed?
The fastest way to check if your RIP routing is working, is to check the routing table, using show ip route. Furthermore, we can view only RIP routes by using show ip route rip. Since we are working with RIP at a very basic level, if you find a route in the routing table it is likely to be correct. Here’s what you should see on R1.
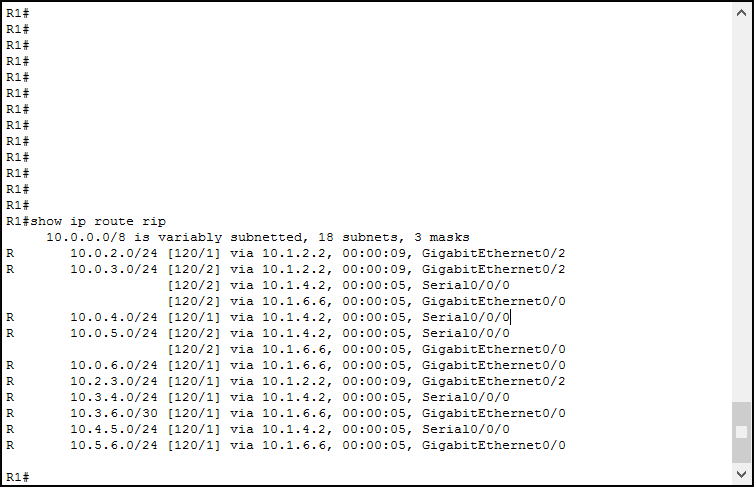
You can see that all RIP routes have an administrative distance of 120, and a metric of 1 or 2 (for this lab). In case you don’t find a route you were expecting, follow these troubleshooting tips.
- Check if the router which should be originating that route is doing so
- Check every router in the expected path, starting from the source router. Specifically, look for RIP version and auto-summary settings
- Wait a few minutes to let timers run
Verify the path
If you look closely at the routing table, you’ll see that the second route has three different next hops. R1 knows that he can reach 10.0.3.0 by going through 10.1.2.2, 10.1.4.2 and 10.1.6.6. Since all these next-hops have advertised a route with a metric of 2, they are all equal from R1’s perspective. As a result, traffic will be load-balanced between those links.
Unfortunately, we cannot completely verify this with a traceroute. Instead, we can use the tools that Cisco packet tracer offers. If you go to the simulation mode, filter for ICMP traffic and then try a ping 10.0.3.1 from R1, you’ll see that packets engage three different paths.
An overview of the RIP Configuration
Of course, we can use show running-config to see if we entered all the commands correctly. However, sometimes we want to merge this information with some dynamic data from the router. Cisco offers you a comprehensive command: show ip protocols. This command presents an overview of all the routing protocols running on the router. In this case, we have only RIP and the output will be as below.
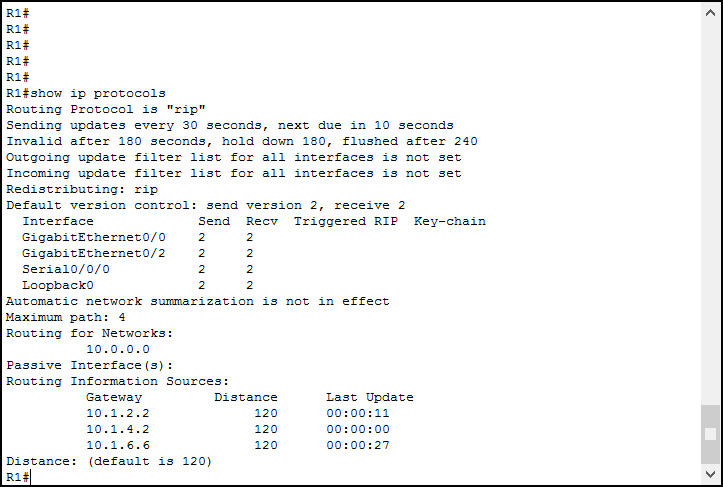
This command is very descriptive and self-explanatory, a great way to identify possible issues in our RIP configuration. Reading it top-down, we can find very useful information:
- What is the current update timer
- How many seconds before the router sends a new advertisement
- Invalid, hold-down and flush timer configuration
Routefiltering (CCNP stuff)- What other protocols are advertised to the RIP neighbors
- Which RIP version is in use, as global setting, and for each interface
- Whether the auto-summary is active
- What networks are matching the
networkcommand - List of routers sending us RIP information
- Administrative distance
As you can see, that’s all we possibly want to know! Use this command whenever you need to perform better troubleshooting.
Debugging RIP
Sometimes, we might want to go deeper in troubleshooting to find specific issues. In those cases, we might check real-time information. In the details, we might want to verify what information the router is receiving, and when. To do that, we can use the debug command. These commands analyze input and output packets, internal processes, and prints information on the terminal, as they happen.
Debugging can be an overwhelming task for a router, so use it with precautions. Since we are using RIP, which generate traffic every 30 seconds, and we are working with a limited set of routes, we can turn it safely.
To debug rip, we use debug ip rip privileged exec command. Note that if you are connected via telnet or SSH, you’ll need to issue terminal monitor to see the output.
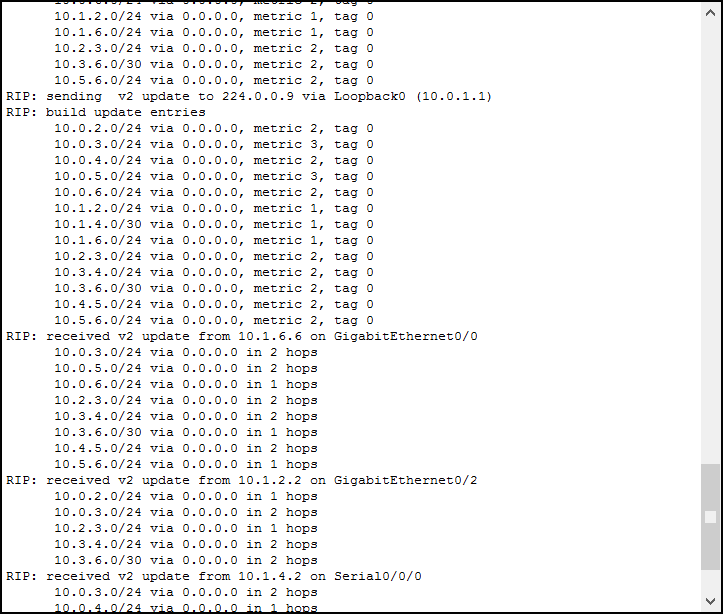
We can clearly see the updates we are receiving and the ones we are sending. The only consideration we need to do about it is the via next-hop 0.0.0.0. When you see this in the output, it means that the next-hop is the one specified in the “received update from” or “sending update to” line.
Once you finished, don’t remember to turn off the debug with undebug ip rip or undebug all. You can then turn off terminal monitor with terminal no monitor command.
Conclusion
In this article, we introduced Dynamic Routing by talking about RIP. Now, you should know the overall features of this protocol, and evaluate its benefits (simplicity) and drawbacks (limitations). We checked the metric, the route poisoning mechanism, and the loop prevention with updates, invalid, hold-down, and flush timers. Then, we hopped into the configuration and we learned these commands:
router ripto enter the configuration prompt specific for ripversionto force RIP versionno auto-summaryto disable classful summarizationnetworkto specify where the router should use RIPshow ip route ripandshow ip protocolsto verify RIP configurationdebug ip ripto check real-time RIP operation (don’t forget toundebug all)
Now you know at least the basics of routing, and you are almost ready to set up networks on your own. Our CCNA certification is closer! As a next step, we will see the basics of IPv6 routing, and then we will go through some Cisco best practices when building a network.

