
IPv6 is a mature technology, designed in the 90s when engineers have foreseen the shortage of IPv4 addresses. Even 20 years later, and with IANA holding no more IPv4 addresses, IPv6 is still not spreading. However, soon we won’t be able anymore to delay the transition. In this article, we get ready for that by learning the basics of IPv6 on Cisco devices. We will see how to configure IPv6 addresses, static routes, and how to use RIP for dynamic IPv6 routing. This way, we should have at least some basic knowledge of this new protocol.
This article comes with a configuration lab! You can download this Packet Tracer lab for free by using the link below, and benefit the most from this article.

Once you do, just open the Packet Tracer lab and follow the instructions in this article.
IPv6 Routing Lab Intro
The Topology
For this lab, we purposefully kept the topology extremely simple. Since we already know how static routes and RIP work, with a clean topology we can focus on IPv6 stuff.

As you can see, we have three Cisco 2911 routers connected with two cables. Names are pretty much self-explanatory: Right and Left routers are going to speak RIPng. Instead, Static will have a default IPv6 route to the Right router.
Requirements
The requirements are simple, as we anticipated above. To be more specific, you need to implement a static IPv6 route and a dedicated RIP instance. Furthermore, we will need to redistribute connected routes in RIP. If you feel confused by now, don’t worry. We will cover everything in detail later.
The Addressing Plan
IPv6 lets us play with some different types of IP addresses. Before we start with this lab, ensure to be familiar with IPv6 concepts. If you aren’t familiar with it, just read our article about it. It contains everything you need to face in this lab!
To keep things simple, we designed an effective addressing plan. First thing, the routers have the same link-local address on all interfaces. We can see this only on the Right router, the only one using two interfaces. Specifically, Static is fe80::1, Right is fe80::2 and Left is fe80::3. The network connecting Static with Right is 2001:db8:acad:1::/64, while the network connecting Right with Left is 2001:db8:acad:2::/64. We kept the same Interface IDs as in link-local addresses: 1 for Static, 2 for Right and 3 for Left.
Implementing IPv6 Routing
The Basics
Cisco routers come with a powerful engine to run IPv6 features. The thing is, that engine is shut down with the factory configuration. As a result, we must turn that feature on before everything else. Without this, the router won’t allow us to insert IPv6-related commands. Luckily, this is extremely simple. We just need to enter the configuration prompt and type ipv6 unicast-routing. This command has no output, nor it takes time to execute. At first glance, it might seem that nothing happened, but in reality, there are a lot of things going on.
In the background, the router allocates resources in terms of memory and CPU to IPv6. It starts to listen to the IPv6 packet, and create the structure to process and route them. But there’s more, with this command we effectively create the IPv6 routing table. Before we can do anything else, connect to all three routers, and enter this command to enable IPv6 routing.
As a next step, we need to configure IPv6 addresses on the router’s interfaces. This is exactly what we used to do with IPv4, but this time we do it with IPv6 addresses.
Configuring IPv6 Global Unicast Addresses
IPv6 offers several types of addresses. Among them, the IPv6-equivalent for a traditional IPv4 address is the global unicast address. This is a public address valid over the Internet. This kind of address has two parts: the prefix (indicating the “network” itself), and the interface ID – indicating who is the router inside that network. Furthermore, routers can have routes to this kind of prefixes, making this address very similar to IPv4.
To configure this kind of address, we need to use the ipv6 address command in the interface configuration mode. Since IPv6 allows multiple addresses on the same interface, if we re-enter this command we won’t override the configuration. Instead, if we want to remove an IPv6 address from an interface we need to issue no ipv6 address. Below, the configuration for the “Static” router.
interface GigabitEthernet 0/1
 ipv6 address 2001:db8:acad:1::1/64
As you can see, the syntax is very similar to IPv4, it only changes the type of address. Furthermore, we can now enter the prefix-length in a CIDR-like syntax, saving us a lot of time. Now that we have an IPv6 address on our router, we can check out the verification commands.
Verifying IPv6 addresses
Just like in IPv4, we have show ipv6 interface brief, offering us a clean output about the IPv6 configuration.
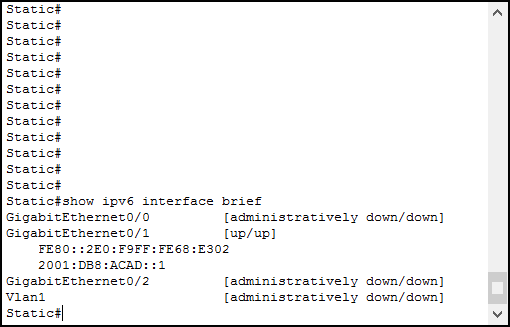
The output is so simple that it doesn’t need an explanation. However, take a minute to think about the differences with its predecessor show ip interface brief. Here, instead of having the IPv6 address next to the interface, we have it below the interface name. This is not a fancy restyling idea, it is a way to respond to a practical need. Specifically, an interface can have many IPv6 addresses, so this is the only way to show them all.
Note also the link-local address FE80::2E0:F9FF:FE68:E302. The router dynamically created this address when we added the global unicast address. We can see the same information, and more, with show ipv6 interface command if we provide the interface name.
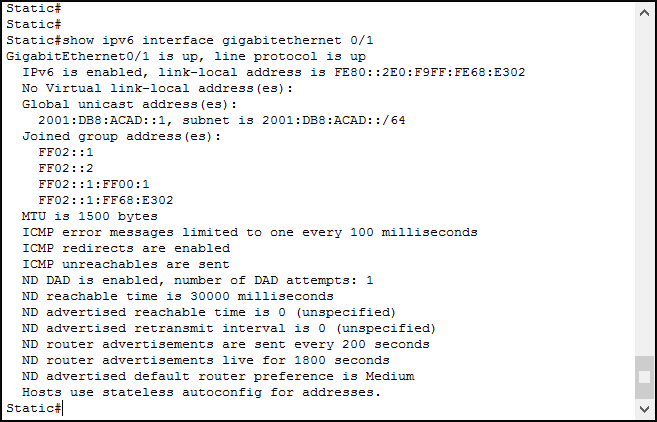
Here, we can see the same information we have seen in the previous output. With that, we have some expert-level details about Neighbor Discovery and ICMP, and the list of multicast groups we are listening to. We haven’t configured anything of that, Cisco IOS implicitly did it for us.
Modifying the link-local address
In IPv6, link-local addresses are valid only on the same Layer 2 segment. They are a hybrid between a MAC address and a traditional IP address. Normally, Cisco automatically creates them using EUI-64 based on the MAC address. However, we may want to change them to ease troubleshooting. To do that, we can use the ipv6 address ... link-local interface configuration command. Below, the configuration for the “Static” router.
interface GigabitEthernet 0/1
 ipv6 address fe80::1 link-local
This way, we are telling the router that the address we just configured is a link-local. As from IPv6 RFC, these addresses must start with fe80::. If we enter this command, we will see the new link-local address in the verification commands output.
Completing the configuration
Now that we know how this works, we can quickly configure IPv6 addresses on the Right and Left router too. Here we have the commands for “Right” router:
ipv6 unicast-routing

interface GigabitEthernet 0/1
 ipv6 address fe80::2 link-local
 ipv6 address 2001:db8:acad:1::2/64

interface GigabitEthernet 0/0
 ipv6 address fe80::2 link-local
 ipv6 address 2001:db8:acad:2::2/64
Note that we assigned the same link-local address to both interfaces. This is because each interface is on a different broadcast domain, so the link-local addresses won’t overlap. Here we have the commands for “Left” router:
ipv6 unicast-routing

interface GigabitEthernet 0/0
 ipv6 address fe80::3 link-local
 ipv6 address 2001:db8:acad:2::3/64
Once we configured the IPv6 addresses, we are ready to build IPv6 routing on top of them.
IPv6 Routing
Static IPv6 Routes
With IPv4, we have the possibility to create static routes just like we did in IPv4. We can do it with ipv6 route command, which has a syntax very similar to its IPv4 counterpart. Here, we tell the router what is the next-hop for a certain prefix. However, we cannot use multicast addresses there as they are not globally unique. Instead, we must use global unicast addresses or site-local addresses.
For this lab, we are going to configure a default route on “Static” pointing to “Right”. We can do it by typing ipv6 route ::/0 2008:db1:acad:1::2 on “Static”. With that, we finished configuring this router and we can focus on the two remainings. However, before we can forget about this router, we may want to check its IPv6 routing table with show ipv6 route.
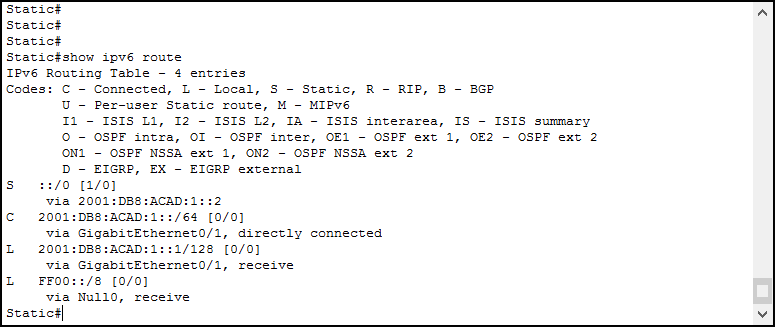
The main difference with the IPv4 routing table is that we don’t have the concept of a major network. As a result, the router presents us all prefixes on two rows each: one to indicate prefix, metric, and administrative distance; the other to indicate the exit interface or next-hop.
Configuring RIPng
To try dynamic routing with IPv6, we chosen RIPng. You can imagine that this is the version of RIP intended for IPv6 routing: “ng” stands for “Next Generation” in fact. The logic behind this protocol is still the same, rearranged to fit the new protocol. Since IPv6 is born classless, there is no auto-summary implemented. Furthermore, the way we configure it slightly changes.
The first thing we want to do is to define a routing instance. This creates a process dedicated to RIPng. With this approach, we can create multiple independent instances of the same routing protocol for segregation. However, for this lab, we are going to use just one. To keep configuration clear, Cisco allows us to give each instance a descriptive name for further reference. Today, we are going to create an instance named MyRipInstance. We can do it by typing ipv6 router rip MyRipInstance in the configuration prompt.
Now, instead of entering Router(config-router)# prompt, we will enter Router(config-rtr)# prompt. This specific prompt indicates that we are configuring an IPv6 routing protocol. From there, on the Right router, we need to enter redistribute connected command. Redistribution is a CCNP topic, but we need to insert this command now to make the lab work. All in all, we are telling the router to advertise with RIPng all the connected routes from the routing table.
Activating RIPng on interfaces
RIPng automatically advertises routes learned via RIPng and connected prefixes where the router is actively speaking RIPng. However, a prefix of a connected interface won’t be advertised unless the router is talking RIP on that interface. To advertise it anyway, we need to configure the redistribution.
However, when we turn on RIPng, our router won’t use it on any interface at all. This is the default behavior, and we need to manually activate it on each interface we want. Therefore, we need to tell our router to talk RIP on the interface facing “Left”. We can do it with ipv6 rip enable interface configuration command, like hereafter:
interface GigabitEthernet 0/0
 ipv6 rip MyRipInstance enable
This way, we tell the router to activate MyRipInstance on that interface. The router will advertise that subnet and will look for RIPng peers on it.
Completing the RIPng Configuration
Dynamic routing can’t be done alone. We need to configure the Left router to use RIPng to exchange routes with the Right router. This is dramatically simple, as we can do it with a few commands as below.
ipv6 router rip MyRipInstance

interface GigabitEthernet 0/0
 ipv6 rip MyRipInstance enable
If you did anything correctly, you should see by now your score reaching 100%.
Conclusion
In this article, we covered the basic configuration and troubleshooting commands of IPv6. Using our existing knowledge of IPv4, we were able to implement static IPv6 routing and dynamic IPv6 routing using RIPng. We also had the occasion to review our knowledge of IPv6 addresses, such as link-local and global unicast. Here you can find a quick recap of the IPv6 command we introduced.
ipv6 unicast-routingto enable IPv6 on a routeripv6 addressto configure IPv6 addresses on an interface, including link-local and global unicastshow ipv6 interfaceandshow ipv6 interfacebrief to verify the IPv6 addressesipv6 routeto configure static IPv6 routingipv6 router ripto create a RIPng routing instanceshow ipv6 routeto check the IPv6 routing tableipv6 rip <instance-name>enable to enable a RIPng instance on a specific interface
With this knowledge, you are ready to face a technology refresh that, someday, will become urgent. Now that you are familiar with the configuration of Cisco devices, we are ready to discuss some architectural topics and learn how to design your network before you implement it. But this is for the next articles in the Free CCNA course!

