Wireshark is a powerful tool: it allows you to see what’s going on in a network. To do that, it shows you all the traffic you send and receive on a Network interface. However, as we have seen in the previous article, it literally collects all the traffic. Therefore, you will have to deal with tons of information, particularly in a production network. This can quickly become messy unless we use a Wireshark Filter. These Wireshark filters tell the software what we want to see, hiding everything else. In this article, we will learn how to create and apply an effective Wireshark filter in our captures.
Looking for pre-made filters?
If that’s what you want, just scroll down to the end of the article. You will find some very useful Wireshark Filter ready to use, copy-and-paste.
Wireshark Filter, a quick introduction
What is a Wireshark Filter?
All in all, a Wireshark Filter is just a piece of text. It is something that looks like “I want to see only HTTP traffic” or “I’d like to see only traffic to and from host X”. As you can imagine, Wireshark doesn’t allow us to write such friendly sentences. Instead, we will have to use a very specific syntax with some strict rules. Don’t worry, we are going to crack it down.
Wireshark supports two types of filters: capture filter and display filter. They have the exact same syntax, what changes is the way they are applied.
If you want to create a capture filter, you have to do it before starting the capture. Then, when launching the capture, Wireshark will capture only the traffic matching the filter. All the traffic that doesn’t match will be discarded, and never stored on your PC. As you can see, this is very useful if you want to see some specific traffic, but you are working in a production network where a lot of traffic is flowing. Instead, keep in mind that traffic that doesn’t match won’t be visible. You can’t even retrieve them later on, you just don’t see this traffic.
A display filter is exactly what the name says. You can apply that to a capture you already made, then cancel the filter and apply another. You can even apply it while the capture is running. This will affect what you see on the screen, but not what you capture. In fact, it will just hide the traffic that doesn’t match but never delete it. This can be useful in troubleshooting, as you can search for stuff by changing the filter multiple times. However, since you are capturing all traffic, you can quickly create large Wireshark files, hard to manage.
Where to write filters
You have two different places to write filters, one for capture filters and the other for display filters. Let’s start with the capture filter, as it is the first one that you can apply.
To apply a capture filter in Wireshark, click the gear icon to launch a capture. This will open the panel where you can select the interface to do the capture on. From this window, you have a small text-box that we have highlighted in red in the following image. You can write capture filters right here.
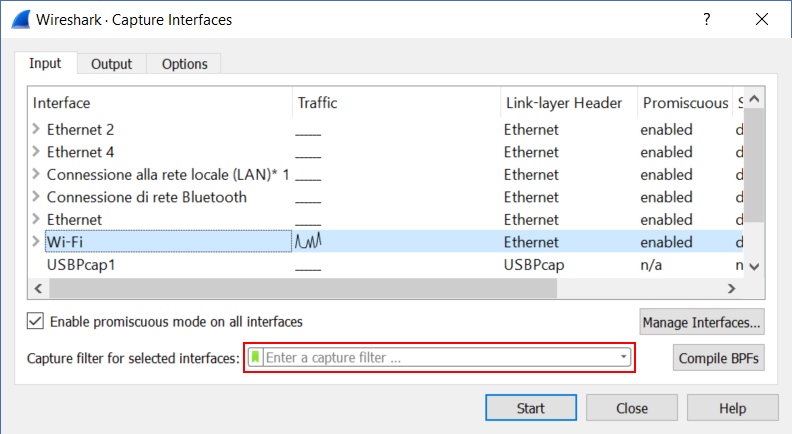
Now, you have to write a correct Wireshark filter. In case you don’t, like by not respecting the syntax, you won’t be able to start the capture. This is great, as we don’t risk starting a capture that doesn’t capture anything. Now, if you start a capture – with or without filter – you will be able to apply a display filter later on. In the window that will pop-up, you will be able to apply a display filter as highlighted in the next picture.
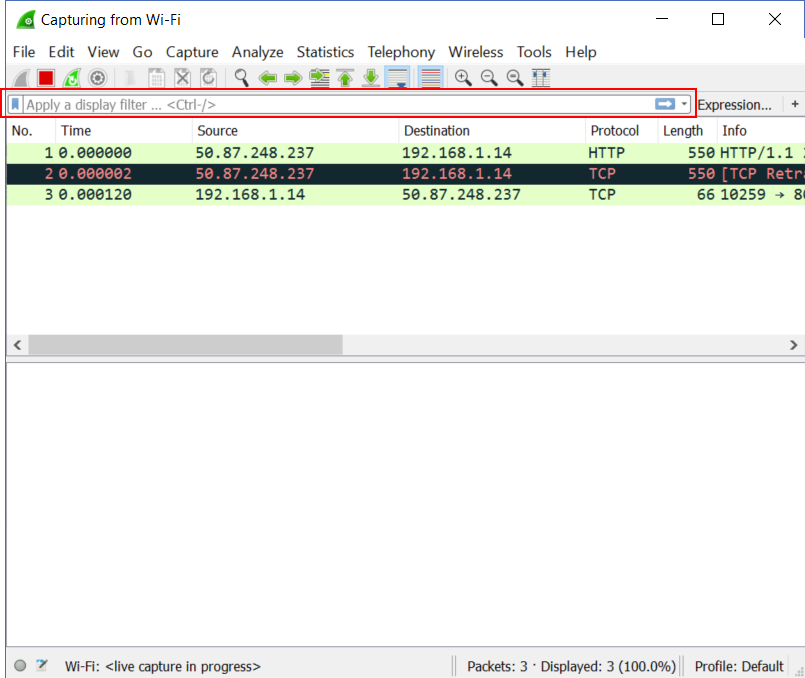
Now, to apply a Wireshark display filter you need to write a correct one. In case you don’t, it simply won’t work and won’t allow you to press enter. If instead, the filter is correct, you will have to press enter and the output will be trimmed. If you have a lot of packets in the capture, this can take some seconds.
Bookmarks?
Now, here’s an important tip. The bookmark icon to the left of any filter box allows you to apply some pre-made filters. You can even write your own and save them for later use.
Writing a Wireshark Filter
The Syntax
The first thing people notice is that you have a single box for writing filters. You can’t add another, so you might ask “How can I filter on multiple items?”. Well, my friend, we can do that with a single filter. In fact, you can write multiple conditions in the same filter.
Some simple operators
When writing a Wireshark filter, you can use some simple operators to join and integrate different conditions. We are talking about boolean operators, the same you know from binary math. Within a filter, you can write:
andor&&to indicate that both conditions must be satisfiedoror||to indicate that at least one of the conditions must be satisfiednotor!to match all packets not satisfying the condition
Here we have three examples. In the first, we match all TCP traffic running on port 80. In the second, we match both HTTP and FTP traffic, while in the third we match everything that is not FTP.
tcp and tcp.port == 80http or ftpnot ftpWe should focus for a moment on the second example. We want to see HTTP and FTP, yet we use the “or” operator: why? Because Wireshark applies the filter on every single packet independently. In fact, a packet can be HTTP or FTP, but not HTTP and FTP at the same time.
Nesting many operators
Wireshark, like any other software, executes the operations in order, from left to right. However, we might want to combine operations in a specific order: for that we need parenthesis. Like in math, the deepest level of parenthesis is the first to be executed. For example, in (x(y(z))) (w(t)), the execution order will be z, y and t, x and w. Of course, letters represent a given expression.
Generally speaking, put parenthesis when you are working with different operators (e.g. AND, OR). Here we have a few examples of correct syntax.
This very first example gets all HTTP and FTP traffic from the device with the IP 192.168.1.14.
(http or ftp) and ip.addr == 192.168.1.14Instead, this example shows all the traffic except ARP, DNS and DHCP.
not (arp or dns or dhcpfo)Comparing stuff
When writing a Wireshark filter, you can compare stuff. A common use of that is comparing fields in the header of a packet with a value of your choice, like “Is TCP port equal to 80?”. To compare two values, we have to use the following operators, according to our needs.
==means “equal”!=means “not equal”>is “greater than”<is “smaller than”>=is “greater than or equal”<=is “smaller than or equal”
With that, you can write quite complex expressions. And check what’s coming in the next section.
The conditions
Now that we know how to join multiple conditions together, we need to know the conditions themselves. Wireshark has plenty of conditions to create a Wireshark filter, so much that we can’t cover them all in a single article. However, we will see the most important ones and see how to understand them, so that you can explore on your own.
Conditions are protocol-related
That’s right, each condition is related to a specific protocol. Want to apply a Wireshark filter based on source IP? Well, this is based on IP protocol, of course. Want to filter per TCP port? That’s TCP stuff. I think we can all see the point here.
So, to write a condition, start by writing the name of the protocol: tcp, udp, dns, ip or whatever. Many “Wireshark names” reflect the name of the protocol, but some are slightly different. Now, the name of the protocol is a condition itself. If you simply write the name of the protocol, this means “the packet must be of this protocol”. If so, the condition is satisfied.
Working with protocol-specific conditions
If you want to work with some specific conditions from a protocol, which are often related to reading its header fields, you need to use a magic symbol: the dot. Use that after a protocol, and see what Wireshark suggests you write. What we are doing here is telling Wireshark “from this protocol, I want to check this specific field”.
In the following table you can see some of the most used conditions.
| Item | Description |
|---|---|
ip.addr | IP address (check both source and destination) |
tcp.port | TCP Layer 4 port (check both source and destination) |
udp.port | UDP Layer 4 port (check both source and destination) |
ip.src | IP source address |
ip.dst | IP destination address |
tcp.srcport | TCP source port |
tcp.dstport | TCP destination port |
udp.srcport | UDP source port |
udp.dstport | UDP destination port |
icmp.type | ICMP numeric type |
ip.tos.precedence | IP precedence |
eth.addr | MAC address |
ip.ttl | IP Time to Live (TTL) |
Now, you have to compare these values with something, generally with values of your choice. For example, write tcp.port == 80 to see all TCP segments with port 80 as the source and/or destination.
Wireshark Pre-made Filters
In the following table, you will see some useful filters we prepared for you, ready to use. Just copy and paste them in your capture or display filter.
| Name | Description | Filter |
|---|---|---|
| Cleanup L2 | Remove some L2 traffic that we often do not need (ARP, DHCP, DNS). | not(arp or dns or dhcpfo) |
| Web Traffic | Show only web traffic. | http or https |
| 2 Hosts | Show the traffic sourced by two hosts (not exclusively between each other, all the traffic they make). | ip.addr == <IP1> or ip.addr == <IP2> |
| Conversation | Show the traffic between two hosts (one toward the other and vice versa). | (ip.src == <IP 1> and ip.dst == <IP 2>) or (ip.src == <IP 2 and ip.dst == <IP 1>) |
| ICMP | Show only ICMP traffic. | icmp |
| Broadcast | Show only L2 broadcast traffic. | eth.addr == ff:ff:ff:ff:ff:ff |
| Broadcast (Clean) | Show only L2 broadcast traffic exclusing ARP and DHCP messages. | eth.addr == ff:ff:ff:ff:ff:ff and not(arp or dhcpfo) |
| TCP Handshakes | Show initiation and grafecul closure of TCP streams. | tcp.flags.syn == 1 or tcp.flags.fin == 1 |
| TCP Resets | Show TCP connection resets | tcp.flags.res == 1 |
Conclusion
With this guide, you now know how to use and apply a Wireshark filter to your Wireshark capture. You know the difference between capture and display filters. Most importantly, you know how to write complex and beautiful filters. Now, it’s just time for you to use this knowledge to troubleshoot your network.
Before letting you go, here’s a tip. Try filtering per hosts or conversations (IP) when applying a capture filter, then filter per protocol in the display. This is probably the best approach, as you collect only a fraction of packets, and then you can still analyze and tune them.
In the following article, we will go deeper into the world of Wireshark by learning some of its great tools.

