Have you ever struggled in finding the problem of a network? There are times when data seems to simply not reach its destination. It’s like your file, stream, or any other kind of content disappears on the cable. While cables don’t make data disappear, it is possible that some device is having problems. With this guide, you will learn how to use Wireshark to exactly find (and fix) your network problems.
In this tutorial, we will explain to you how to use Wireshark from scratch. First, we will start explaining how to download Wireshark for free, and how to install it on Windows/MAC/Linux. Then, we will see how to use it, how to sniff packets, how to store such packets, and how to read them. Before everything else, we will give explain what is Wireshark.
Introducing the WireShark Tutorial
What is Wireshark?
WireShark is an Open Source Software for sniffing packets. In other words, it is free software: you can download and use Wireshark for free. Technically, it’s even more than that: you can modify its code and change the way it works, or extend its functionalities. However, that’s what developers do: as network engineers, we will limit ourselves to just use Wireshark.
What does sniffing packets mean? Wireshark can capture network traffic on an interface, like your Ethernet interface or Wi-Fi interface. To say this in a different way, it can read everything you send and receive on a network. For example, if you send an email, it will see all the details, and see if you have effectively sent it. Among other things, Wireshark can capture:
- IP Addresses
- MAC addresses
- TCP and UDP port
- Webpages sent with HTTP
- Text traffic (like Telnet, or any unencrypted protocol)
- Type of protocol
As you might guess, all of that is extremely useful when you want to troubleshoot network issues.
Is using Wireshark safe?
Yes, using wireshark is completely safe. Of course, Wireshark is able to read all of your data, even sensitive data, but you tell Wireshark when to start and when to finish. Most importantly, Wireshark runs on your PC and won’t send what it reads to anyone else. So, what you see in Wireshark is only for you to see.
How to Download WireShark for Free
Wireshark is Open Source and completely free to use. To download it, you can simply consult their official website. Even better, go directly to their download page.
If you want to keep WireShark on a USB stick, to plug it in any Windows PC and run it, simply get the Portable version. In any other case, just select the WireShark version that reflects your Operating System.
How to install Wireshark
If you downloaded an executable version (not the portable), you will need to install it. Fortunately, installing Wireshark is extremely easy: you just need to run the file you downloaded. It will open a wizard, where everything you need to do is clicking “Next” until you see the “Finish” button.
At this point, you will have Wireshark within the programs installed on your computer. Search for it, and run it. If you downloaded the portable version, run that instead. This Wireshark tutorial will apply to both versions, as they are identical in their features.
A quick tip: if you installed Wireshark, you might have two software: Wireshark and Wireshark Legacy. They are almost the same, it only changes the graphical interface. Since we are geeks, and we always the most recent technology, we should use simply “Wireshark”.
How to use WireShark
Getting to know WireShark
Using WireShark is very easy, as you will see. If you launch Wireshark, you will see the window below. We marked the important stuff with red circles so that you know where to look at.
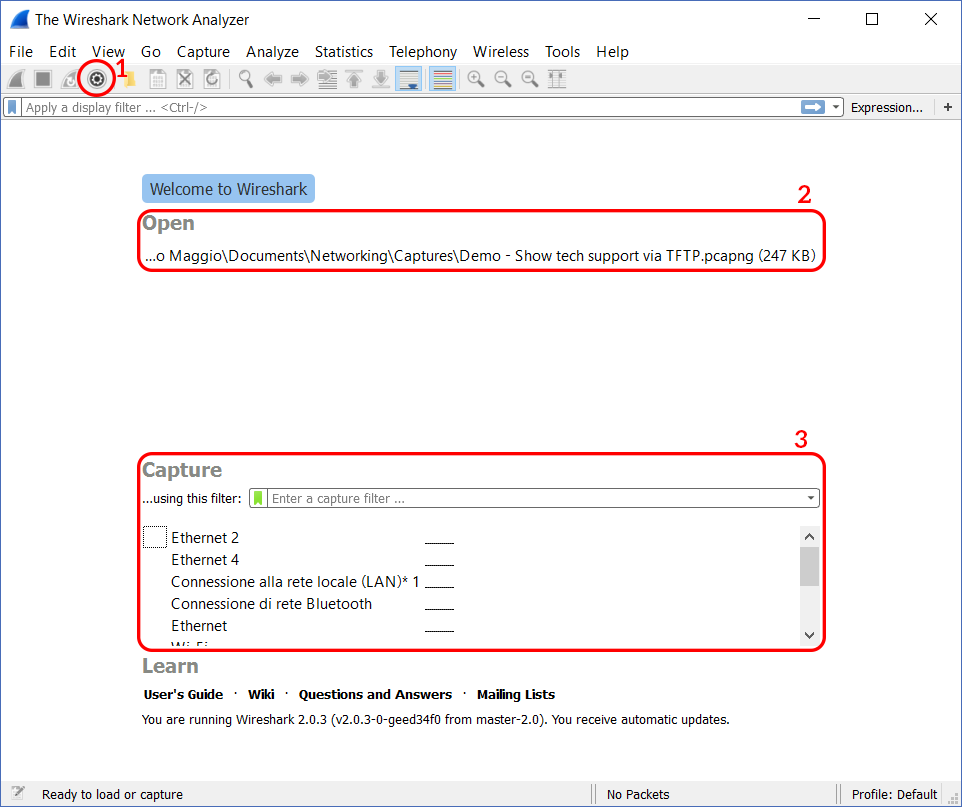
The first item we highlighted is the capture option button (1). From there, you can start a Packet Capture and specify all its settings. Then, in the middle of the window, we have the Open section (2). WireShark can save the captured data into special files, that you can later open: in this section, you can see the recently opened files. Finally, the Capture section (3). This is just a shortcut for the capture options, where you can quickly start a capture.
Since we are opening Wireshark for the first time, we have no file to open. Instead, we should capture data for the first time. To see how to use Wireshark for capturing packets, just read the next section.
How to use WireShark to sniff traffic
WireShark does two things: it captures the packets, and it presents them to you in a user-friendly way. Obviously, without the first, you can’t do the second. So, to start a packet capture, click on the capture option icon (the one with the gears). A new window will pop-up.

As you can see, the “Start” button is gray and you can’t click on it. This is because you haven’t selected any interface just yet. A computer sends and receive traffic on interfaces, or NICs. Therefore, you need to tell Wireshark on which interface do the capture. Remember, Wi-Fi is Wifi of course, while Ethernet is a cable interface. Most computers will have just two NICs, one Wi-Fi and one Ethernet.
How to be sure about what NIC to use? Next to the interface, we see a graph of the traffic. You expect a flat line on all NICs but one: that’s the one currently in use. If you let some time pass, you will see the graph getting its shape. For example, we are currently using Wi-Fi 2, as in the picture.

You could expand the Interface (the arrow at the very left) and filter per MAC address. However, there’s no need to do that, and it would be too advanced for our needs. So, just select the interface (the whole line will be highlighted in light blue). Then, click Start to launch the capture.
Capturing Traffic in Wireshark
As soon as you start, the following window will pop-up.

At first, this interface is not so intuitive. However, as soon as you get its sense, everything will be so easy and familiar. For convenience, we numbered important stuff.
- This button is for Start capturing packets again, but since we are already capturing it won’t work. If you stop the capture, this button will be enabled, and clicking it will make you start a new capture.
- The second button is for Stopping the current capture. Data will still remain visible, but you won’t listen to further packets. Capturing packets can quickly overwhelm your RAM, so stop the capture as soon as you believe to have everything you need.
- The third button Stops the capture and immediately restarts it with the same parameters (same interface, same filters, and so on). Data captured so far is lost.
- Here, you can write a display filter. Since you will get a lot of packets, you want to be able to trim down the output. Here you can write that you want to see, for example, only HTTP traffic. Doing filters is for another article, anyway.
- In this section, you have the list of packets captured so far. Each packet is a row in the table.
- In the bottom part of the screen, you have further details on the selected packet. That’s right, you can select a row in the table above, and you will find more details on the section below. If you double-click on a packet in the table, this box will pop-out in a new window.
Now, it’s time to analyze packets!
Analyzing the packets with WireShark
If you know how to use Wireshark, you know how to analyze packets. Here we will explain to you the basic fields you see in the table, the fifth item in the list above.
- No. is the number of packets in the stream. In fact, Wireshark counts the packets received. For example, if you see 24 in this field, it means that this is the 24th packet received since the beginning of the capture.
- Time simply indicates the time, in second, the packet was received start counting from the capture start. If you see 5 there, it means this packet was received 5 seconds after starting the capture. Now, milliseconds matter when talking about packets, so you see a lot of decimal precision.
- Source and Destination indicate respectively source and destination IP addresses.
- Protocol indicates the protocol of this packet: it can be a transport protocol, or even an application layer protocol.
- Length indicates the length of the packet in bytes.
- Info gives you some protocol-specific details.
If you want to store the capture and check it at a later time, you can simply save it (from the file menu).
Conclusion
Now that you know how to use Wireshark, the best thing to do is try on your own. Just try to surf the web, send emails or even play online games while sniffing the traffic. Then, get back to Wireshark and stop the capture. Now, it’s just time to analyze it, look for protocols and interesting information. The best way to master Wireshark is using it.
What do you think about Wireshark? Was it useful to your troubleshooting? Just let me know in the comments. And, if you want to learn more about it, just wait for the next articles. You will learn the advanced stuff about Wireshark, like filtering – both display and capture, promiscuous mode, and more.

