If you love SDN like me, you have already tried automating SSH connections to network devices. In fact, we already covered this topic in an extensive SDN article. However, this relies on channel-based SSH, which is something not all devices support. Specifically, dealing with interactive CLI can be a real pain – and Cisco devices have that. Well, no more pain my friend. In this article, we are going to see how to implement a better solution that makes Paramiko Cisco SSH connections.
Channels or Shell?
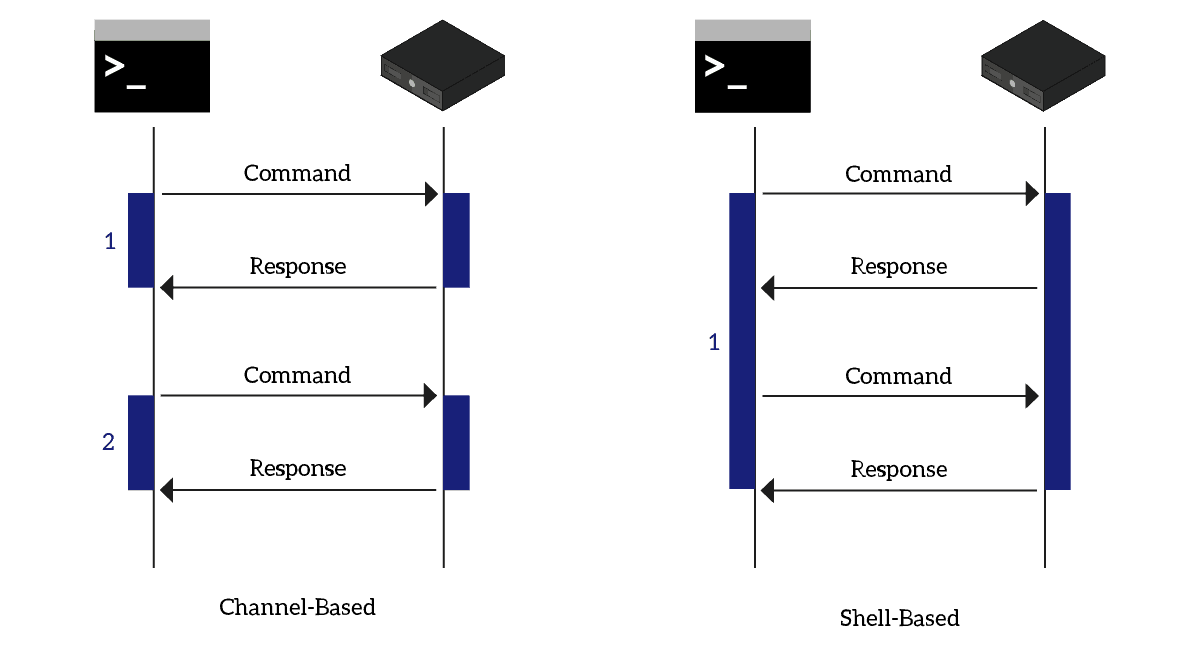
If you plan to control a device with SSH programmatically, SSH channels are awesome. Each channel is a two-way flow that represents a transaction. In other words, you open the channel and send a command to the device. Then, the device uses the channel (think of it as a pipe) to communicate things back to you. Once it finishes responding, it closes the channel. This comes also very handy when transferring a file: one file, one channel. Unsurprisingly, this is what SFTP (FTP over SSH) does.
Many terminals, however, prefer working with a single channel. Here, the entire session runs on a single channel that closes when you are done with the device. Since a channel is a stream of text, and so is what you exchange with the device, this choice makes sense. SSH does not understand that you typed show run on the device, and it returned the configuration. It just sees characters flowing back and forth. This is no harm when you connect to the device with PuTTY. Instead, it is the reason why with paramiko cisco connections seem to not work well, at first at least.
In this article, we will see how to use a shell connection to control a remote device. Meanwhile, we will update our GitHub sdncore project to include this new mode.
Structuring the Project
The SubDrivers
Programming is all about abstractions. You hide complexity inside functions, then combine them into other functions that hide an additional level of complexity. Eventually, you reduce the solution of a complex problem to the click of a button. We originally created two driver classes, one for Telnet and one for SSH. This allows us to use a facade class that can control a device regardless of the protocol because both expose the same methods.
However, controlling a device in SSH with channels is radically different from controlling it with the Shell. So we might want to create two separate drivers. Well, wait a minute: SSH is still the same protocol after all. Therefore, our best solution is to create special drivers that our driver will run. The structure will look like this.
class Driver:
  pass


class TelnetDriver(Driver):
  pass


class SSHDriver(Driver):
  class SubDriver:
    pass

  class ChannelSubDriver(SubDriver):
    pass

  class ShellSubDriver(SubDriver):
    pass
Both SubDrivers will expose the same methods, so that – in the end – it makes no difference if the device wants channels or a shell.
The super-class
The first thing we want to do is defining what a SubDriver should be like. We can do that by defining an abstract class, where we define all the methods it should have. Since these SubDrivers are exclusively for SSH, and you should never see them outside of that context, we will define this inside the SSHDriver class.
class SSHDriver(Driver):
  class SubDriver:
        def __init__(self, ssh_client, chunk_size):
            raise NotImplementedError()

        def open(self, target, port, username, password, look_for_keys):
            raise NotImplementedError()

        def send_text(self, text):
            raise NotImplementedError()

        def read_eof(self, timeout=2):
            raise NotImplementedError()

        def read_until(self, text, timeout=2):
            raise NotImplementedError()

        def expect(self, expr_list, timeout=2):
            raise NotImplementedError()

        def close(self):
            raise NotImplementedError()
Channel-based SSH Driver
The ChannelSubDriver is the simple Paramiko implementation of SSH. If you are following our SDN course, you’ll know we did this implementation in this article. Back then, we did it inside the main SSHDriver. But now it is time to change, we need to shift it inside the ChannelSubDriver.
class ChannelSubDriver(SubDriver):
    def __init__(self, ssh_client, chunk_size):
        self.client = ssh_client
        self.chunk_size = chunk_size
        self.stream_in = None
        self.stream_out = None
        self.stream_err = None

    def open(self, target, port, username, password, look_for_keys):
        self.client.connect(
            target,
            port=port,
            username=username,
            password=password,
            look_for_keys=look_for_keys
        )

    def send_text(self, text):
        self.stream_in, self.stream_out, self.stream_err = self.client.exec_command(text)

    def read_eof(self, timeout=2):
        data = b''
        signal_timeout = threading.Event()
        t1 = threading.Thread(
            target=set_timeout,
            args=(signal_timeout, timeout,)
        )
        t1.start()
        while not signal_timeout.is_set() and not self.stream_out.channel.exit_status_ready():
            while not signal_timeout.is_set() and self.stream_out.channel.recv_ready():
                data += self.stream_out.channel.recv(self.chunk_size)
        return data

    def read_until(self, text, timeout=2):
        data = b''
        signal_timeout = threading.Event()
        t1 = threading.Thread(
            target=set_timeout,
            args=(signal_timeout, timeout,)
        )
        t1.start()
        while not signal_timeout.is_set() and not self.stream_out.channel.exit_status_ready():
            while not signal_timeout.is_set() and self.stream_out.channel.recv_ready():
                data += self.stream_out.channel.recv(1024)
                pos = data.find(bytes(text, 'utf8'))
                if pos > -1:
                    return data[:pos + len(text)]
        return data

    def expect(self, expr_list, timeout=2):
        if timeout is not None:
            data = b''
            signal_timeout = threading.Event()
            t1 = threading.Thread(
                target=self._set_timeout,
                args=(signal_timeout, timeout,)
            )
            t1.start()
        if isinstance(expr_list[0], type(re.compile(''))):
            expressions = expr_list
        else:
            expressions = []
            for expr in expr_list:
                expressions.append(re.compile(expr))
        while not signal_timeout.is_set() and not self.stream_out.channel.exit_status_ready():
            while not signal_timeout.is_set() and self.stream_out.channel.recv_ready():
                data += self.stream_out.channel.recv(1)
                for i, expr in enumerate(expressions):
                    result = expr.match(str(data, 'utf8'))
                    if result is not None:
                        return i, result, data
        return -1, None, data

    def close(self):
        self._client.close()
Some explanation
Don’t get scared by all the code above: we have a detailed description of it here. However, some things are different now.
- The client is now public, it used to be
_client - The streams are not a dictionary anymore (
_streams). Instead, each stream is an independent member of the class:stream_in,stream_outandstream_err. - We now have an easy way to define the chunk size (previously hardcoded)
Writing the SubDrivers for Paramiko Cisco connections
Introducing Shell-based SSH Driver
Now things start to get a little bit interesting. Since the data stream is continuous until the end of the connection, we need to work around that. Before we start, we should define a constant.
class ShellSubDriver(SubDriver):
  READ_DELAY = 0.1
This class constant is extremely important. Since we are going to read a piece of data, then wait, and then read another piece of data, we need some timing. If we do that in a simple while True loop we are going to overload the CPU for nothing. Instead, this delay between a cycle and another keeps the CPU cool, and allows the remote device to actually send something.
Now, we can cover all the parts of this amazing Sub-Driver.
The constructor
def __init__(self, ssh_client, chunk_size):
  self.client = ssh_client
  self.chunk_size = chunk_size
  self.shell = None
  self.stream_queue = queue.Queue()
  self.terminate_reading = threading.Event()
  self.reading_thread = None
This is fairly simple. Our constructor wants a paramiko Client and the size of the chunk as input. The latter is just the number of bytes we want to read with a single cycle. We also initialize our shell to None and create three important members.
stream_queuewill keep the text that the device sends us until we process itterminate_readingevent will tell it’s time to exit a loop as we are closing the connectionreading_threadwill hold the thread that is responsible for populating thestream_queue. This thread will loop untilterminate_readingstops it.
The function that reads from the device
This special function is probably the core of this SubDriver. Unsurprisingly, it is also the most complex. However, the concept is simple: it launches a function as a thread, and that function continues to check for data coming from the device. As soon as something arrives, the function puts into the queue.
def _launch_reader(self):
  def reader(shell, store_queue, chunk_size, terminator_event, max_wait):
    wait = 0
    while not terminator_event.is_set():
      time.sleep(wait)
      # Read only if there is something to read
      if shell.recv_ready():
        start = time.time()
        store_queue.put(shell.recv(chunk_size))
        # Calculate the wait to approximately fit the time the device needs to generate output
        wait = time.time() - start
      # If this cycle generated no output, we increase the waiting time
      else:
        wait += 0.01
      # Waiting time should never exceed its maximum
      if wait > max_wait:
        wait = max_wait
  self.terminate_reading = threading.Event()
  self.reading_thread = threading.Thread(
    target=reader,
    args=(self.shell, self.stream_queue, self.chunk_size, self.terminate_reading, 2)
  )
  self.reading_thread.daemon = True
  self.reading_thread.start()
We can see that _launch_reader contains a function, reader.
“Reader”
The reader function is what will run in the thread. As you can see, we define it inside the _launch_reader function, because we don’t want to use it anywhere else. More than that, we don’t want the possibility of its use anywhere else.
Even there, to avoid overloading the CPU, we have a wait time before we check for data from the device again. Initially, we want to do an immediate check, so we start with a wait of 0. Then, we enter the loop. This loop will end when someone, outside of this function, sets the terminator_event. In other words, some other piece of code will tell the reader “Hey, it’s time to go home!”.
Since we are lazy, before doing anything we sleep (wait) for the time agreed. Then, if the device has something we read it. Even better, we can do more than that: we measure how much time we took to read. So we store the time in a variable, then read and put the data in the queue. After that, we measure the time again and subtract the time of a few moments ago (start). We now have the time we took to read, and we will use it as wait time for the next cycle. This ensures that, more or less, we are going to read when the test is ready, not waiting any cycle.
Instead, if the device is not ready to send anything, it probably needs a little more time. Thus, we increment the wait. In the end, no matter how we manipulated the wait, we make sure we do not exceed the maximum time we can wait (max_wait). If we exceeded it, we stick wait back to the value of max_wait.
“Launch Reader”
Now the fun part. We initialize the event that we will use as terminator – this makes it possible to close and re-open the same driver multiple times. We then define the thread that will run the reader, and the parameters we want to use.
We set the reading_thread to be a daemon: this way we are sure that it will end when our program ends. In theory, the terminator event is enough, but when working with timing you may find some unpredictable things once in a while. Better stay on the safe side.
And, finally, we launch the reader. As soon as we call this _launch_reader method, our program will be listening for data coming from the device.
Getting text to actually use it
With our reader, we take data from the device and put them in a queue. However, we also need to take data from the queue to an arbitrary part of the application. Thus, we need to use a new class method: _get_ready_text. This will return everything that is in the queue as a string and flush the queue.
def _get_ready_text(self):
  ret = b''
  while not self.stream_queue.empty():
    ret += self.stream_queue.get()
  return str(ret, 'utf8')
While the queue is not empty, it continues adding its content to a binary string. Before returning, we convert this string to a UTF-8 string. Since in this loop we are performing just an operation (the get()), we are faster than the loop that populates the queue. That loop, in fact, has to fetch from the device and handle the wait time, other than populating the queue. This means we will never be stuck into reading data which is still coming.
Even if the device continues sending while we are reading, we will eventually catch up and return some text. The device will continue to send text, that we will keep in the queue for another time.
Connecting
Now we can start implementing the actual methods we need on this Sub-Driver. The first is open(), the one that creates the connection. As you can see, it is simple: it connects the device, creates the shell, and launches the reader.
def open(self, target, port, username, password, look_for_keys):
  self.client.connect(
    target,
    port=port,
    username=username,
    password=password,
    look_for_keys=look_for_keys
  )
  self.shell = self.client.invoke_shell()
  self._launch_reader()
Sending text
This is absolutely the most simple method we have. The shell already exposes a send() method, so we just need to relay our text to it.
def send_text(self, text):
  self.shell.send(text)
Some reading
As you know, our drivers can read text in two ways: until the end of the stream, or until they find some text. We need to implement two different methods for that. The way they fetch data from the queue is always the same, while they differ in how they handle that data.
Until EOF
The read_eof() function reads until timeout or until it receives an EOFError. While the timeout does not trigger, and we do not receive any error, we keep storing the text in a variable that we will return. As simple as that.
def read_eof(self, timeout=2):
  data = ''
  signal_timeout = threading.Event()
  t1 = threading.Thread(
    target=set_timeout,
    args=(signal_timeout, timeout,)
  )
  t1.start()
  # While timeout has not expired and there is data to read
  try:
    while not signal_timeout.is_set():
      data += self._get_ready_text()
      time.sleep(self.READ_DELAY)
  except EOFError:
    pass
  return data
To implement the timeout, we use a set_timeout function, available in our vty.driver file. It just sleeps for the specified time, then set the event.
def set_timeout(event, duration):
  time.sleep(duration)
  event.set()
Until Arbitrary Text
The read_until() function reads until timeout or until it finds the text in the output. It then returns the output up to the text found, included. If it does not find the text, it just returns the whole output.
To implement this function, we just need to look for the text in the output every time we add something to the output. We do that with the find() method that all strings have.
def read_until(self, text, timeout=2):
  data = ''
  signal_timeout = threading.Event()
  t1 = threading.Thread(
    target=set_timeout,
    args=(signal_timeout, timeout,)
  )
  t1.start()
  # While timeout has not expired and there is data to read
  while not signal_timeout.is_set():
    got = self._get_ready_text()
    data += got
    pos = data.find(text)
    if pos > -1:
      return data[:pos + len(text)]
    time.sleep(self.READ_DELAY)
  return data
Expecting text
Our driver must also implement an expect() function. This models the function with the same name available in the Python telnetlib.
This function wants to know a list of regular expressions and will look for them in the text. As soon as it finds one of them, it will return the number of expression that matched, the items that match in the output and the output up to that point.
def expect(self, expr_list, timeout=2):
  data = ''
  signal_timeout = threading.Event()
  if isinstance(expr_list[0], type(re.compile(''))):
    expressions = expr_list
  else:
    expressions = []
    for expr in expr_list:
      expressions.append(re.compile(expr))
  if timeout is not None:
    t1 = threading.Thread(
      target=self._set_timeout,
      args=(signal_timeout, timeout,)
    )
    t1.start()
  # While timeout has not expired and there is data to read
  while not signal_timeout.is_set():
    data += self._get_ready_text()
    for i, expr in enumerate(expressions):
      result = expr.match(data)
      if result is not None:
        return i, result, data
    time.sleep(self.READ_DELAY)
  return -1, None, data
Closing the connection
Before we go, we should close the connection. However, before we terminate the client, we also want to terminate our reading thread. We do it gracefully with our terminate_reading event. We just set it, and as soon as the reader notices it will stop running.
After that, we can close the client as well.
def close(self):
  self.terminate_reading.set()
  self.client.close()
The SSH Driver
Now that we have our two sub-drivers in place, we need to engage them from our main SSH driver. This is extremely simple. As we will see, the SSH Driver will just relay parameters to the sub-driver, and return its returns. We can think of it as a facade class to interact with the sub-driver, no matter what the sub-driver is.
However, we need to just pay some attention to the constructor. Here, based on the parameter shell_mode, we decide which kind of driver we want to use.
class SSHDriver(Driver):
    class SubDriver:
        """Code from SubDriver here..."""
    pass

    class ChannelSubDriver(SubDriver):
        """Code from ChannelSubDriver here..."""
    pass

    class ShellSubDriver(SubDriver):
        """Code from ShellSubDriver here..."""
    pass

    def __init__(self, target, username='', password='', port=22, auto_add_keys=True, shell_mode=True,
                 look_for_keys=False, chunk_size=1024):
        self.target = target
        self.username = username
        self.password = password
        self.port = port
        self.shell_mode = shell_mode
        self.look_for_keys = look_for_keys
        self._client = client.SSHClient()
        if auto_add_keys:
            self._client.set_missing_host_key_policy(client.AutoAddPolicy())
        if shell_mode:
            sub_driver = self.ShellSubDriver
        else:
            sub_driver = self.ChannelSubDriver
        self._driver = sub_driver(self._client, chunk_size)

    def open(self):
        try:
            self._driver.open(self.target,
                              port=self.port,
                              username=self.username,
                              password=self.password,
                              look_for_keys=self.look_for_keys)
        except AuthenticationException as ex:
            raise DriverError("Authentication failed") from ex
        except client.SSHException as ex:
            raise DriverError("Keys error when attempting connection to " + self.target) from ex

    def send_text(self, text):
        try:
            self._driver.send_text(text)
            return True
        except AttributeError as ex:
            raise DriverError('Attempting to use a session that was not opened') from ex

    def read_eof(self, timeout=2):
        return self._driver.read_eof(timeout)

    def read_until(self, text, timeout=2):
        return self._driver.read_until(text, timeout)

    def expect(self, expr_list, timeout=2):
        return self._driver.expect(expr_list, timeout)

    def close(self):
        self._driver.close()
The Paramiko Cisco Connection
Now we have our cool driver, and we can use it to connect to a Cisco device. Here we have a cool example we tested against GNS3.
from sdncore.sdncore.vty.drivers.ssh import SSHDriver

td = SSHDriver('10.0.0.1', 'admin', 'cisco', shell_mode=True)
td.open()
td.send_text('terminal length 0\n')
td.read_until('#')
td.send_text('show run\n')
print(td.read_until('vty', timeout=20))
td.send_text('show ver\n')
print(td.read_until('#'))
Wrapping it up
In this article, we see how paramiko allows you to use SSH in Python to connect network devices, specifically Cisco devices. You can apply this knowledge to any device offering a VTY interface, and you can integrate this shell option into your SDN scripts.
If you want to experiment a bit with your code, remember the following bullet points.
- To work with a device that has an interactive shell, you need to call
invoke_shell()on the client: this will return a shell you can use to send and receive data - You can then call
send(text)on the shell to send some text to the remote device - The
recv_ready()method of the shell will return True when there is something to read - Use
recv(num)on the shell to fetch an arbitrary number of bytes from the output of the device. If the output is not ready, the function will wait until there is something to read. Better to use it in conjunction withrecv_ready()!
So, what do you think about shell mode? Do you see yourself using it in your scripts? Just let me know in the comments!

