When you buy an Internet link, you want to see if you get what you’re paying for. If you want to do that at home, you can use many speed test services. Popular examples are the Speedtest by Ookla, by Telstra, or by Verizon. However, those methods are not reliable enough for an enterprise. Furthermore, you can only test Internet speed, and not speed on internal/private circuits. That’s why, at the enterprise level, we use iperf (actually iperf3), a powerful and free tool. In this tutorial, we will see how to use iperf to verify the speed of any link, reliably.
Getting started with iperf
What is iperf?
Iperf is a command-line tool that allows you to test the bandwidth, any way you like. Unlike online speed tests, you have to provide both server and client. In other words, when doing an online speed test, you connect to a server on the Internet, owned by the provider of the test (like Ookla). Then, the application measures the network performance between you and such a server. Instead, with iperf, you have to set up your own iperf server. Don’t worry, you don’t need special hardware, you only need to run a command from your prompt. In fact, you can have both the server and the client on the same computer.
The advantage of running your own server is predictability. You know where the server is, and you may repeat the test in the future. That’s not the case with online services, where they allocate you a server dynamically. This means you won’t be able to reproduce the same test in the future if you do an online speed test. Since you place the server whenever you want, you can also have it on your internal network and thus test internal links.
Getting iperf
The sable version of iperf is iperf3. It is free software (BSD license) you can download from iperf.fr. In a rush? Here is a quick link to the download page. You will find an iperf for any operating system and architecture you need. In this guide, we are using iperf3 on Windows (64 bit), but the tutorial on how to use iperf is the same for any OS.
If you are on Windows like me, you will get a compressed ZIP file. Extract it, and if you want to do things faster copy its content into C:\Windows\System32. This way, you will always have iperf3 at hand as a command on the prompt. If you don’t do that, you will need to move to the folder where you have iperf before you can give the command.
How to use iperf
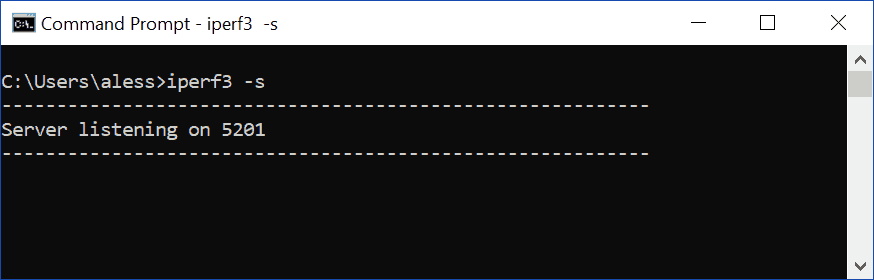
Once we have iperf, we need to learn how to use it. As we mentioned above, we need to run both server and client. The server will keep listening, accepting client connections. Thus, this is the first thing we need to do. Running the server is as simple as writing iperf3 -s in the prompt (-s stands for server). The first time you do that, on Windows, it will ask you network permission. Of course, flag the permissions and click Allow access.

Once you enable the access, a simple message will appear on the prompt, telling you that the server is ready to accept connections. By default, iperf3 listens on port 5201.
Now, we will leave the server be. This server will accept all our connections. However, we will be able to tweak the tests and even pilot the server from the iperf client. That’s where the real deal is.
A simple speed test with iperf
Now, how to use iperf3 to run a simple speed test? You can simply use the iperf3 -c command, of course replacing “<server IP>” with the IP of your server. However, we want to have a better test. Thus, we want to give TCP all the time it needs to expand the window size: better to run a test for some more seconds. We can do that with the -t option, followed by the number of seconds. This will tell iperf3 how long to run the test. Generally, one to two minutes are enough (just to show, we will use 5 seconds). Since our server is running on the same PC, the target IP will be localhost at 127.0.0.1, but that’s just the case of this demonstration.
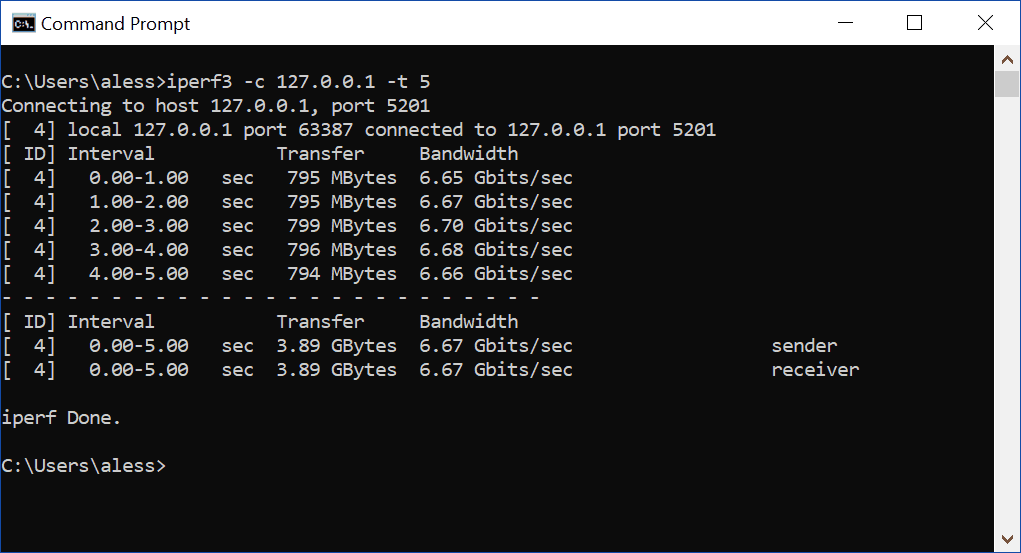
If we want to know how to use iperf, we need to know how analyze the output. The standard output is a table with four columns. Furthermore, the last two rows of the table (after the dash line) represent the totals.
- ID is the ID of the iperf operation
- Interval is the time span the row refers to
- Transfer is the amount of data exchanged between client and server. In the end, speed test is about transferring files and measuring how long it took.
- Bandwidth is the measured bandwidth
Why don’t we have a single total/summary row? Because we want to see the different performances between sending and receiving. In fact, on the far right of the summary rows, you will see sender and receiver bandwidth. In our case, the sender is the client so it means the upload speed. Instead, receiver means download speed. The two might not be always the same, in case of asymmetric bandwidth.
Other cool options
So far so good. In fact, you know how to use iperf by simply using the commands above. However, you may want to use some options to tweak the measurement at your liking. If you want to know all options, use --help. Here, we will see the most useful ones.
-Pcreates N parallel connections, useful to push links to their limit-Rruns in reverse mode: the server will send and the client will receive-bindicate a limit bandwidth (for example 10k, 5mb, 1gb). The test won’t go much beyond this value, even if the link has higher capacity.-Jgenerates the output in JSON once the operation finishes, useful if you want to use iperf in scripts.
Try to experiment combining all the options you’d like together. You will achieve enterprise-grade professional bandwidth testing.
Conclusion (and TL;DR)
Iperf3 is a powerful tool to run custom and reliable bandwidth tests. In fact, it is perfect for enterprise-grade requirements. If you want to know how to use iperf, you need only two basic commands. First, run a server on a device with iperf3 -s. Then, on another device run iperf3 -t 60 -c . This will measure the bandwidth between the two on a period of 60 seconds, which is large enough to get a real measurement.
What do you think about iperf? Do you see yourself using it, instead of using the tools available online? Let me know your opinions in the comments.

