
If you know what is a PWA, you’ll want to build one. In fact, with this approach, you can create an app that runs on any device with just one codebase. More than that, it looks native on any device. Luckily, building a PWA is simple and easy, you only need to know a little bit of Javascript. If you do, get ready because we explain how to build a PWA as fast as possible. With this tutorial, you will have your PWA up and running in minutes.
Get ready to build your PWA
As long as you use Javascript, you can build your PWA with the technologies you want. You could go with plain Javascript, a more complex framework, or even with the ugly JQuery. In fact, the only requirement is that you have a service worker and give the user some feedback as you load content from the backend. If you don’t know what a service worker is, we got you covered later on.
However, for this tutorial, we want to do things right. Thus, JQuery is definitely not an option. We could go with plain Javascript, but then we would have to code a little bit more. Thus, we go with a framework: Vue. If you are not familiar with it, no problem. First, install npm that comes with the Node.js framework. You can download it from here. This will allow you to run JavaScript code on your computer. Let the installer do its job, and ensure the folder where you install Node is added to the PATH variable. Now, you can call the npm command. In fact, install Vue as follows.
npm install vueAfter that, add the PWA plugin for Vue as follow.
vue add @vue/pwaGo in a folder that contains your project with the prompt. In here, create the Vue project with vue create project-name. It will walk you through a wizard, where default values work just fine. This will also create a new folder to contain the project. And this is it! Now, we have a project set-up for PWA development.
How to build a PWA
Folder Structure
The folder structure comes from the Vue project, rather than from the PWA itself. However, since we are working with Vue, you need to grasp the basics of it. Here is what the structure looks like in our Visual Studio Code editor.
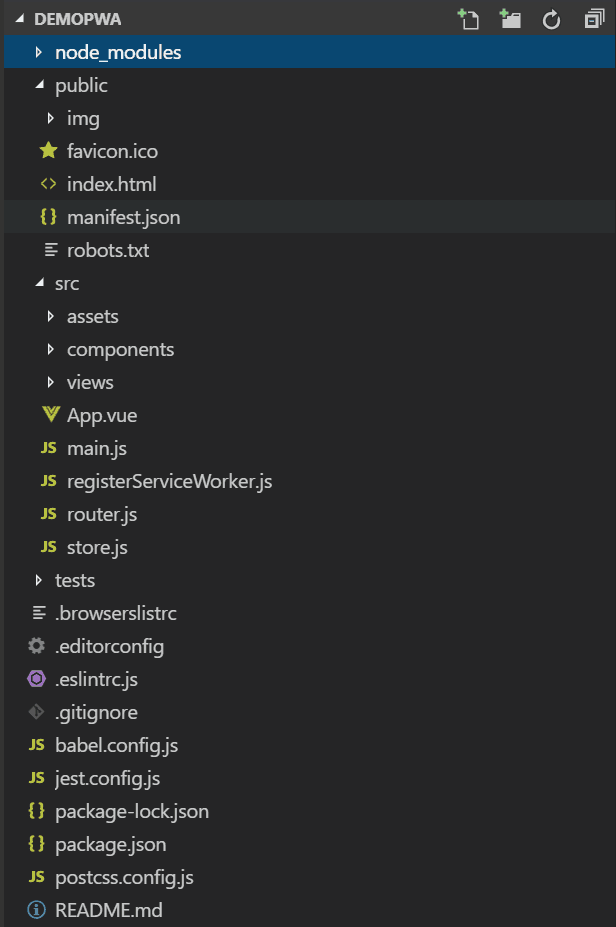
We can quickly summarize this structure:
- The public folder contains static material, like images and the index HTML page that loads the PWA
- The real magic happens in the src folder, where we have all our logic of the application. Here we can see the assets (static files), the Vue components, and the views (dynamic pages). The
App.vuecoordinates everything, whilemain.jsis in charge of starting everything up. We also have a service worker registration script, a Vue router, and a store. - The tests folder contains unit tests
- All other files in the root of our project describe the project itself, its dependencies, and its configuration
In the end, when you are ready with your Vue project, you want to create a super-compact set of minified JavaScript, HTML, and CSS files. To do that, you need to build your project. You can do that with npm run build, that will make such files in the dist folder, that will be created just for that.
Instead, if you are developing and you want to see changes live, you need to run the site in developer mode. Doing that is easy, just use npm run serve. This will continuously watch for changes and automatically recompute the application. If you do that, it will tell you the URL where you can see your app, which for me is http://localhost:8080/.
Service Worker
Service Worker is at the heart of your PWA. It is the engine that handles the caching. In our app, we already have the registerServiceWorker.js script. This will load into the app a Service Worker from the file service-worker.js. However, we need to create such file at the root of our project. Here is some example code you could put into your service-worker.js.
workbox.setConfig({
    debug: false,
  });

  workbox.precaching.precacheAndRoute([]);

  workbox.routing.registerRoute(
    /\.(?:png|gif|jpg|jpeg|svg)$/,
    workbox.strategies.staleWhileRevalidate({
      cacheName: 'images',
      plugins: [
        new workbox.expiration.Plugin({
          maxEntries: 60,
          maxAgeSeconds: 30 * 24 * 60 * 60, // 30 Days
        }),
      ],
    }),
  );

  workbox.routing.registerRoute(
    new RegExp('https://url-to-api'),
    workbox.strategies.networkFirst({
      cacheName: 'api',
    }),
  );

  workbox.routing.registerRoute(
    new RegExp('https://fonts.(?:googleapis|gstatic).com/(.*)'),
    workbox.strategies.cacheFirst({
      cacheName: 'googleapis',
      plugins: [
        new workbox.expiration.Plugin({
          maxEntries: 30,
        }),
      ],
    }),
  )
Basically, you are configuring Workbox, a tool from Google. Here, you define a set of caching rules based on the type of files. We defined three different rules.
- For images, we use the stale while revalidate strategy. This serves to the user the image in cache, if available, and then triggers the call to the backend. The image obtained from the backend is then used to update the cache.
- The second rule is for our API (note that the URL needs to be changed). For that, we go network first, meaning that we try to contact our backend server as first option.
- Finally, for Google fonts, we try to use the cache as first choice, thanks to the cache first strategy.
The service worker will intercept HTTP calls and will act according to such rules. As easy as that!
API Strategy
To create a great PWA, you need to have a clear idea on how to engage your backend server. Typically, the best way to do it for a PWA, is to have some special APIs. Unlike normal APIs, you don’t authenticate the user with a static token, but you follow the same rules as authentication for frontend pages. For example, you may use an HTTP-Only cookie. Besides that, those are just normal APIs.
In other words, your frontend JavaScript application interacts with the backend using JSON. If you manage to have all your backend calls following this method, you will have awesome efficiency. In fact, you only exchange what you strictly need over the network. A simple way to do that is using axios to make the calls. So, install it with npm install axios, and then use it as follows.
import axios from 'axios'

axios({
    method: 'get',
    url: '/api/customer'
}).then(response => {
    if (response.status === 200) {
        console.log(response.data.name)
    }
})
Axios automatically parses the JSON body and converts it to an object inside response.data. Very, very easy!
Manifest
Another important thing you need to take care if you want to know how to build a PWA is the manifest. The Web App Manifest is a descriptive file that tells Google, Android, and iOS some information about your app. Luckily for us, it is simply a JSON file that you can write manually. The purpose of this file is to provide information before opening the app. For example, it tells what is the icon to show when you add the app to your home screen. Actually, you can list more than one icon – each of a different size, to better fit different screens. Name your manifest manifest.json. This is some example content.
{
  "short_name": "Maps",
  "name": "Google Maps",
  "icons": [
    {
      "src": "/images/icons-192.png",
      "type": "image/png",
      "sizes": "192x192"
    },
    {
      "src": "/images/icons-512.png",
      "type": "image/png",
      "sizes": "512x512"
    }
  ],
  "start_url": "/maps/?source=pwa",
  "background_color": "#3367D6",
  "display": "standalone",
  "scope": "/maps/",
  "theme_color": "#3367D6"
}
The background color will be used on the splash screen while loading the app. This gives the user much better feedback than a white, blank, page loading. Then, you need to include the reference to the manifest in your HTML code for all pages, as follows.
<link rel="manifest" href="/manifest.json">
Remember, having a manifest is mandatory to build a PWA. It simply won’t work without one. Google has a long explanation about all the parameters you can tune in the manifest.
Verify the PWA-ness of your app
Once your app is ready, you can build it with npm run build. At this point, you can upload it to your server (possibly a test server) and see how it works. Google offers a great tool to test published PWAs to help you understand your weaknesses. I am talking about lighthouse, that you can add as a Chrome extension. This tool will give you more insight about your PWA, and I recommend to use it before releasing an app to a production state.
In Conclusion
To wrap things up, in this article we gave you the basis on how to build a PWA. You know that you need a service worker, and you have a copy-and-paste version that handles caching in some decent way. We also presented a way to deal with backend calls, and an example basic manifest. To finish, we gave you the link to Lighthouse, the Google tool to test your PWA. Of course, this is not a start-to-finish tutorial, and it assumes you have some basic knowledge of Javascript. If you do, you will get your PWA running in minutes. Please leave a comment if you want to learn more!

