Networks can be beautiful and complex with the only use of routers and switches. However, a network made of just routers and switches is completely useless. In fact, the purpose of any network is to move data from some devices to some others. Without end-devices actually sourcing traffic, a network doesn’t make much sense. Adding real servers in your lab might be expensive, but not today. With GNS3, you can add all the virtual servers you’d like. In this lab, we will explain how to do that: connecting VMs in GNS3.
New to GNS3? Get yourself ready with this awesome GNS3 tutorial.
What can I do with VMs in GNS3?
All in all, you can do a lot with VMs in GNS3. A VM (Virtual Machine) is a virtual computer, running its own operating system. In your physical PC, you might run multiple virtual machines simultaneously. In fact, the only limit for that is your CPU and RAM.
Each Virtual Machine not only has its own operating system, but it also has its own resources. Your physical computer will dedicate to it some RAM, some CPU, and some disk. With all of that, the machine will be exactly like a physical computer: you can run any software you like in it. For example, you could run a web server, an FTP server, or a custom application.
With GNS3, you create a virtual network without end devices. By adding VMs in GNS3, you can make this network meaningful. You can add a web server and see if your firewall rules are effectively blocking the traffic, for example. But the best benefit of VMs in GNS3 is yet to come…
The best benefit of having VMs in GNS3
VMs are now everywhere in the corporate network. Companies do not run physical servers to run applications anymore. Instead, they run special software on them to host many VM. This adds flexibility, as the software is not tied to a physical device anymore. Because of that, all vendors have started developing network virtual machines recently.
You can have an F5 load balancer in a VM, a Palo Alto or Fortigate firewall, a Juniper Virtual SRX (firewall), and so on. In other words, you can really try out many different products, and integrate them with your network.
Starting with VMs in GNS3
There are two types of VMs…
You can tell by the name that a VM is not a normal device: it’s virtual! In fact, you need a physical device (your computer) that runs special software to virtualize devices. Many alternatives exist, but only the two most popular are supported by GNS3.
- Oracle VirtualBox is a simple solution, it has everything you need to start and it is completely free. However, it feels somewhat amateurish
- Real men want to use VMWare Workstation, a much better and enterprise-oriented solution. Not only it surpasses VirtualBox in terms of features, it is also somewhat more stable. While this is the king of advanced stuff, it has a major setback for us: you have to pay for it.
Since we want to reach as many people as possible with this lab, we are going to use Oracle VirtualBox. If you don’t know where to start, we are going to cover it in a second.
Download Oracle VirtualBox
Downloading Oracle VirtualBox is completely free. If comes in several versions, depending on your operating system (on your physical device). Consult the VirtualBox official download page to get the version that suits your system.
Once you downloaded the right version for you, just follow the installation by going through the classical “Next” – “Next” sequence until you hit the finish button.
Okay, VirtualBox is just like a Virtual Box, but it’s an empty box. Now, we need to download an operating system to put in that box.
Lubuntu, the Lightweight Ubuntu
Linux is a formidable operating system. You can run a lot of stuff on it, and it’s free. Now, we all know that Linux comes in a huge variety of distributions. Ubuntu is probably the easiest to use if you are new to the Linux world, but it doesn’t meet our requirements. In fact, it is sized several GBs and requires precious resources to run as a VM. We could do that, but why wast resources?
That’s where the Lightweight Ubuntu comes into the picture. It is basically a downsized ubuntu, that still has everything we need. The advantage? It is much smaller and requires fewer resources. Of course, it is Open Source and thus free to download. Just click on the link below.

You will get an ISO file of about 950MB. In the next part, we will see how to add it to VirtualBox.
Adding Lubuntu in VirtualBox
This article is about adding VMs in GNS3, and we are going to explain how to do it with lubuntu. Once you know the process, you will be able to do it with any operating system you like.
The process
Before adding VMs in GNS3, we need to create such VMs in VirtualBox. In fact, we need to tell VirtualBox to use the file we just downloaded (lubuntu) to run a VM. This process is extremely easy, it has only three steps.
- We customize resource settings for the VM (RAM, CPU and so on)
- We make the VM point to the ISO file we downloaded
- Done, we can run the VM!
Creating the VM
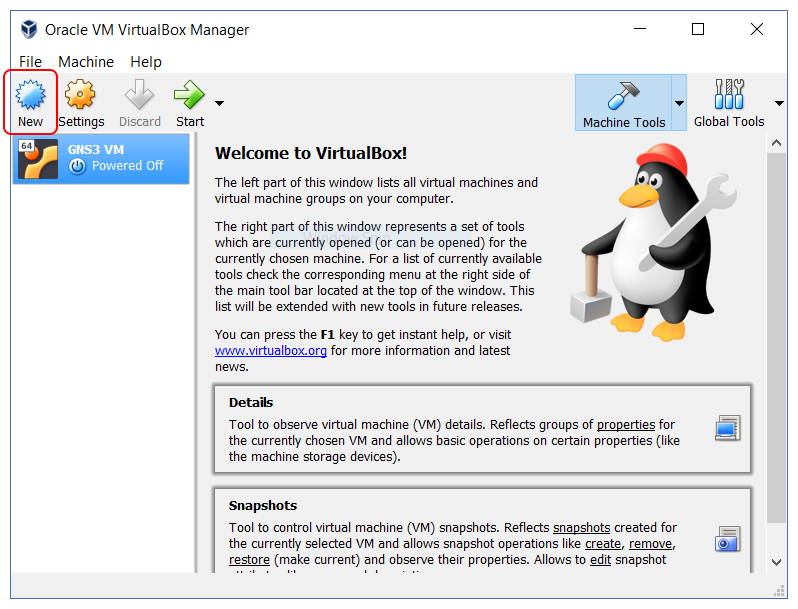
Open VirtualBox, then click the “New” icon on the top left of the screen, as in the screenshot below.
A new Window will open, asking to specify some basic settings. We can name it Lubuntu 32-bit and select Linux/Ubuntu 32-bit as Type and version. On this page, we can also give it 1GB of RAM (1024MB) and select to create a Virtual Disk immediately.
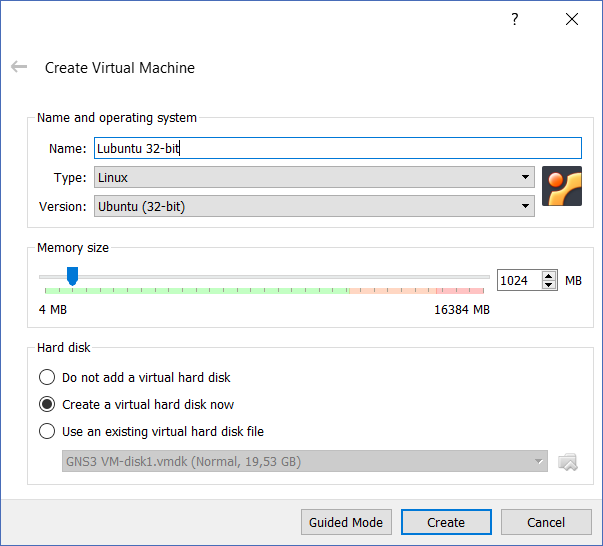
Once you finish, click Create.
Creating the Virtual Disk
The Virtual Disk of a machine is a file on your PC that holds all the files of the virtual machine. For this lab, you can leave everything unchanged in the following window. However, be aware that you might need to tune the sizing for a bigger operating system.
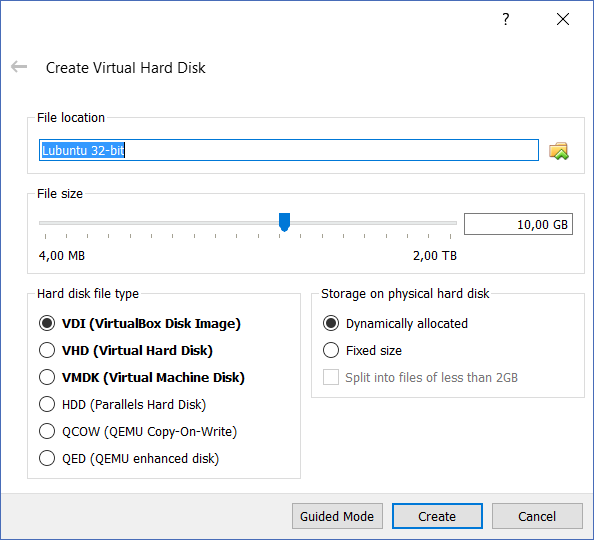
Click Create in this page too. The machine will be created.
Installing Lubuntu
The lubuntu ISO
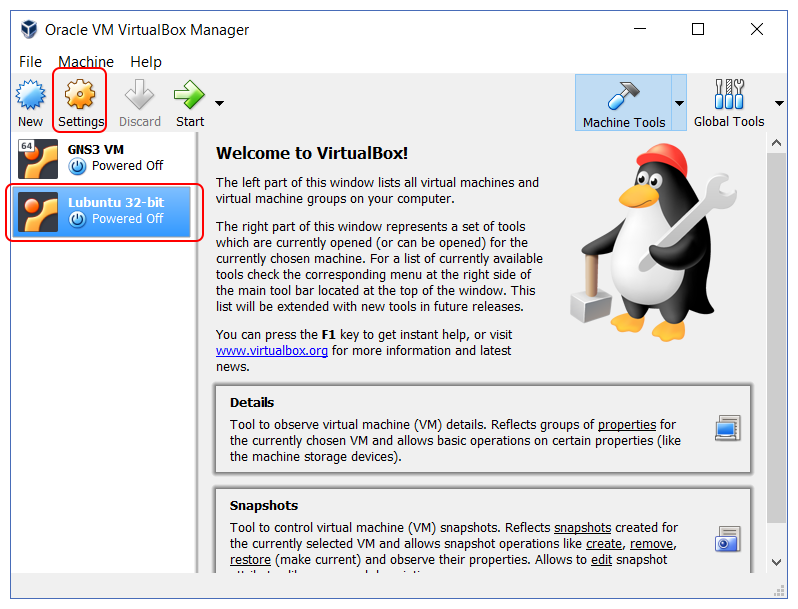
An ISO file is a file that resembles an optical disk, like DVD or CD. That’s what we have downloaded earlier in this article. Now, we need to tell our VM to use that file to emulate its disk. To do that, we need to edit the settings of the Virtual Machine. This is as simple as clicking the Settings icon with the VM selected (blue background).
This will open a new window, from which you have to select Storage. This will change the tab on the right, where you need to select the Empty IDE controller, and then click on the “Choose a Virtual Optical disk…” icon.
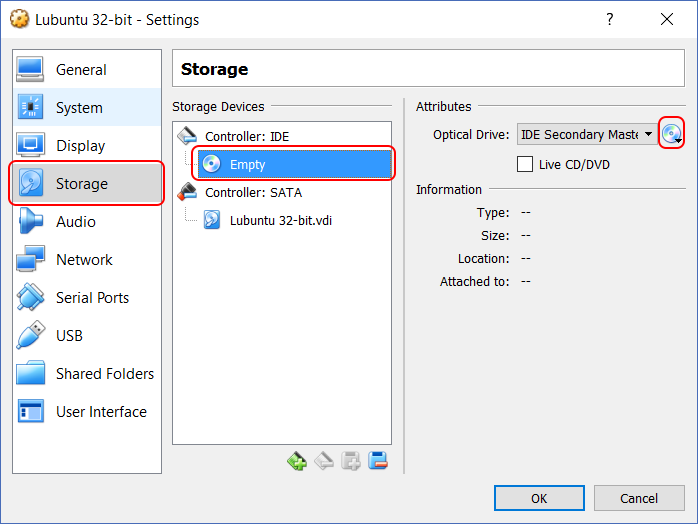
This will open a File Browser. Just search for your ISO and select it. Then, click “OK” and get back to the VirtualBox home.
Starting the VM (and installing Lubuntu)
To start the VM, simply click the Start Icon (the green right arrow). A new window will pop up in a while, where you will see the screen of your Virtual Machine. By clicking in it, you are controlling it and you can’t move the mouse outside. To get back to your physical PC, hit the right Ctrl button instead. Installing lubutu is going to be fairly easy. In fact, the graphical interface is complete and you can simply navigate by using the arrows.
It will ask you for the system language, then we will have to select “Install Lubuntu”. At this point, the VM screen may simply look broken. It is a common issue with Ubuntu and VirtualBox: if you experience that, you have to hit Right Ctrl + F1, then Right Ctrl + F7, then Right Ctrl + F1 again. Remember to click again inside the Virtual machine screen each time, as hitting these combinations will get you back to your PC. In case this alone doesn’t work, try increasing the Video Memory from the VM settings > System.
From now on, the VM will allow you to use the mouse. Just continue with the default settings. As the last thing, it will ask you to create a username and a password. Create one according to your taste, for me, it was simply Alessandro. Now sit tight and wait for the installation to finish.
Our first steps in the new VM
After the installation, Lubuntu will restart. Then, it will ask us to log in with the account we created during the installation process. We can do that, and once in we have to install Net Tools (to configure IP addresses) and IPerf (to test connectivity). To do that, we need to type the following commands.
sudo apt install net-tools
sudo apt install iperf
Now, we can type ifconfig to see the IP addressing of our machine. At this point, we are ready to add this VM in GNS3. Before doing so, close the VM (Power it off).
Configuring VMs in GNS3
Adding the VM
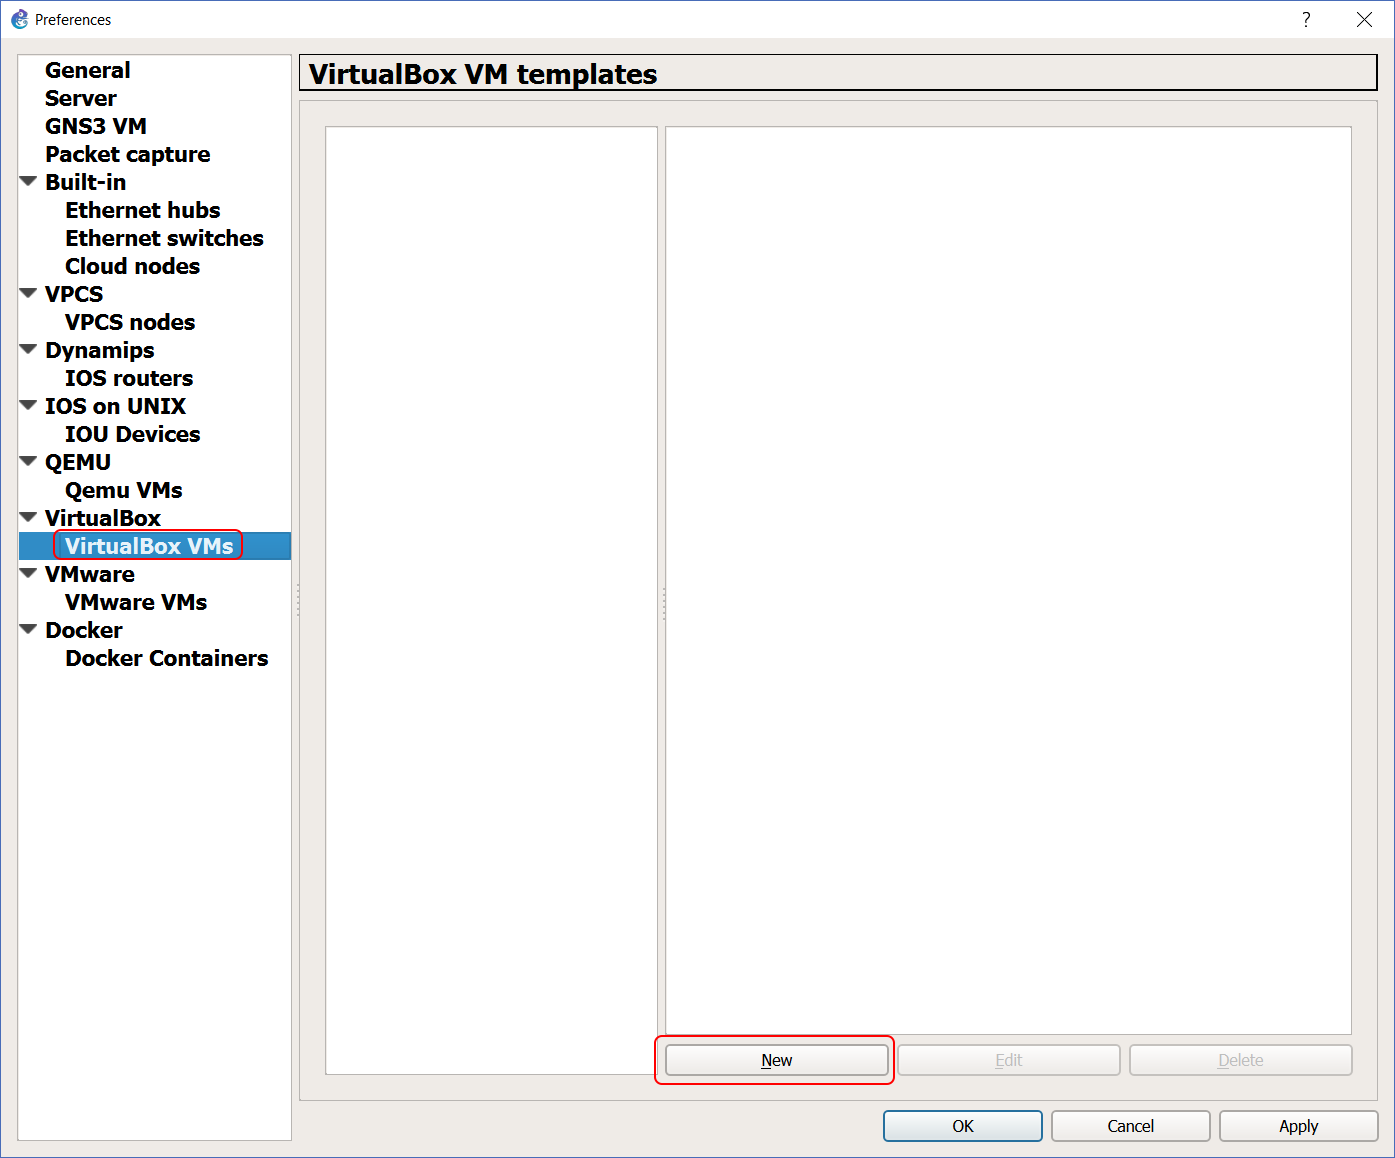
First thing, we need to tell GNS3 that the Lubuntu Virtual Machine exists and that we want that machine to be available in GNS3 topologies. To do that, in GNS3, go to Edit > Preferences. From there, select VirtualBoxVMs and click New, as in the picture below.
Now, we have to select “Run this VirtualBox VM on local Computer”, and then select our Lubuntu VM. GNS3 is interconnected with VirtualBox, so it knows the VMs you already have and will ask to associate one of them. At this point, we only need to click Finish. Now, click Apply and close the Preference window. We are going to have Lubuntu in our topology in a second.
Adding VMs in GNS3 Topology
Now, our VM is available in the End Devices lists, and we can easily drag it into the topology. Do that, and add a router as well. Then, interconnect the two with a cable, as in the picture below.
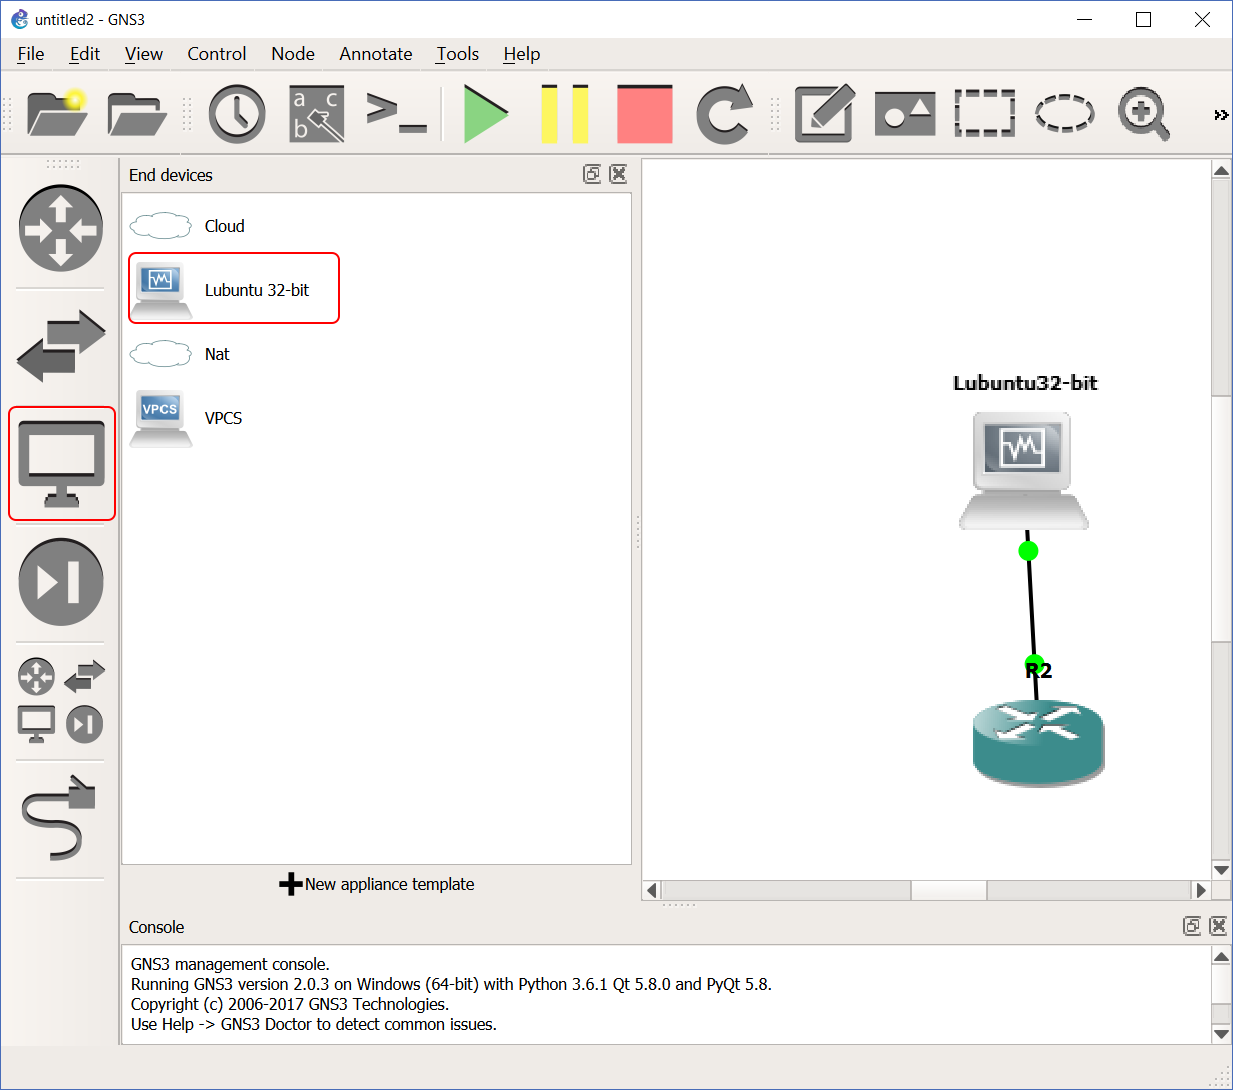
To power on the devices, simply select each (the router, the VM) and click on the start button (the green triangle). Now we can configure our router and our VM.
Configuring IP address on our VM
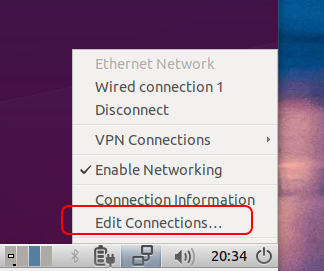
In our example, we are not going to do anything interesting with our Virtual Machine. Instead, we are just showing that it can ping the router and vice versa. To do that, we need to configure an IP address on the Virtual Machine. This is extremely simple, just click on the network icon at the bottom right, then select Edit Connections.
Now, double-click on “Wired Connection 1” and move to IPv4 settings. Here select Manual, then press Add to add a new IP address. Configure the new IP address to be 172.16.0.2 with a mask of 255.255.255.0 and a default gateway of 172.16.0.1. Then, click Save. Now your Virtual Machine is ready!
Configure the IP address on the router
In our lab, we connected Lubuntu to Ethernet 0/0, but in case you used a different interface then you will have to apply the configuration on that interface. Here are the commands we typed. To type them, you need to open the console of the router.
configure terminal

interface Ethernet 0/0
 ip address 172.16.0.1 255.255.255.0
 no shutdown
 exit
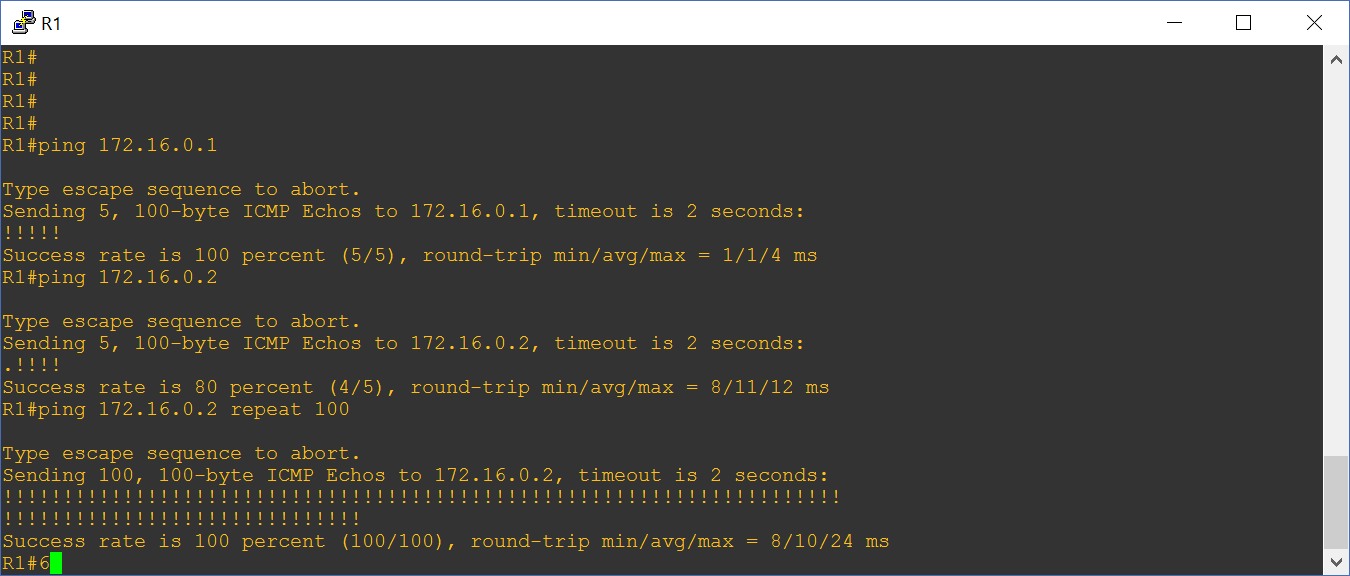
And now, you will be able to ping the PC, like in the screenshot below.
Fixing bugs and making GNS3 work
Sometimes, integrating GNS3 with a third-party product like VirtualBox can be a real pain. While the GNS3 team did (and is doing) an awesome job in that, the solution still doesn’t come in a real all-in-one pack. Because of that, something might be missing and you might be left with a non-working lab. Here are my tips and solutions to common problems.
- If you are using the GNS3 VM or the local server, disable authentication. This won’t solve the problem, but will allow you to debug. If you don’t want to turn off authentication, use a password you know instead of the automatically generated one. When you see in the bottom part of the screen “Failed to…” and a URL, you will be able to browse that URL and read more details about the error message. This is a lifesaver!
- Can’t link the VirtualBox VM with a cable to your router? This is because NPCAP is missing on your machine, go to install it.
- Not see the “New” button to add the VirtualBox VM? Just reboot your PC.
- If you get some error message like “cannot start the server” when you launch GNS3, check your Windows’ firewall. Still in trouble? Try to open the GNS3 folder in a prompt and run
gns3server.exemanually.
Hopefully, you will get your lab up in minutes!
Conclusion
Adding VMs in GNS3 can change your technical career. Believe it or not, this is the only way to deploy a virtual datacenter on your laptop in minutes, being always up-to-date with new technologies. See a new product? You try it. Want to test the deployment of a web server? You can do that. You could even try deploying your own Cloud system with OpenStack since the entire world is shifting to the cloud.
You can connect GNS3 to literally anything, and this will allow you to experiment. What do you thing about this? How are you going to use this tool to boost your skills? Just let me know in the comments.


2 Responses
Thanks, it is very helpful.
Thank you, I am deeply happy this was helpful!
I am also open to suggestions, so in case you have something you want to read about, just let me know!
Comments are closed.