
If you want to manage many network devices, you simply can’t afford to do it locally. You can’t physically go to one of your devices to check its status, you need to control it remotely. In our application layer article, we discovered we can control a device with Telnet and SSH. Telnet, however, is not secure: it sends everything in clear text, including passwords! For this reason, we might want to use a secure alternative: SSH. Nonetheless, managing a device remotely requires you to add a few more commands to have the same experience as on-site. This is what we are going to achieve with Syslog and terminal monitor.
The best way to learn is to always practice. Therefore, we prepared a Packet Tracer lab that you can download for free using the link below.

Once you downloaded the lab, just open it with Cisco Packet Tracer. Then, try the commands you see in the article on the devices. You will soon become a master of SSH, Syslog, and Terminal monitor.
SSH, Syslog, and Terminal Monitor Lab Intro
The Topology
For this Packet Tracer lab, we kept the topology extremely flat. As you can see from the image below, we have just a switch connecting a laptop, a server, and a router. The light-blue cable on the left is just a console cable.
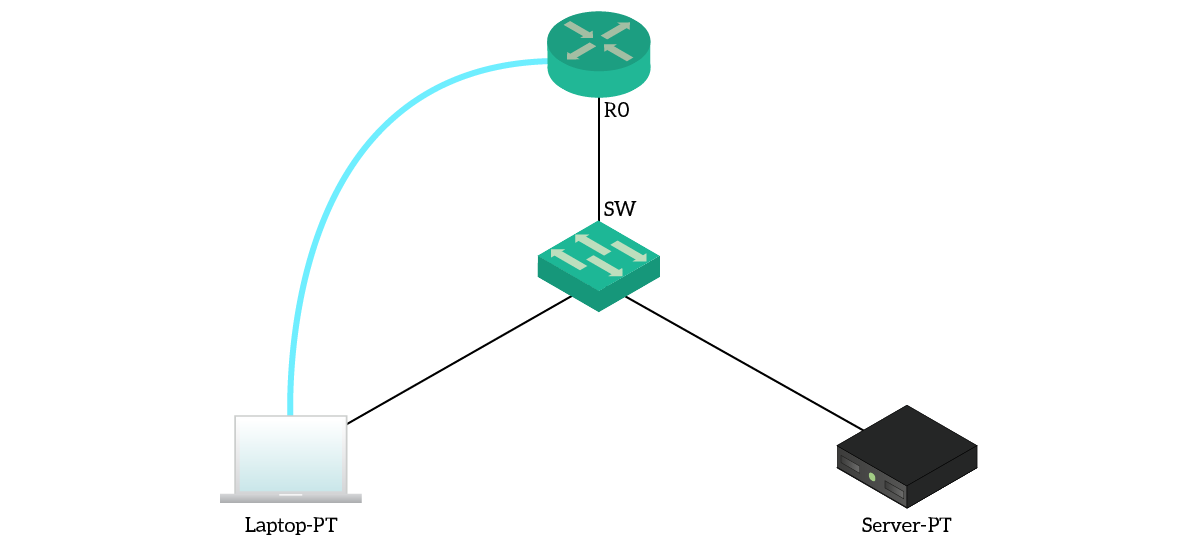
Everything is placed in the same network, VLAN 1. We all know that this is not best practice, but it will enable smoother progress of our lab. Everything has a static address in the 192.168.1.0/24 network: the laptop is .10, the server .11 and the router .1.
The Requirements
A simple topology comes with simple requirements. The first thing we want to do is to enable SSH authentication on VTY lines and remove anything else. Then, we want to connect using SSH and see system messages in real-time (this is Terminal monitor). Finally, we want to send all the logs to the server so that they can be stored and read later.
This will see us using the console cable for the first part of the lab, to enable SSH access. After that, we will connect using SSH and continue the configuration from there.
Configuring SSH
A brief explanation
SSH stands for Secure Shell, and it is a protocol that exchanges text between devices. Its major goal is to allow the usage of terminal devices (without graphical interface) remotely. You send some text to the device, and the device sends some text back to you. Unlike Telnet, which sends the characters as you type, SSH encrypts them before sending them out. The device on the other side will decrypt them, and only then process them.
The user experience doesn’t change from Telnet, but security changes. This encryption-decryption process involves some kind of trust between your PC and the remote device. We built this with RSA keys, which are long strings of random-looking text. Each device has a pair of keys, a private and a public one. The private key is used to encrypt data, the public key to decrypt them. Only the public key associated with a private key can decrypt its messages. As a result, if you use the public key of your remote device to decrypt its traffic, you know it was the one encrypting it. For the purpose of this article, you just need to know that you need to create those keys on the router.
Now that you have the fundamentals of encryption, we can start with the configuration!
The Console Cable in Packet Tracer
If you are following the CCNA course, this is the first time you will be using the console cable. It is extremely easy: you just need to open the Laptop and go to the desktop tab. From there, select Terminal.
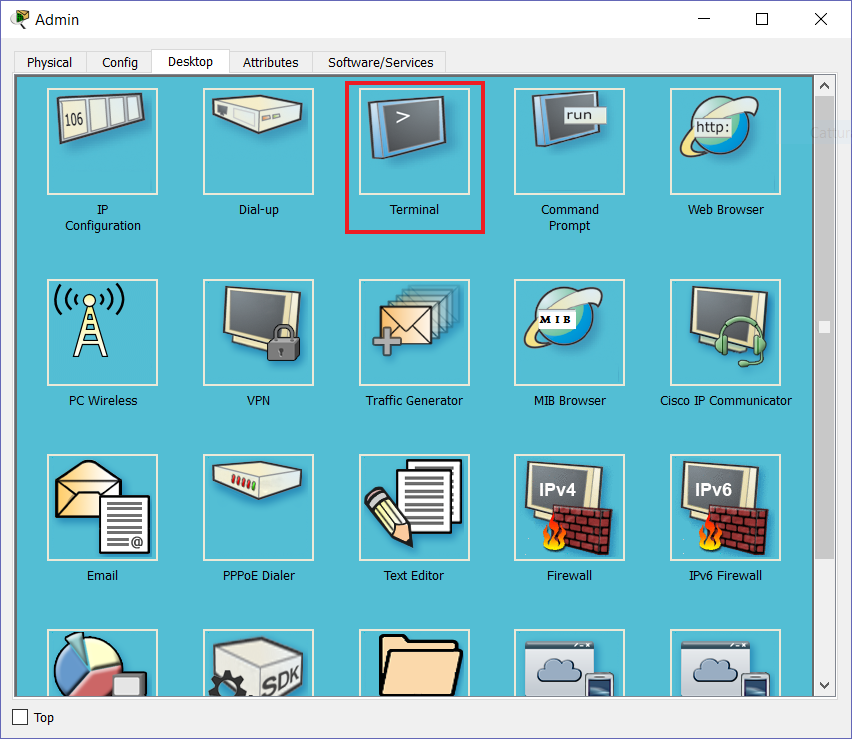
A window will pop-up with several pre-compiled parameters. You can leave everything as is and click on “OK”. It will open a white terminal where you can control the router, just like we did in the previous labs.
Enabling SSH
To activate the Secure Shell, we first need to create the RSA keys. The algorithm that creates them starts from the hostname and the domain name, so we need to define both first. Since the host-name is already defined, we can go straight to the domain name. To do that, we can use the ip domain-name configuration command. For this lab, we are going to use “company.local”.
Now, we can generate the keys by using crypto key generate rsa command. As a first question, this command will ask us to provide the modulus size. By default, it is going to use 512 which is quite secure. However, we want even more security, so we will specify 1024. Note that this is mandatory for your scoring. Here’s a recap of the commands discovered until now.
ip domain-name company.local
crypto key generate rsa
Now, we can do a little more fine-tuning. First, we want to turn on SSH version 2, which is better. After that, we want to create a local admin user with a password of “ictshore” and set also the enable secret to “ictshore”.
ip ssh version 2
username admin privilege 15 secret ictshore
enable secret ictshore
At this point, we just need to activate SSH on the VTY lines and tell them to authenticate against the local database. Nothing easier, we just need to modify the transport input and the login method.
line vty 0 15
 transport input ssh
 login local
Here we go. Now SSH is active!
Access a device with SSH
Accessing a device with SSH is a little bit different from Telnet. With telnet, we only need to write telnet and the IP address of the target device. With SSH, instead, we need to type ssh -l, followed by the username and then the target IP. So, using the Admin laptop, open the command prompt and type the code below to test the connection.
ssh -l admin 192.168.1.1If everything is correct, the connection will open and you will be prompted for the password. Once in, type enable to gain access do privileged-exec commands.
Working with Logs
Terminal Monitor
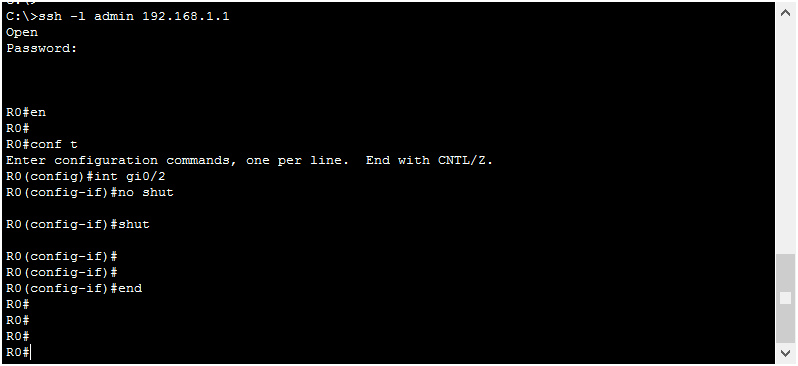
Logging messages are a great way to see what’s happening on the device, real-time. They automatically appear on the console connection, but they do not on terminal lines (VTYs). For example, try to turn on and off the GigabitEthernet 0/2 interface. You won’t see anything, as from the screenshot below.
If we want to see the logs, all we need to do is type terminal monitor. This is a privileged exec command, not a configuration command. We can try the same exercise again, and see the logs now.
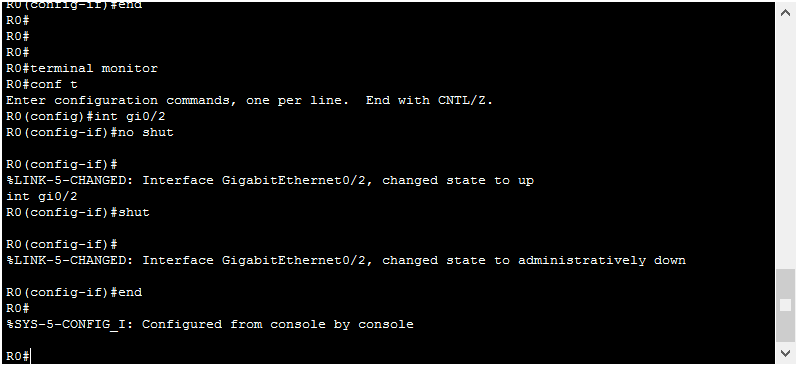
The terminal monitor is activated on the VTY you are connected. The moment you disconnect, it will be turned off and will require you to turn it on again if you want to gather more logs. To manually turn off the terminal monitor, you don’t negate the command. You need to negate the monitor, so you have to type terminal no monitor (and not “no terminal monitor”). The terminal monitor is often handy when you need to use debug.
Syslog
Syslog is a simple feature present on many devices (not only Cisco) that allows remote logging. In other words, your device sends all the logs to a server instead of buffering them locally. This does not prevent them to be displayed in real-time with the terminal monitor. With a server, you can gather logs of many different devices and analyze them together. To do that even better, you should configure NTP to have consistent timing.
Syslog groups logs into seven different Severity Levels. The lower the severity, the more important (or critical) the event. Here’s a table showing the Syslog severity levels.
| ID | Name | Description |
|---|---|---|
| 0 | Emergency | System is unusable |
| 1 | Alert | Requires immediate intervention (e.g. database corruption) |
| 2 | Critical | Critical condition such as a partial hardware fault |
| 3 | Error | Generic error condition |
| 4 | Warning | Generic warning condition |
| 5 | Notice | Significant condition which is not an error, but it may still require special handling |
| 6 | Informational | Info message |
| 7 | Debug | Debug-level message |
With this in mind, you can configure Syslog to send messages to the server only if they are of certain severity (or lower). To do that, you first need to define which is the Syslog server with logging host configuration command. Then, you can use logging trap to define the severity. Here’s what you should type.
logging host 192.168.1.11
logging trap debugging
With these very two commands, your score should reach 100%. If you try to generate more logs (like with the interface on/off trick), you will be able to see them on the server. In case you want to do that, go to the Server and select the “Services” tab. From there, select “Syslog” on the left panel.
Conclusion
In this article, we learned three cornerstone tools that any network engineer uses: SSH, Terminal Monitor, and Syslog. Now it’s time that you go outside and try them. For example, here’s a pro tip: you can establish two concurrent SSH sessions to the same device, and use one of them to configure the device, the other for the terminal monitor. This way you won’t mess together configuration commands with logs.
For your convenience, here we list all the commands you need to remember:
- Set
hostnameandip-domain name, then generate the RSA key withcrypto key generate rsacommand in order to enable SSH - Set the SSH version with
ip ssh versioncommand - Remember to select SSH as
transport inputon the VTY lines, and to enablelogin local - You can turn Terminal Monitor on and off with
terminal monitorandterminal no monitorprivileged-exec command, to see logs on VTY lines - You can enable remote logging by specifying a server with
logging hostand defining the logging severity withlogging trap
With this knowledge, you are now starting to be able to manage and maintain complex network infrastructure. Continue onto this path and the CCNA certification will be in your hands in less than you might think.

