
In our modern society, all we want is control. We want to know what’s happening, when, and why. The computer networking world makes no difference. Imagine how beautiful it would be to know the exact state of all the routers and switches in the company. Imagine that you can get an email in case a router fails, or that you can see a monthly report of device availability. Well, luckily for you we can do all of that with SNMP. SNMP, or Simple Network Management Protocol, is a standard protocol that automates configuration and monitoring of network devices. If you want to know how to use SNMP in your network, you are in the right place. In this article, we will talk about the Simple Network Management Protocol, both in theory and on Cisco devices.
After all, SNMP is about configuration. Because of that, we are shipping this article with a free Packet Tracer lab that you can download for free using the link below.

Once you do, just open the lab and use it as the article proceed. You will try everything you learn immediately, mastering SNMP in minutes.
SNMP Lab Intro
For this lab, we have an extremely simple topology. As you can see in the picture, we have a router, a switch, and a PC.

All the devices have an IP address in the same broadcast domain, 192.168.1.0/24. As you might be able to tell, Router is .1, SW is .2 and PC is .11. Our goal here is very basic: configure SNMP.
Specifically, we want to configure SNMP with its default settings. We want the PC to access the router in Read-Only, and the switch in Read-Write. In both cases, we should use “ictshore” as a password.
Introducing SNMP
SNMP is an Application Layer protocol that leverages UDP on port 161 for all message types but traps, which use port 162. Over the years, we moved through many versions of this protocol, yet, the concept is still the same.
Simple Network Management Protocol see two entities in any communication. At the “server-side”, we have the manager: a device running a specific software known as Network Management Station (NMS). Instead, on the other side, we have one or more network devices, that run a specific software: the agent.
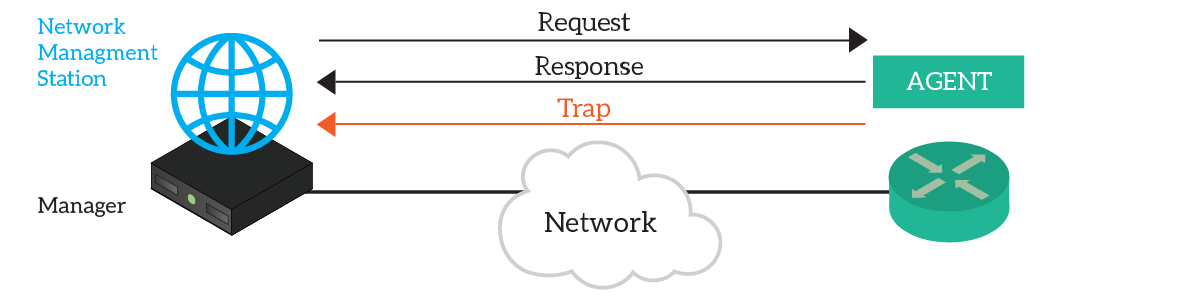
The NMS makes requests to the Agent on the network device, which returns a response. We have get requests to read content, and set requests to modify the parameters of the device running the agent. With SNMP, you can configure all the settings of a device just like you could do with CLI.
Then, we have the trap. This is a special type of unsolicited message that the agent sources autonomously. For example, if the network device finds out that a fan has stopped working, it generates a trap and sends it to the NMS. This is an Alert mechanism.
The same NMS can support multiple network devices, of course. Limits depend on the specific software in use as NMS: there are many proprietary implementations.
SNMP v1 and v2c
The first official version of SNMP is, of course, version 1. In this version, we can do everything said above. However, to trust each other, the network device and the manager share a secret password, sent in every message in clear text. That shared password is known as community string, or simply community. Of course, this is not the best approach in terms of security.
We can see this version as a draft, where we have all the basic features but not the tuning like security. As a result, this version was quickly deprecated with the release of version 2.
Version 2 implements a new message known as “GetBulk”. This allows the NMS to efficiently iterate through all the configuration items on the target network device, both in get and set mode. However, this was not the major improvement. Version 2 introduced a much better security approach, but this wasn’t well accepted by the public. Its complex implementation resulted in people not willing to migrate, and in the release of a new version: v2c.
Version 2 C restored the support for community-based authentication. Because of this, v2c turned to be the standard de-facto after v1. The lack of security made many network engineers implement v2c in Read-Only mode only. However, this resulted to be obsolete anyway with the release of the third version.
SNMP v3
The third version is the actual SNMP version, the one you want to use. It adds tons of minor improvements on performance, and modify some conventions and terminology. The most significant addition, however, is the cryptography.
SNMPv3 implements a new security model where you can specify what is the level of security you are looking for. We have the possibility to select one of these three options:
- NoAuthNoPriv (No authentication, No privacy) – The network device doesn’t even authenticate the NMS.
- AuthNoPriv (Authentication, No privacy) – Similar to the previous versions, we authenticate the NMS through the use of a shared secret.
- AuthPriv (Authentication and Privacy) – This is the best approach: it doesn’t limit to authenticate the NMS, it also encrypts the SNMP traffic.
Ideally, you want to use SNMPv3 with AuthPriv on all your network. However, remember that SNMP versions are not backward compatible. Still, many commercial NMS softwares support them all to increase compatibility.
The Management Information Base
SNMP leverages the concept of Management Information Base (MIB). This is a numeric way to represent each configuration component in a world-wide unique manner.
Each network device capable of running an SNMP Agent has a MIB to represent its configuration. Devices of the same exact model, of course, will have the same exact MIB. You can think of the MIB like an index to access some areas of the configuration. That Index is a tree, composed by the position of the child among the other children of the same parent node.
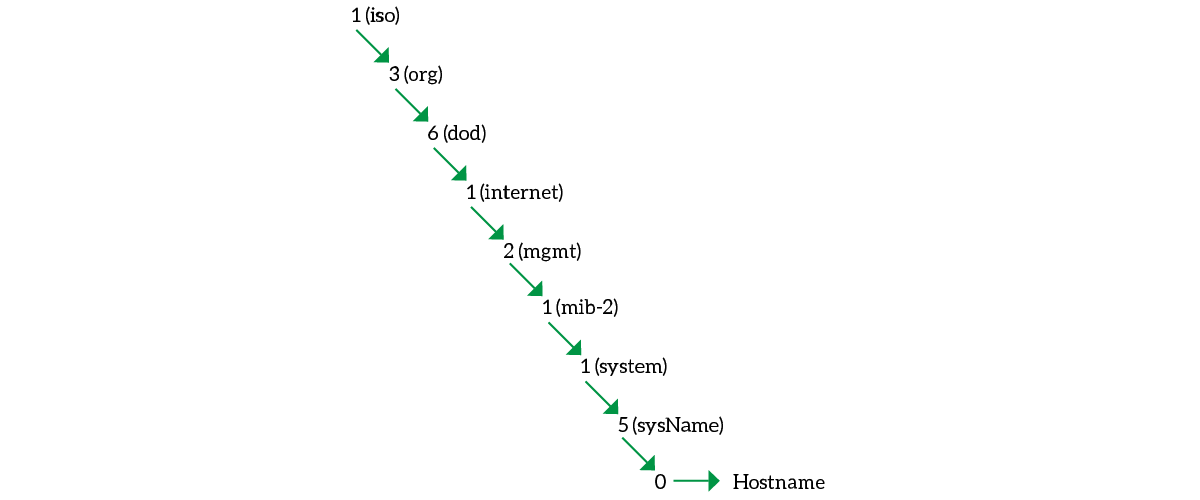
We write down these numeric positions dividing them with a dot. As a result, the complete identifier for the hostname (from the picture) will be .1.3.6.1.2.1.1.5.0. This string is the Object ID (OID). Note that the final zero indicates “get the value here”. You will see the last item to be zero for all unique-value items (just one on the device, like the hostname).
Configuring SNMP
Configuring SMP is easy, particularly in Packet Tracer where our commands are limited. For our lab, we need to configure the Router to be Read Only and the Switch to be Read-Write.
So, we can start by logging on the router and enter the configuration prompt. From there, we can type snmp-server community ro, where “ro” stands for “Read Only”. The complete command for this lab will be this one.
snmp-server community ictshore ro
On the switch, we are going to do the exact same thing, but for Read-Write. We will need to use the “rw” keyword, as below.
snmp-server community ictshore rw
By default, IOS devices will try to use SNMP v2c. You can change that with snmp version command. Note that you can specify on the same device two different communities, one for Read-Only and the other for Read Write.
Congratulations! With these two commands, you should have completed this lab. Read on for the cool part now…
Reading the MIB in Packet Tracer
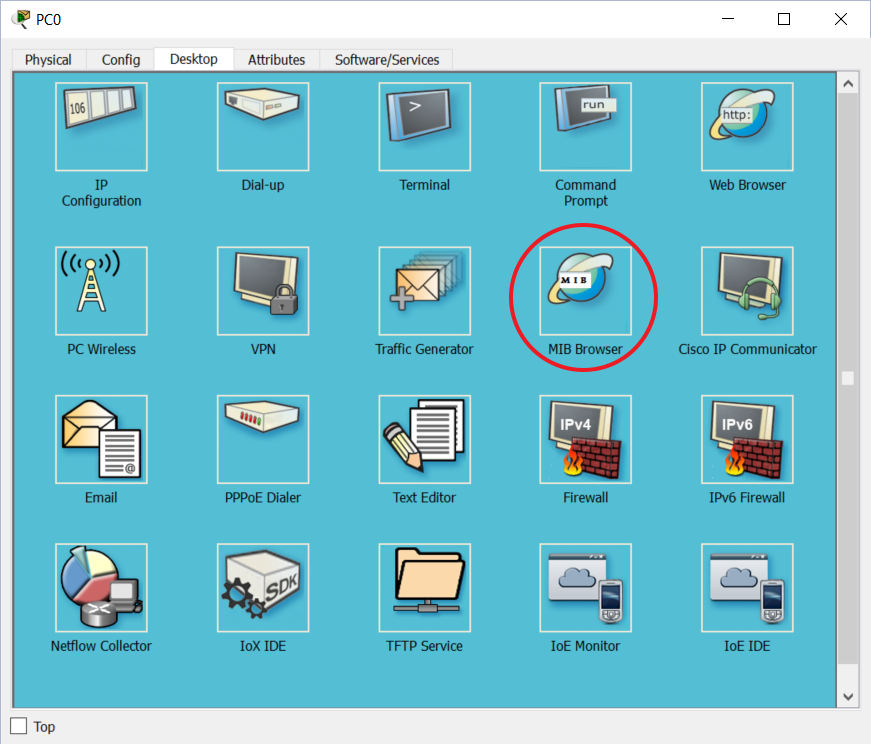
Why do we have a computer in the lab? You can guess it: we will use it to read the MIB of our devices. Open the computer and go to the Desktop Tab. From there, select “MIB browser” as in the picture.
Use the tree on the left to navigate between possible objects, then write in the “Address” field the target device. You will need to use the advanced settings to specify the community. Then click “get” to read the content.
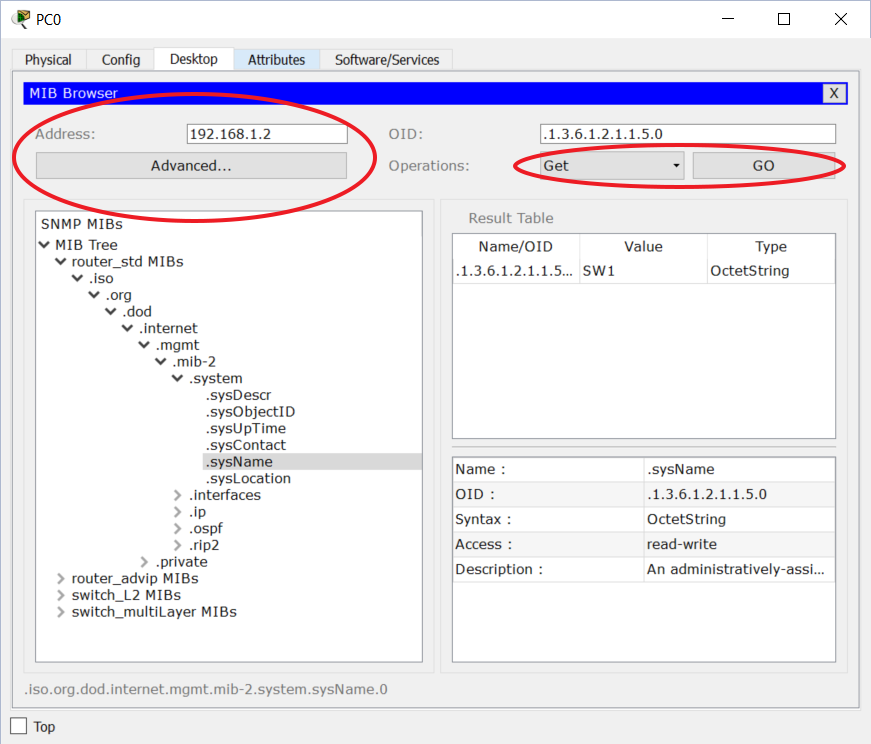
Now, I encourage you to explore the MIB and understand how things work. If you have a commercial NMS, you will need to upload the MIBs of your devices (you can download them from the Cisco website).
Conclusion
In this article, we covered SNMP, a beautiful protocol to manage a whole network remotely. For convenience, here we have a recap of everything you should take with you.
- SNMPv1 and v2 use plain-text authentication, they are not secure.
- SNMPv3 supports different levels of security: none, authentication, authentication, and encryption (AuthPriv). You want to use the last.
- Different SNMP version doesn’t talk with each other.
- Configure the community string on a Cisco device with
smp-server community <password> <ro|rw>. - Change the SNMP version with
snmp version.
With this knowledge, you are ready to automate the network and understand some other automation technologies like AAA and Programmability. Just continue with the CCNA course to discover them.

