
Companies use the network infrastructure to move information, even sensitive. As a result, they are subject to hackers to attack more often than you might think. Considering this, security becomes every day more important when creating a network. Cisco offers us a great tool to implement security at the data-link layer: Port Security. In this lab, we are going to learn what is port security, how it works, and how we can implement and troubleshoot it.
To benefit the most from this article, download the lab with the link below. Then, follow the article while completing the lab. Otherwise, just check out the explanation.

Once you downloaded it, open it with Cisco Packet Tracer and we are set to go.
Port Security Lab Intro
The Topology
Here’s a picture of the devices in our lab.
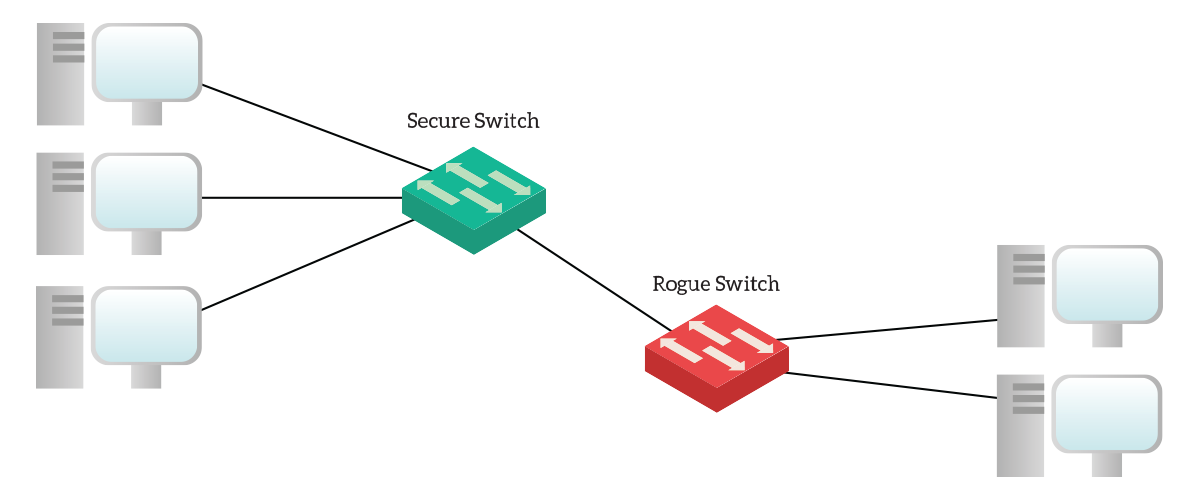
As you can see from the topology above, we are working with two switches and five computers. However, for the purpose of this lab, one switch is out of our control. This is the “RogueSwitch”, that might be a switch a user connected in order to have more ports on his desk. Obviously, this is something we don’t want, and we are going to block that with port-security.
All PCs have a correct IP address in the VLAN 1 subnet (10.192.168.1.0/24), but no default gateway. This is not needed since we are going to use only intra-VLAN communication. The following table reports the details about the IP address configuration.
| Device | Address |
|---|---|
| PC0 | 192.168.1.10 |
| PC1 | 192.168.1.11 |
| PC2 | 192.168.1.12 |
| PC3 | 192.168.1.13 |
| PC4 | 192.168.1.14 |
The Requirements
For this lab, we are going to implement Port Security in several flavors. Specifically, we are going to try four different configurations on four different ports. The only device we are going to configure is Switch, as follows.
- Configure Switch to allow a single device on each port
- In case multiple devices connect to FastEthernet 0/1, allow the first only
- In case multiple devices connect to FastEthernet 0/2, allow the first only and generate an alert
- If multiple devices connect either to FastEthernet 0/3 or 0/4, shut down the port and generate an alert
- Remember what device is connected to FastEthernet 0/1 through 0/3 and allow only that. Do not hardcode it manually.
From these requirements, you should be able to guess what port security is about. However, in the next section, we are going to explain all the details and theory you need. After that, we will start to put our hands on the gears.
All about Port Security
What is Port Security?
Port Security is an extremely simple yet powerful security tool present on Cisco switches. Here’s a formal definition:
Port Security is a technology that restrict access to the network based on source MAC address.
In other words, we are talking about a set of configuration commands you can apply only to access ports. With these commands, the switch is going to inspect the source MAC address on frames incoming on that port. You can configure how many different MAC address to expect, or even which ones. Furthermore, you can configure the behavior in case something is different from expected.
Port Security is not simply designed to control which devices can access the network. We all know that a hacker can change the MAC address of its PC. Instead, Port Security protects us from TCAM flooding directly, and from DHCP Starvation indirectly.
TCAM Flooding Protection
Cisco switches have a specific portion of memory called TCAM. This memory contains all the bindings between a switch interface and a MAC address. The thing is, this is space-limited: even if it can host several thousands of MAC addresses, it has an end. Once it is full, the switch won’t be able to remember those bindings. As a result, to avoid dropping traffic, the switch will act exactly as a hub. It will forward traffic out of all ports. The TCAM associates one or more MAC addresses to a physical port. Therefore, an attacker could generate fake frames with many different MAC addresses to exploit this vulnerability.
Besides creating instability, this exposes your data. Any traffic will be mirrored to all other ports, so the hacker can listen to everything on the network. Obviously, we want to prevent that. Port Security is designed to prevent TCAM flooding attacks, and it does it is very effective. Since you can control the number of devices allowed on each port, you can predict how many MAC addresses the TCAM will have to store.
DHCP Starvation Protection (side effect)
A DHCP server assigns IP addresses to end devices dynamically. To do that, it has a pool of IP addresses to fetch from. To avoid duplicates, it remembers any previous assignment, so that it assigns only free addresses. Once the DHCP server has no more addresses to assign, it just stops assigning them. An attacker may create multiple DHCP Requests in order to exploit this. This is DHCP Starvation.
DHCP Starvation alone creates outages, as clients won’t get IP addresses anymore. However, it is often used in conjunction with DHCP spoofing. Once the trusted server is KO with the starvation, an attacker can bring a rogue DHCP server into the network. Then, he can configure it to put itself as the default gateway. Therefore, all the traffic goes to the hacker, which may relay it to the correct destination. This way, users are unaware while the hacker is inspecting their traffic.
Port Security is not designed to protect against these attacks. Cisco offers you different tools, like DHCP snooping. However, since you can limit the device on a port, it will be hard for a hacker to starve your server.
Configuring Port Security
The Configuration Commands
When configuring Port Security, there are a few things to keep in mind. First of all, you can configure it only on access ports hardcoded with switchport mode access command. Then, you can use several commands to tune Port Security. While you are doing so, Port Security is still off. Once you finish, you will have to turn it on with a specific command. As a best practice, always do the tuning first, then turn it on. You can find in the following table all the commands, all given in the interface configuration prompt (config-if).
| Command | Description |
|---|---|
switchport port-security maximum N | Set to “N” the number of MAC address to accept on this port. Default is 1. |
switchport port-security mac-address XXXX.XXXX.XXXX | Hardcode one MAC address to the port. You can specify one or more MAC addresses, if so the switch will accept traffic only from them. Without this command,all MAC addresses are accepted unless they exceed the maximum. |
switchport port-security mac-address sticky | Write in the configuration the MAC addresses seen on the port, then allow only them. Not compatible with hardcoded MAC address. |
switchport port-security violation action | Specify what to do when a violation happens. Instead of action, we must write what the device should perform. We have three options. protect silently drops traffic from any exceeding MAC. restrict drops traffic from any exceeding MAC and generates an alert. shutdown (the default), blocks the port if a violation happens (and generates an alert). |
switchport port-security | Turns on Port Security. |
Configuring the “Protect” port
The first interface we are going to configure is FastEthernet 0/1. This is the port facing toward PC0, and we must configure it to allow a single MAC address. Furthermore, by requirements, don’t want to generate alerts in case of violation. However, we want the switch to learn and hardcode PC0’s MAC address. This is the step list we must follow.
- Force the port in access mode with
switchport mode access. - Set the maximum MAC addresses allowed to 1 with
switchport port-security maximum 1. This way, the port will consider “violation” if it sees more than two MAC addresses. - Configure the violation action to silent drop with
switchport port-security violation protect. As a result, the switch will drop all traffic sourced from any MAC address different from the first. However, while doing so, the switch does not raise alerts. - Turn on sticky MAC address with
switchport port-security mac-address sticky. This means that the switch will put in the configuration the first MAC address it receives. After that, it will accept traffic from this MAC address only (in this case just one, as from the maximum). Then, the administrator can check it and save the configuration. - Turn on Port Security with
switchport port-security.
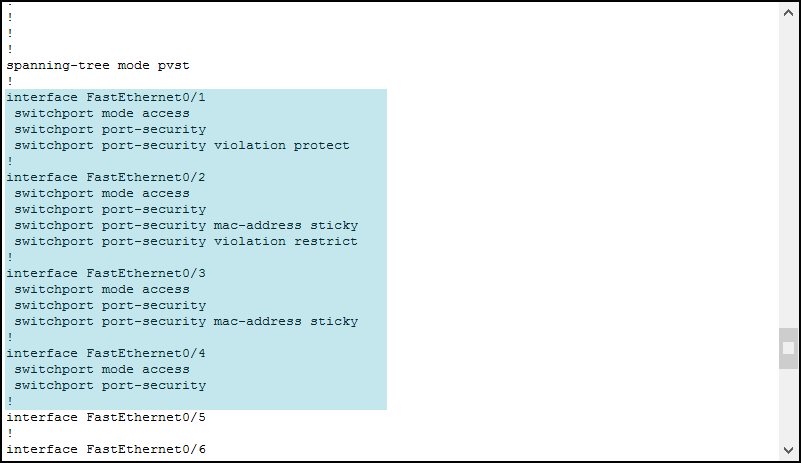
Below, a quick recap of what we typed.
Switch(config)#
Switch(config)#interface FastEthernet 0/1
Switch(config-if)#switchport mode access
Switch(config-if)#switchport port-security maximum 1
Switch(config-if)#switchport port-security violation protect
Switch(config-if)#switchport port-security mac-address sticky
Switch(config-if)#switchport port-security
Switch(config-if)#exit
Switch(config)#
This is a pretty good template. According to our requirements, we can apply this exact template to all other ports, changing only the violation action. In fact, this is what we are going to do in the next steps.
Configuring the “Restrict” port
Interface FastEthernet 0/2 faces PC1, and we need to configure it to generate alerts by requirements. However, two different violation actions generate alerts on the violation. We are talking about restrict and shutdown mode. The key difference is that shutdown generates an alert, then shut down the port. For this port, we only want alerts, so we are going to use restrict.
To configure the violation action to be restrict, use switchport port-security violation restrict command. We are going to see how the alerts look like in a minute, once we finished the configuration. To that, add all the commands from the template in the previous section (maximum, sticky MAC and so on). Once you finished, it is time to move to the shutdown method.
Configuring the “Shutdown” ports
Finally, we need to configure the two remaining interfaces. FastEthernet 0/3 and FastEthernet 0/4. As a requirement, both must shutdown in case of violation. This is the default behavior for Port Security. Therefore, we just enter the previous template and change the violation action to shutdown with switchport port-security violation shutdown.
Be aware, as a requirement, we only need sticky MAC addresses on FastEthernet 0/3, not on FastEthernet 0/4. At this point, we finished our configuration, but we need to do something more on sticky MAC addresses, otherwise, they won’t work.
Populating sticky MAC addresses
We should spend some time talking about sticky MAC addresses. Unlike hardcoded MAC addresses, here you don’t specify which MAC address to expect. Therefore, the switch must dynamically learn a MAC address. However, this is true for the first time only. After that, the switch must remember this MAC address (or these, in case they are a few), and accept traffic only from them.
The switch will learn many sticky MAC addresses as many specified in the maximum command.
As soon as the switch receives a packet, it will inspect it and learn the MAC address. In this process, the switch stores the MAC in the running configuration. This MAC address starts to be part of the configuration immediately but is not retained upon reboot. Therefore, you must log in to your switch and save the configuration.
Now, issue show running-config to check out the Port Security configuration. As you can see, there is no MAC address just yet.
To make the switch learn MAC addresses, we need to generate some traffic. Open PC0 desktop, then start the command prompt. From there, ping PC1 with ping 192.168.1.11. This way, the switch will learn PC0’s MAC address and PC1’s MAC address (from the response). After this ping, ping PC2 with ping 192.168.1.12. Then, check the configuration of the switch again.

Now, if we want, we can use write to save the configuration. At this point, the switch will retain these MAC addresses even after a reboot. For the configuration part, this is everything we need to know. Instead, we need to continue this lab with troubleshooting.
Troubleshooting Port Security
Generating a violation
As a network engineer, you must be able to deal with port security in all of its flavors. Therefore, you have to detect if a device is not working because it is exceeding the maximum threshold, or its MAC address is unknown. Furthermore, you must know how to check if an interface is shut down because of Port Security. To work on that, however, we need to generate a violation first.
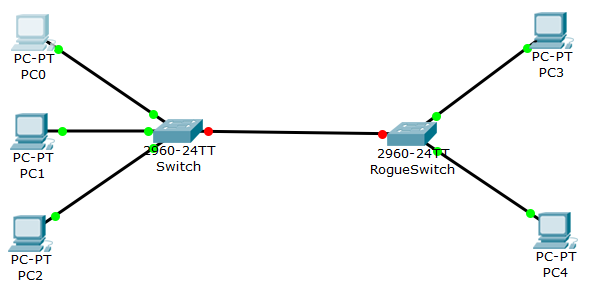
Imagine your network allow a single device on each port. A user, without informing you, attached a small 8-ports switch to connect both desktop PC and laptop. This is the Rogue Switch in our lab. We configured the port toward it (FastEthernet 0/4) with a maximum of one MAC address. All we need to do to trigger the violation is to make both PCs connected to that device generate traffic. We can do it by pinging PC3 (192.168.1.13) and PC4 (192.168.1.14) from PC1. As soon as you do, the interface will turn red. Note that if RogueSwitch generates traffic by itself, you might trigger a violation with a single ping.
Looking for the violation (and recovering)
Unlike Packet Tracer, in reality, we don’t have fancy red dots on the cables. We need to check the configuration. If we are on the switch when the violation happens, we will see a log message. This message is generated only with restrict and shutdown mode. However, we cannot assume to be already connected on all switches. We need to find a better way. Luckily, we can check the interface status with show interfaces command.

Err-disabled interfaces recover automatically every five minutes, and this is configurable. Note that Port Security is not the only reason for an interface to go in this state. The same interface will appear as simply “down/down” in show ip interfaces brief. However, if you want to check all interfaces in bulk you can use show interfaces status, but this command is not available in Packet Tracer.
The automatic recovery of err-disabled interfaces exists for a reason. Most of the time, our users to generate violations, not hackers. For example, many users may connect an extra switch in meeting rooms. Therefore, you want the interface to automatically recover after a while. This is not a real security issue, as the hacker does not have the time to complete the attack if he has to wait for the recovery.
However, you might want to manually recover an interface. To do that, simply turn it off and then on (shutdown, then no shutdown). Note that this does not disable Port Security, and another violation will shutdown the interface again (if the mode is shutdown).
Conclusion (and bonus tips)
In this article, we covered all the details you need to configure and troubleshoot Port Security. We used several commands, both for configuring and troubleshooting this powerful technology. Here’s a recap.
switchport port-securityturns on this feature on an interface- Tune the configuration with
switchport port-security maximum,switchport port-security mac-addressandswitchport port-security mac-address sticky - Define the violation with
switchport port-security violation:- Use
protectto drop silently - Choose
restrictto drop with an alert - Use
shutdownto block the port
- Use
- Verify and troubleshoot using
show interfacesandshow interfaces status - Manually recover with
shutdownandno shutdown, or wait for the timeout
Now, here’s a quick tip. From many questions that might arise about Port Security, this is quite common. What maximum value should I set? Well, dear reader, it depends. What is important is that you set it. Set it even at 50, but set it. This will save you from very dangerous attacks. If you already set it, then we can discuss a more realistic value. Personally, I would stick with the minimum needed. If you plan to connect a computer, use 1. Instead, if you plan to connect an IP phone and a computer, use 2.
Now that we know all the secrets, we are ready to pause with topic related to switching and start something a little bit more advanced: routing. In the next article in the CCNA course, we will introduce just that!


3 Responses
Great work Alessandro.
I appreciate what you have done here and I thank you. I will take the opportunity to point out that the lab is giving me an error message when I try to load it:
“We noticed an unrecoverable error in this file while loading Physical View Object. Please report this issue to … These errors may be fixed by deleting the corrupt item and recreating it.”
Best regards!
Hello Rafael, thank you for pointing this out, I’ll double check the lab. Do you have the same error on other labs from ictshore.com as well? Which version of Packet Tracer are you using?
Hello Alessandro, I too had the same issue as Rafael. I downloaded the lab, I opened it in Packet Tracer, but from that point forward it would not allow me to do anything. I could click on something, but nothing happened. I could see the topology with the red RogueSwitch, but I couldn’t get into the good switch to configure port security. I just went ahead and built it myself in Packet Tracer with the IP addresses provided. I downloaded the lab on two different machines and got the same response. Something is wrong with the lab. Thanks again for making this available, it is sooooo helpful!!!
Comments are closed.