
OSPF is a stable routing protocol, and we know it from this article. In fact, we have tons of reasons that motivate us to adopt it with IPv4. IPv6 makes no difference, we still want to use OSPF. While the configuration commands are slightly different, the concept is always the same. In this article, we are going to guide you through the new commands of this protocol. We are entering the world of what Cisco calls “OSPFv6”, or simply OSPF for IPv6.
This is a practice article, where we will see some configuration commands. The best way to remember is to try them on your own, this is why we created this lab. You can download it for free by using the link below.

Once you downloaded it, un-zip it and open it with Packet Tracer. You will be able to try the commands you learn in the lab, and this will help you mastering OSPFv6.
OSPFv6 Lab Intro
The topology
Look at the picture below, do you recognize the topology? If you are coming from the Free CCNA course, you will. This arrow-like topology is the same we used for traditional IPv4 OSPF. In this article, we are going to use it for OSPFv6.
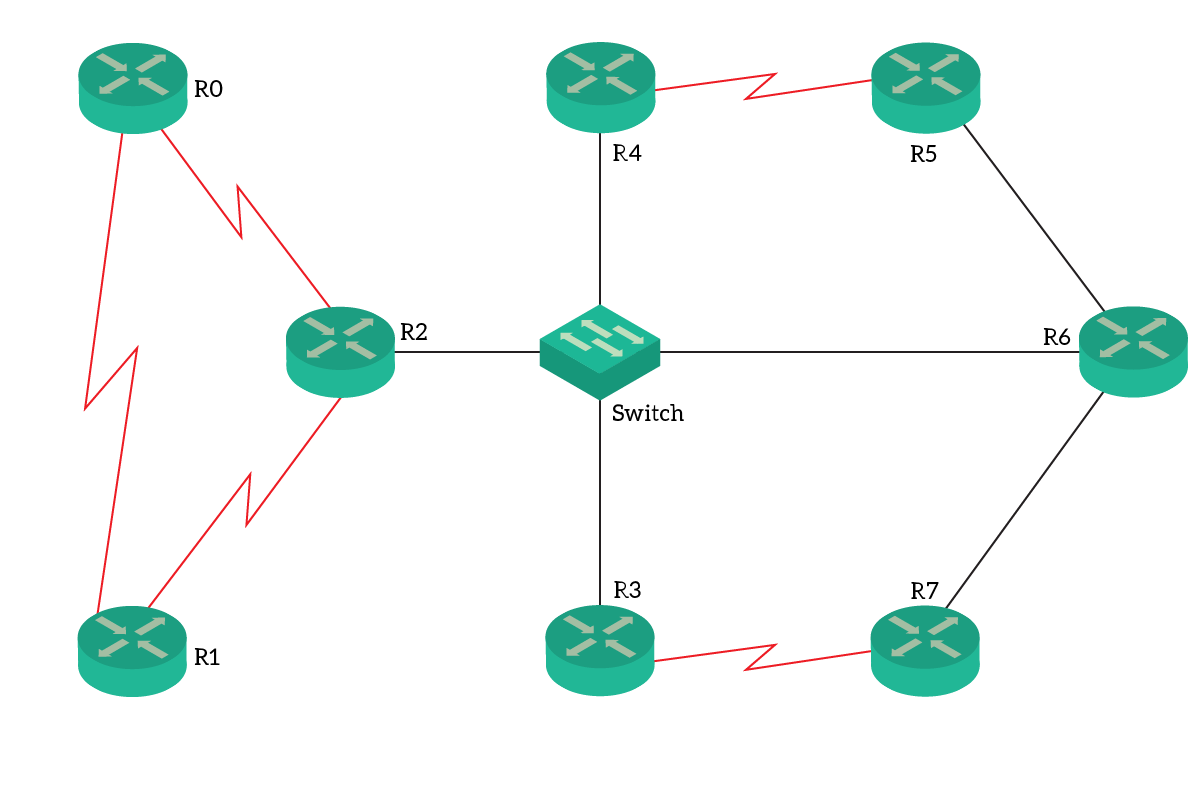
As you can see, we have 8 routers in total, going from 0 to 7. We connected four of them to a central switch, operating only in VLAN 1. Then, we added some ring-like connections between the other routers. The physical and Layer 2 topology is still the same as the previous article. What changes, though, is the whole addressing plan. We have completely removed all IPv4 addresses and replaced them with IPv6 ones.
This results in a cleaner and more predictable addressing plan. Each router has its interface ID set to its router number, except router 0. For example, router 1 will be ::1 on any network, router 2 ::2 and so on. Instead, Router 0 will be ::10. The subnet we are going to use are reported below.
| Link | Subnet |
|---|---|
| R0-R1 | 2001:db8:0:1::/64 |
| R0-R2 | 2001:db8:0:2::/64 |
| R1-R2 | 2001:db8:1:2::/64 |
| Broadcast (Switch) | 2001:db8:cafe::/64 |
| R3-R7 | 2001:db8:3:7::/64 |
| R4-R5 | 2001:db8:4:5::/64 |
| R5-R6 | 2001:db8:5:6::/64 |
| R6-R7 | 2001:db8:6:7::/64 |
The Requirements
Even if we moved to the newer protocol, requirements haven’t changed. In fact, we still want to use OSPF to reach convergence. We are still working at a CCNA-level, so all routers will go into Area 0 as they did for IPv4. And, we even want the same router IDs we had before. To refresh your mind, we want the router ID to be 1.0.0.0 plus the router number. Router 1 will be 1.0.0.1, router 4 will be router 1.0.0.4 and so on.
Configuring OSPFv6 (OSPF for IPv6)
Before we start…
Cisco offers two ways of configuring OSPF for IPv6. The simplest one is the one we are going to use in this article, the OSPFv6. In the CCNP certification, you will learn about a more sophisticated alternative: OSPFv3. Just know that both exist and that based on needs you may use one instead of the others. Since we have simplicity in our mind, we will go for OSPFv6.
Note that “OSPFv6” is not really the sixth version of OSPF. It doesn’t even exist such version. Instead, it is just an informal jargon we use, only for Cisco devices, to define the configuration done with ipv6 router ospf command. You’ll see in the next section what are we talking about.
The OSPFv6 Router
All routers come pre-configured with IPv6 addresses and with ipv6 unicast-routing enabled. If you want to do a set up from scratch, don’t forget that. Since we have our routers ready we will just skip that part.
The first thing we want to do, is to turn on OSPFv6 on the router. To do that, we use the ipv6 router ospf command, followed by the process ID. Just like in IPv4, the process ID is a locally significant number that identifies the OSPF instance. Therefore, it doesn’t need to match between routers. However, for scoring purposes, always set the ID to 1 during this lab.
At this point, you will enter the Router(config-rtr)# prompt. This indicates you are configuring an IPv6 routing protocol (rtr instead of router means just that). And, most likely, you will see another interesting thing. When you enter the prompt, the router will send you this warning.
%OSPFv3-4-NORTRID: OSPFv3 process 1 could not pick a router-id,please configure manuallyThis NORTID (No Router ID) warning indicates that the OSPFv6 process has no router ID. In fact, if we don’t define it manually, the router tries to create one from its IPv4 interfaces. The thing is, we have no IPv4 at all on this router, so it can’t automatically generate a router ID. So, until we configure a router ID manually, the OSPF process won’t start.
To configure the router ID, we just type router-id followed by the ID. If you are starting on router 0, then you will type router-id 1.0.0.0.
Adding networks
We remember from the previous article that having the OSPF process on doesn’t mean we are doing routing. In fact, we need to specify the networks for which we want to do routing. This is true also with IPv6 and OSPFv6, but the configuration paradigm is completely different. If you are still in the config-rtr prompt, type ? to see all the available commands. You won’t see any network command, because we don’t use that anymore.
With OSPFv6, we associate networks to the routing instance at the interface level. As a result, in the router configuration prompt, we will add only protocol-specific settings, like the router ID. Instead, we need to enter the interface configuration and associate the interface to a process ID.
To do that, we type ipv6 ospf area at the interface configuration level. Just look at the interfaces that have an IPv6 address (with show ipv6 interface brief) and add them to the binding.
Below, an example of the whole configuration on Router 0.
ipv6 router ospf 1
 router-id 1.0.0.0
 exit

interface Serial0/0/0
 ipv6 ospf 1 area 0
 exit

interface Serial0/0/1
 ipv6 ospf 1 area 0
 exit
The other routers
For other routers, we are going to apply the same principles and commands. The only things to change are the values (interface name and Router IDs). Because of that, you should be able to do all the configuration on your own. In case you struggle, we reported below all the remaining configuration.
This is for R1…
ipv6 router ospf 1
 router-id 1.0.0.1
 exit

interface Serial0/0/0
 ipv6 ospf 1 area 0
 exit

interface Serial0/0/1
 ipv6 ospf 1 area 0
 exit
Instead, this other is for R2 (note that it has three interfaces).
ipv6 router ospf 1
 router-id 1.0.0.2
 exit

interface Serial0/0/0
 ipv6 ospf 1 area 0
 exit

interface Serial0/0/1
 ipv6 ospf 1 area 0
 exit

interface GigabitEthernet0/0
 ipv6 ospf 1 area 0
 exit
Then we have R3…
ipv6 router ospf 1
 router-id 1.0.0.3
 exit

interface Serial0/0/0
 ipv6 ospf 1 area 0
 exit

interface GigabitEthernet0/0
 ipv6 ospf 1 area 0
 exit
Then R4…
ipv6 router ospf 1
 router-id 1.0.0.4
 exit

interface Serial0/0/0
 ipv6 ospf 1 area 0
 exit

interface GigabitEthernet0/0
 ipv6 ospf 1 area 0
exitR5…
ipv6 router ospf 1
 router-id 1.0.0.5
 exit

interface Serial0/0/0
 ipv6 ospf 1 area 0
 exit

interface GigabitEthernet0/1
 ipv6 ospf 1 area 0
 exit
And this is the configuration of R6, which has three interfaces too…
ipv6 router ospf 1
 router-id 1.0.0.6
 exit

interface GigabitEthernet0/0
 ipv6 ospf 1 area 0
 exit

interface GigabitEthernet0/1
 ipv6 ospf 1 area 0
 exit

interface GigabitEthernet0/2
 ipv6 ospf 1 area 0
 exit
And, in the end, we have R7 which is a lot like R5.
ipv6 router ospf 1
 router-id 1.0.0.7
 exit

interface Serial0/0/0
 ipv6 ospf 1 area 0
 exit

interface GigabitEthernet0/0
 ipv6 ospf 1 area 0
 exit
Congratulations, You have now mastered the configuration of OSPFv6!
Troubleshooting OSPFv6
Even if useful, configuration alone is worthless. In fact, sometimes we just type the wrong letter or number, or we just forgot about a device or customization. In these cases, you need to find your way to the truth. If you know the right tools, troubleshooting will be easier than you might think. In this section, we will just give you these tools.
Verifying the LSDB
To verify the Link State Database with OSPFv6, we have our old but gold show ipv6 ospf database. This command is identical to our IPv4 counterpart, we only need to add “v6” after “ip”.
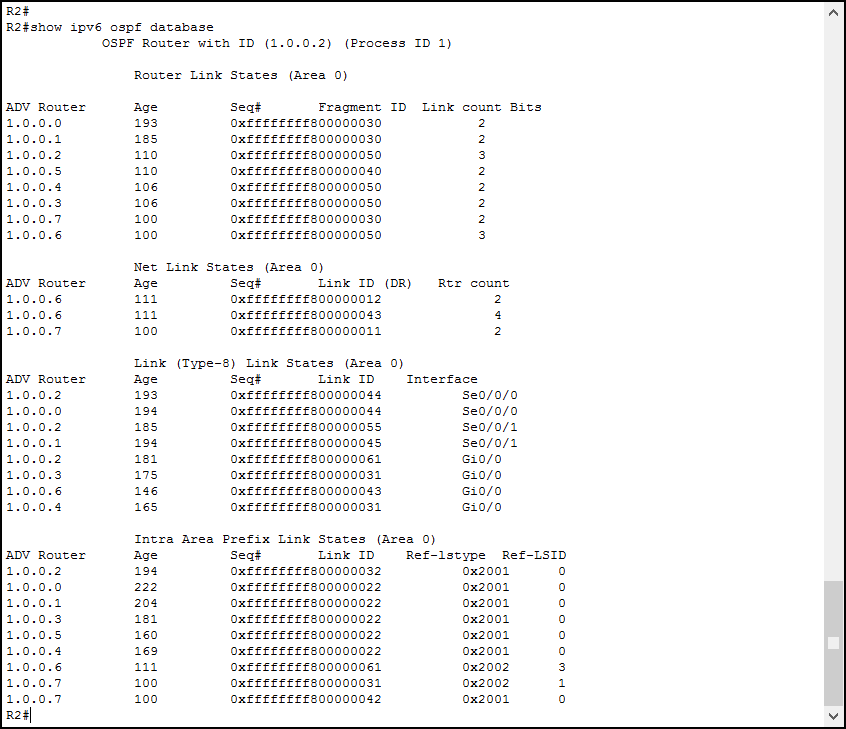
Just like we did for IPv4, we need to focus on the Router advertisements and on the Net advertisements. These two are the top two tables shown in the output. Since this command shows the entire LSDB, you can use it to see if a route that didn’t make it to the routing table is there. If you see a network with this command, but not in the routing table, maybe another protocol has a better route to it.
Troubleshooting Adjacencies
At the CCNA level, we use single-area OSPF. Furthermore, we are not working with complex concepts like redistribution or route filtering. So, once the routers join the OSPF domain, they are most likely to propagate routes. Where we can encounter problems, instead, are the adjacencies. It is a common problem to see two routers not talking with each other. To easily identify if we have that problem, we can use the show ipv6 ospf neighbor command.
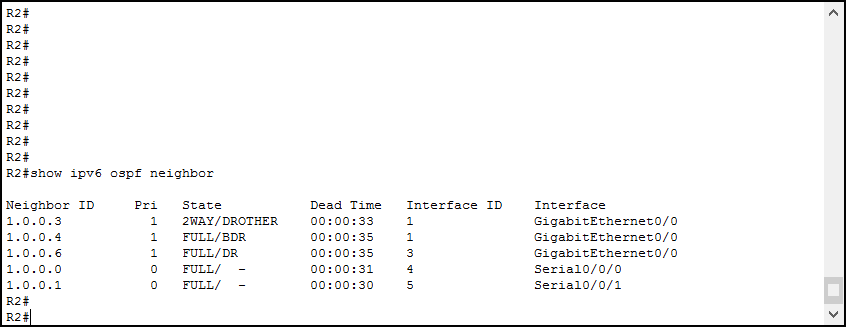
Even this command is identical to its IPv4 version. It shows the Router ID of the neighbor, the priority, and the state. Then, exactly like in IPv4, it adds the dead time and the interface. States are exactly the same, and we want to see the FULL state with everyone except on the broadcast segment. On them, instead, we expect to see a full adjacency with the DR, one with the BDR and many other 2-Way with the DROTHER routers. In case you don’t see the adjacency with the DR, check if the local router is the DR before panic. A router won’t have an adjacency with itself!
Conclusion
With this article, we configured an entire topology with OSPF for IPv6. This concludes our CCNA journey in the world of OSPF: we started with theory, then faced the IPv4 and IPv6 configuration. Using the knowledge you gained from this article, you are now able to deploy a mid-size routing domain on your own. Since the commands are basically identical to the ones of IPv4, we can report the same key concepts.
- Use
ipv6 router ospfto create an OSPFv6 instance - Define the router ID with
router-idunder theconfig-rtrprompt, this is mandatory if the router has no IPv4 address at all - To associate an interface to the OSPF instance, under the interface configuration type
ipv6 ospf area - Troubleshoot with
show ipv6 ospf databaseandshow ipv6 ospf neighbor
With this very knowledge, you have now the tools to understand complex routing. In the following articles, we are going to introduce another routing masterpiece: EIGRP. You will be able to compare it to OSPF, and soon assess and select a routing protocol over another.


2 Responses
Hi, I would like to know which version of packet tracer did you use for this lab (OSPFv6 Lab Intro)
Hello, everything has been made in Packet Tracer 7.
Comments are closed.