In the previous article of the CCNA Course series, we talked about IPv4 addressing. We know how IP addresses work, and we know that if a device has an IP address instead of another is probably because someone decided that. In this article, we will talk about subnetting with IPv4, the networking discipline that defines the size of subnets, how many hosts they can support, and how they should be positioned in the global network. After this article, you will be ready to prepare your own IP addressing plan for your own network. So, let’s get started to dive into IPv4 subnetting.
Netmasks and CIDRs
We already know from the previous article about IPv4 that the classful addressing scheme is now considered legacy and that it has been replaced by classless addressing, which relies on subnet masks. A subnet mask, known also as netmask, is just a series of ones and zeroes that defines where the Network ID portion of the related IP addresses ends in favor of the Host ID portion. To be even more specific, the netmask is 32-bits long just as the IP address, and it always comes with a related IP address. If you overlay that IP address with the subnet mask, the Network ID portion correspond to the 1 portion of the subnet mask, while the Host ID portion corresponds to the 0 portion.
To represent a subnet mask, we generally use the same dotted notation as the IP address, but this does not only take time to write, it is also hard to read (you have to skim on 4 bits of IP address plus 4 bytes of netmasks). Since the netmask is just a series of 1 followed by a series of 0, couldn’t be easier to just tell how many ones we have in the subnet mask? Fortunately, to represent the combination of IP address plus subnet mask in a more human-readable fashion, we have the CIDR notation. CIDR stands for Classless Inter-Domain Routing, and with this notation, we do not represent the subnet mask with the dotted notation, but we simply say how many 1s are contained in it. Then, we put that just after the IP address, with a slash making the division. This is why that system is also known as “slash notation”.
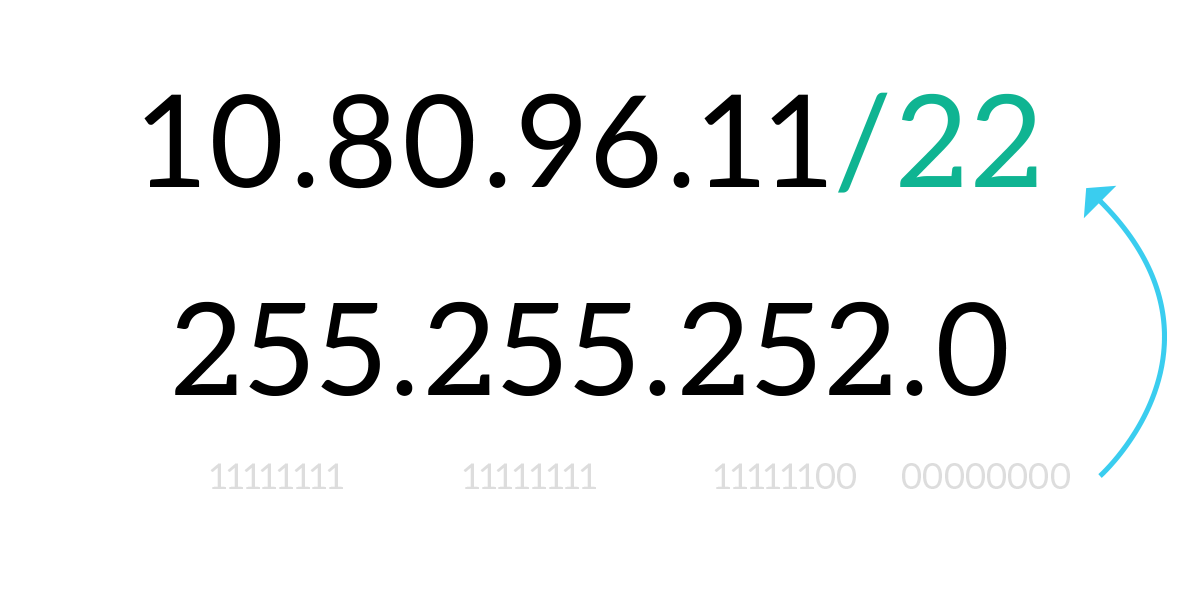
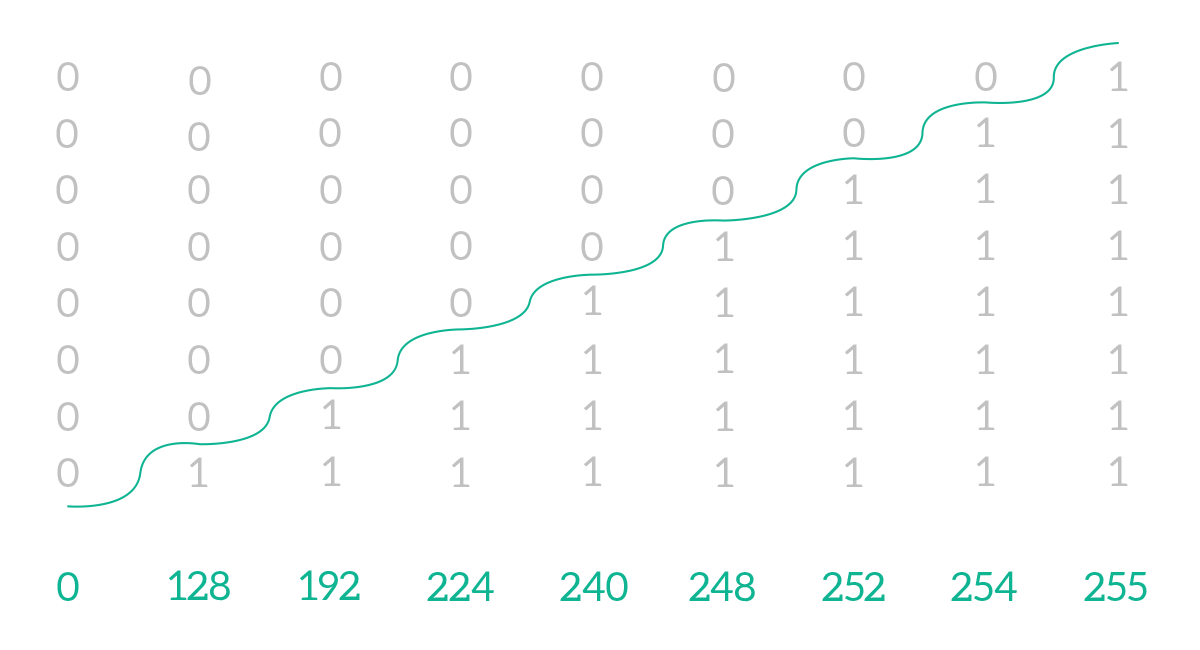
The CIDR notation is possible because the ones in a subnet mask are always consecutive, so you can just count them: you will never have a 1 after a 0 in a subnet mask. Because of that rule, each byte of a subnet mask can have only some specific values, and not all 256 possible values (from 0 to 255) a byte can normally have. For example, the decimal number 93 is written in binary as 0101 1101, which contains ones after zeros, so it won’t be allowed in a subnet mask. Instead, in a subnet mask, we can have from 0 to 8 ones consecutively, bringing to the table nine different possible values: 0, 128, 192, 224, 248, 252, 254, and 255. The following image explains just that.
Now that we know this different (and faster) way to represent subnet masks, before going deeper into subnetting it is time to understand what is its purpose. All in all, subnetting allows us to optimize the size of our network, reducing the size of the broadcast domain to really fit the dimension of our network. Basically, you start with the idea “I have to connect a certain number of devices together”, and then with subnetting, you define how they should be logically grouped. You define their address space: remember that the member of the group (the device) is called host, while the group itself is the subnet.
With subnetting, you actually perform that logical grouping, and you are going to do that in order to create a specific number of groups or a group that can contain a specific number of devices (or you will even have both these requirements at the same time). Nevertheless, remember that the member of the group is called host, and it is just a network device, while the group of devices is the subnet itself. In the next section, we will start presenting you with some practical skills for subnetting, and then we will see how to satisfy the first requirement.
From host to subnet
Before explaining how to create the right subnet or subnets, it is mandatory to understand how to retrieve the subnet your computer is part of given the IP address and the subnet mask. Fortunately, that’s pretty easy. Let’s say we know the IP address and the CIDR notation, the first thing we have to do is to write down the subnet mask in dotted notation. Then, we have to convert both the IP address and the subnet mask in binary notation. Now it comes the fun part, we write them (in binary) one above the other as in a mathematical operation, and then we perform the bitwise AND operation, writing down the result. Just to refresh your memory, 1 AND 0 = 0, 0 AND 1 = 0, 0 AND 0 = 0, 1 AND 1 = 1. In case you need some more help with binary math, check out our introductory binary math article.
Once we have obtained a binary result, we can convert it back to dotted notation and we will have the subnet address, which is a special IP address indicating the subnet itself rather than a host.
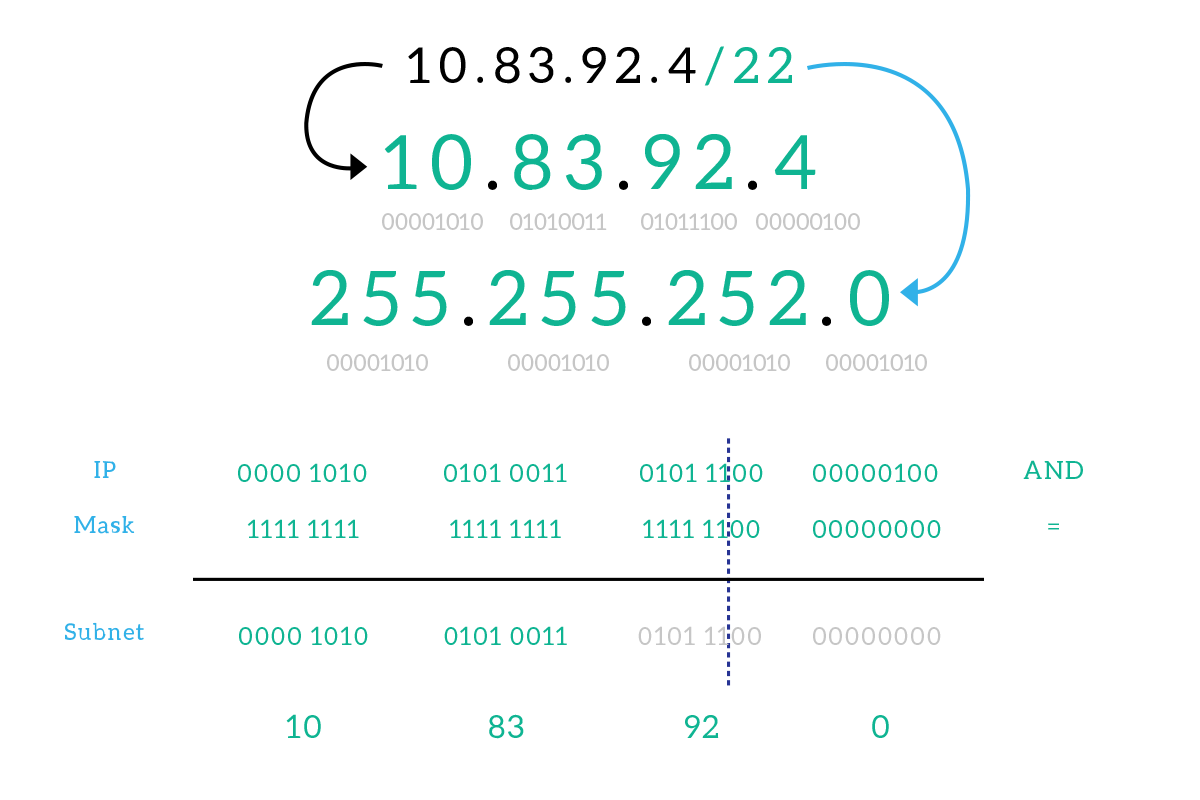
Now, here’s a quick tip. As you can see from the image, there is a blue dashed line in the binary operation that divides all the numbers into two parts. We placed that line there because this is the place where the consecutive ones in the subnet mask end: if you look at the result (always binary) you will see that before the blue line it is identical to the IP address, and after the line, it is just zeros. That’s the nature of the AND operation, so you can just know how many ones are contained into the subnet mask, place a virtual division there and just write the IP address as is up to that line, then fill the rest with zeroes. This will save you a lot of time, specifically with masks that correspond to the division between two bytes (on the dot of the dotted notation: /8, /16 and /24), because you can write down the IP address as-is up to the dot, and then write 0 for the bytes after the dot. Remember that, it will be very useful to create subnets, as the next section explains.
Creating subnets
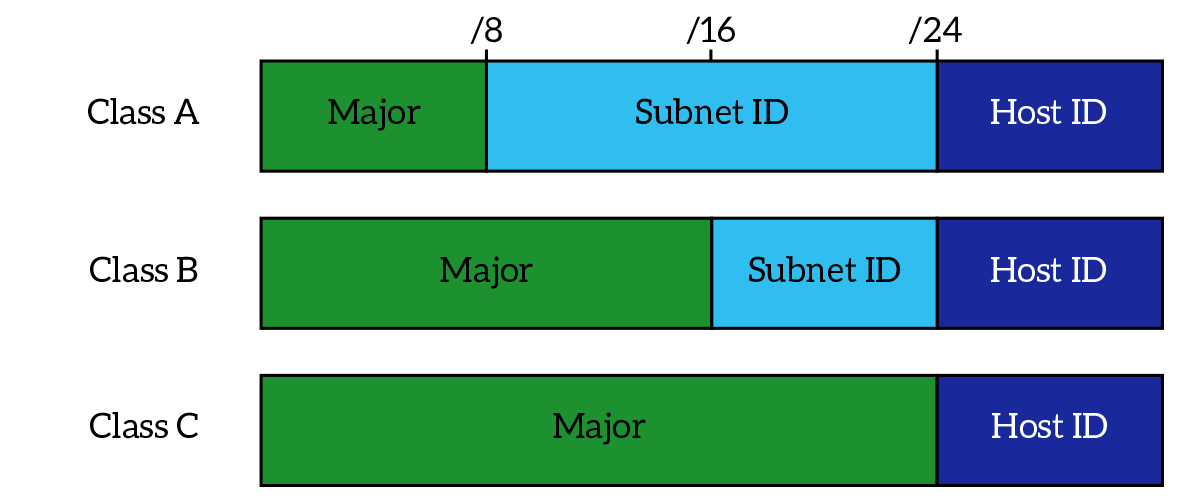
Before we can create subnets, we have to truly know what’s inside an IP address. When working with custom subnets, an IP address is made of three different parts: the Major, the Subnet ID, and the Host ID. These are just a logical way to divide the bits inside the IP address, but they are important because they identify the role of the bits in the IP address.
Starting from the first bit in the IP address, we have the Major identifier, which is the portion of the IP address that comes from the major network and that cannot be modified with subnetting. In other words, you are given a classful network, and you can create sub-networks (do subnetting) from it, but you cannot modify the major. Imagine you have to renovate the interior of a house: you can use the inside space to create rooms the size you want them, but in this case, you cannot modify the perimeter nor the volume of the house. In that case, the major network can be compared to the house volume that you cannot modify. The size of this portion varies depending on the class of the original network (A, B, C).
Then, we have the Subnet ID field. This field identifies the subnet between all the subnets you create from the major (if converted to integer), and its length varies according to your needs: you are the one deciding how long this field should be. A bigger subnet ID field will steal space from the host ID portion, and vice versa. The bigger the subnet ID field, the more subnets you can create.
Finally, we have the Host ID field. The value of that field identifies the host within a subnet. The size of this field is your choice but remember (as said above) that if you want a bigger Host ID field you will have to sacrifice some space from the Subnet ID. The bigger the Host ID, the more hosts you can have in the subnet (so in the same group). It is worth mentioning that an address that has all zero in the Host ID field is a subnet address (it identifies the subnet), and an address that has all ones in the Host ID field is the directed broadcast address for that subnet (don’t remember what a directed broadcast is? Our IPv4 addressing article will clarify you that). Both subnet address and directed broadcast address cannot be assigned to a host.
Now, the major portion is not always a classful network. Instead, it is just the mother-network that you are going to divide into smaller sub-networks. It is the space you are given, and that you have to use carefully to satisfy your requirements. Now that we know that, we can say that subnetting is the process of sizing the Subnet ID and Host ID portions in order to create a certain number of subnets that can contain a certain number of hosts each.
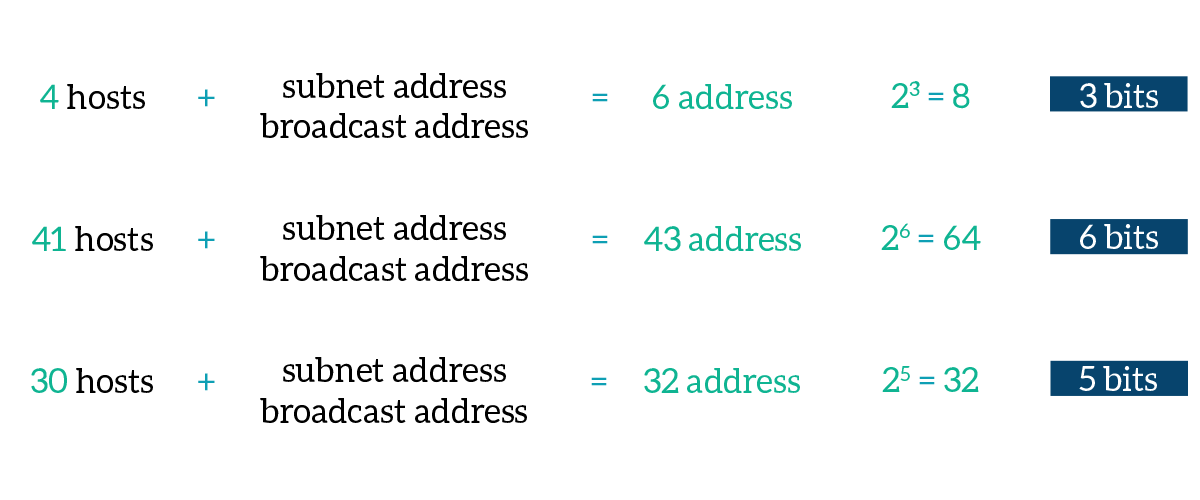
So, let’s start with the easy part: creating subnets that can contain a specific number of hosts. If that’s what you have to do, then you have to carefully size the Host ID portion of your network. As a requirement, you will be told how many devices are going to be connected to that subnet, and that’s the only thing you need to do your job. Generally, your requirement is the number of devices that are going to be connected, not the number of addresses. It may seem the same, but it’s not. Remember that you have to count the subnet address and the directed broadcast address, that cannot be assigned to any device. Therefore, the number of addresses needed will be the number of hosts, plus two. Obtained the number of addresses, you need to find out which is the power of two that results in a number equal to or greater than that number of addresses. Then, that power is going to be how many bits are needed in the Host ID field, the Subnet ID will take the remaining space. Take a look at the following examples to clarify this concept.
The concept is identical when you want to create a specific number of subnets and you do not care about the number of hosts contained in each. In this case, you see how many subnets you want and you find the power of two that is equal or greater than the number of subnets you want, and then that number is the number of bits you are going to have in your Subnet ID field. To move to the next subnet, you just increase the value (not the size) of your Subnet ID field.
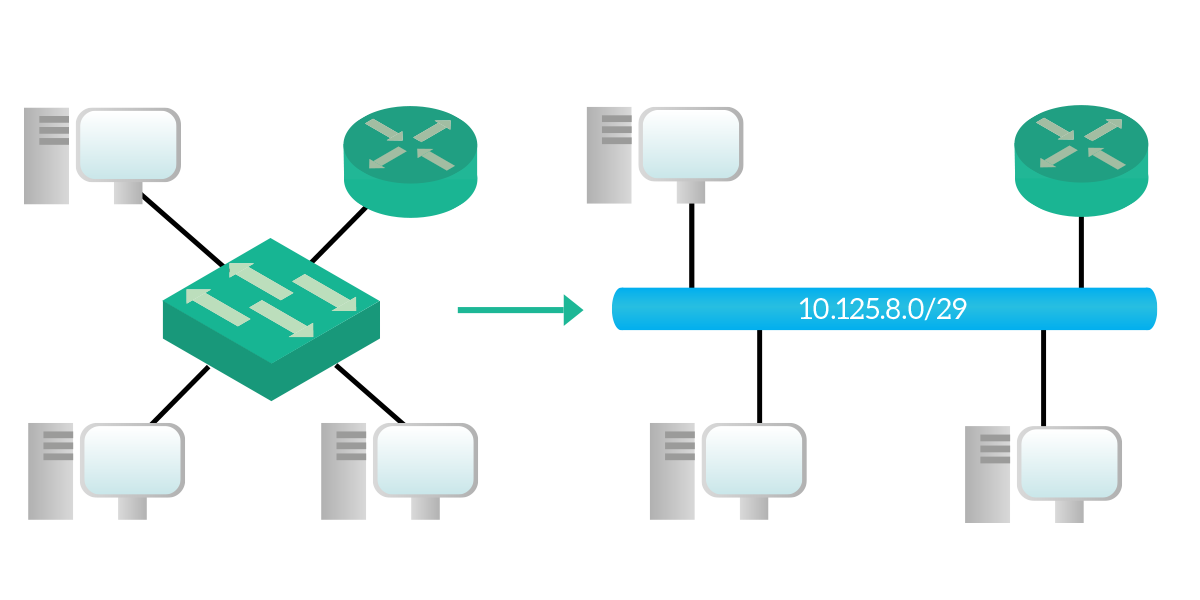
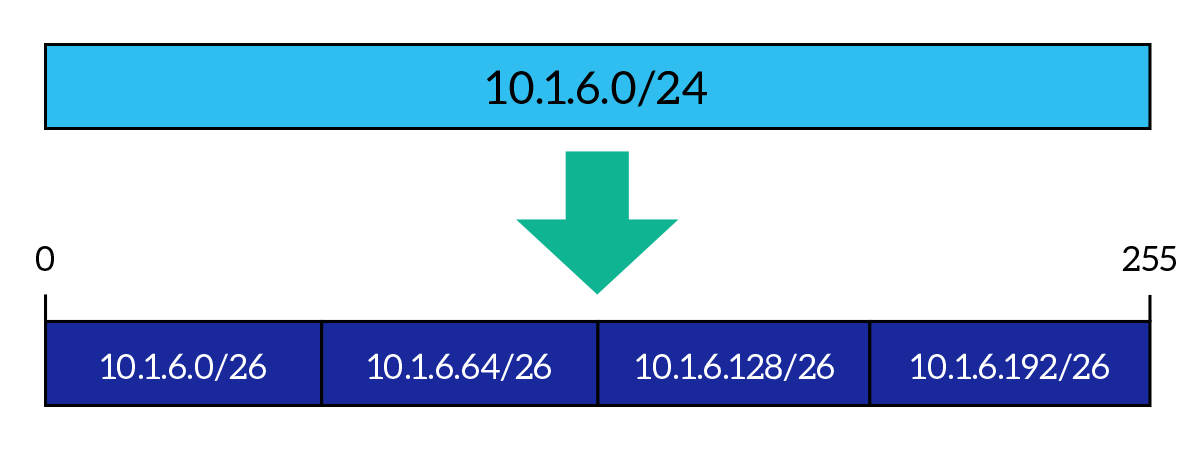
For example, if you need to create four different subnets from a /24 major, they are going to have a /26 subnet mask, because 24 bits – 26 bits results in 2 bits, and 22 = 4, having the number of subnets you needed. The subnet ID is just after the major field, so it will occupy (in this case), the two higher bits of the last octet (byte). So, the first subnet will have 0 in the last byte, then the second will have 64 (the last bit of the subnet ID went from 0 to 1, subnet ID value is 01), then 128 (subnet ID is 10) and then 192 (subnet ID is 11). Dividing a major network into subnets of the same size (each with the same subnet mask and containing the same number of hosts) is called Fixed-Length Subnet Masking (FLSM), because you create several subnets and all with the same subnet mask, as in the picture below.
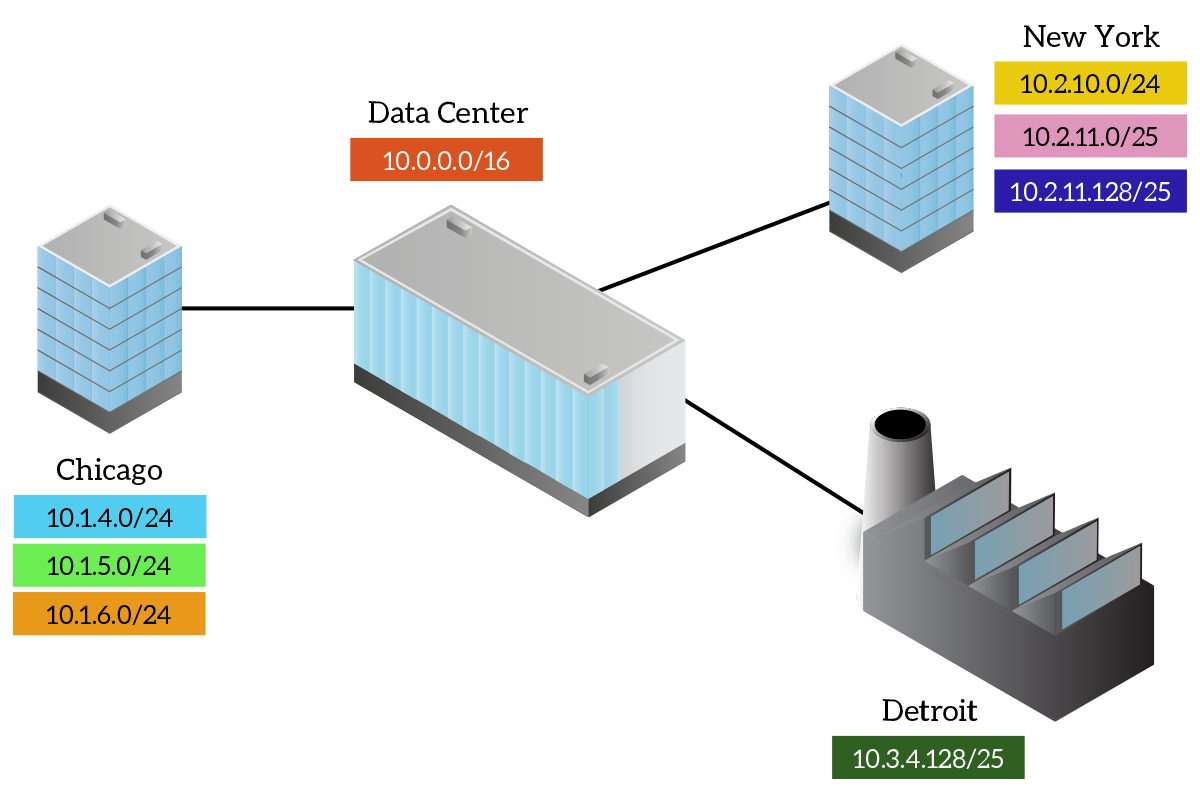
FLSM poses serious limits to the flexibility of the network design because all subnets have to be the same size. Certainly, it is simple, always because subnets have to be the same size: you know that the Subnet ID field is of a specific size, so you can easily increment it to switch to the next subnet. But as in the picture below, we don’t really need all networks to be of the same size. Instead, there are places where we need many hosts but a few subnets and other places where many subnets are needed, but not so many hosts. For example, in an Enterprise environment, bigger buildings will have more employees and will require more hosts, while buildings with few users (such as plants) will require fewer addresses. The data center (the place where you have all the servers), instead, may contain tons of hosts, but also tons of subnets, depending on its design. The modern world requires flexibility, and FLSM cannot provide it. This is why we actually use Variable-Length Subnet Masking (VLSM), the key topic of the next section.
Variable-Length Subnet Masking
All the subnets used in an Enterprise creates the addressing plan for that Enterprise. This is just what the name says, it defines where are located the subnets within the company, what are these subnets, and how big they are. To do a great addressing plan, the use of VLSM is mandatory. With it, you will be able to satisfy all the requirements in the best possible way. As we already know, VLSM allows you to create subnets of different sizes from the same major network, but in doing so you have to be very careful. Here’s a working example.
At first glance, it may seem very trivial: you put a /25 network, then two /27, and so on, but it’s not. For example, you cannot put a /25 network after a /27 network, at least not in any case. This is because subnets of a certain size can start only at specific bits: the root cause for that is in the anatomy of the subnet mask, which can have only consecutive ones. The specific bits where a subnet can start are the ones coming from FLSM, so it may be extremely useful to create some guidelines: you know you are going to need subnets of specific sizes, so you do FLSM of your major for each of these different sizes, but instead of reserving the address space, you just write down something like a milestone, a checkpoint. Then, you can do VLSM visually, knowing that a subnet of a certain size can start only in its checkpoints on the guideline.

It may seem a little bit complex for the first time, but with the practice, it will come naturally to you. You will start to remember where the checkpoints are and you will be able to do subnetting all in your mind. However, just to help you to swallow these concepts, we prepared two examples of VLSM: the first one is wrong and the second one is OK. Let’s start with the wrong one.
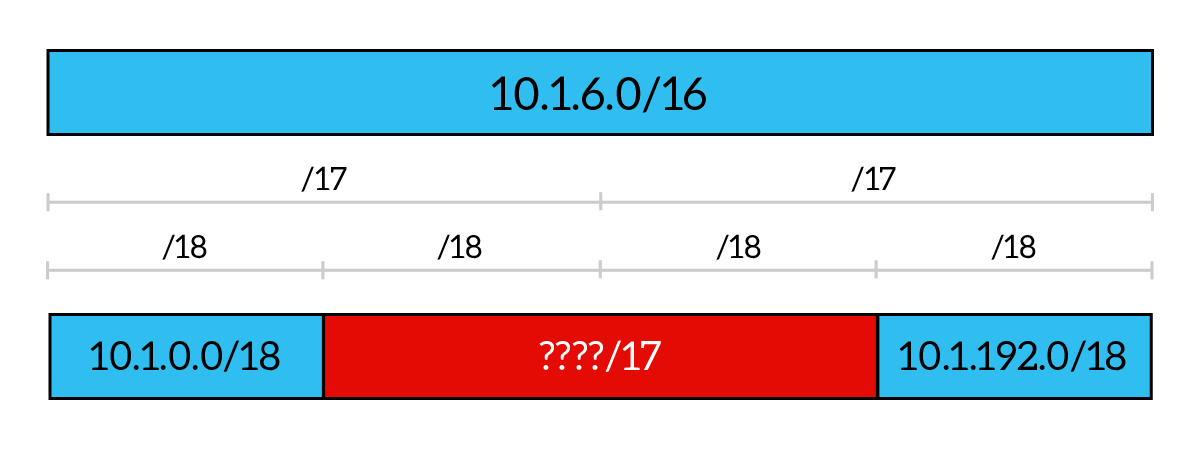
Below, we start from 10.1.0.0/16 major network and our task is to create a /18 network for some servers in the Data Center. Simple task, we just use the first portion of our network to create the 10.1.0.0/18 subnet, and up to this everything is ok. Later on, our boss asks us to create more subnets: a /17 and a /18. If we try to do that in this order, we won’t be able to do it, because the /17 network cannot just start after the 10.1.0.0/18 we created. If we try to create something like 10.1.64.0/17 we will do something terribly wrong, because if we put the bitwise AND between the IP address and the subnet mask (255.255.128.0) we will obtain 10.1.0.0/17, we are using the host ID portion! As you can see, there is no checkpoint on the /17 line in the position where we are trying to create these subnet. Creating the other /18 subnet and then this /17 subnet will work instead.
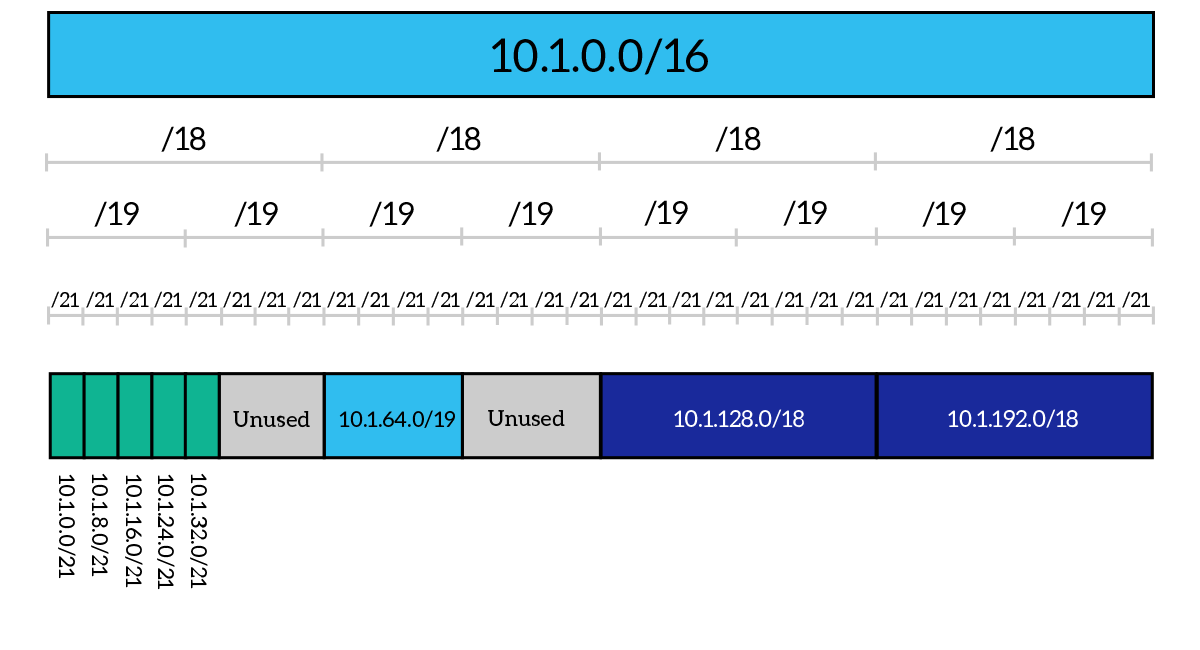
Now, for the sake of your eyes, it’s time for an example of VLSM done the right way. In this case, we start from the 10.1.0.0/16 major network as before, but we are told to create five subnets with 2,048 addresses each. We start that from the very beginning of the major network, creating the subnets 10.1.0.0/21 through 10.1.32.0/21. Then, a few months later, our boss walks in the door to ask us for a new /19 subnet. The problem is, we cannot put it just after the last subnet we created. So, we have to leave some addressing space unused to reach the next checkpoint on the /19 line: here we can place our new subnet, which is 10.1.64.0/19. After some time passes, we are told to create two new /18 subnets, and this time we still have to leave some unused space to get on the next available checkpoint on the /18 line. We will be able to use unused space later, for smaller subnets.
Quick tips for subnetting like a pro
Subnetting is complex and crucial at the same time. Particularly the first times you do it, subnetting can take a lot of time. So, this section contains some useful tricks to do that much quicker, looking like a true expert.
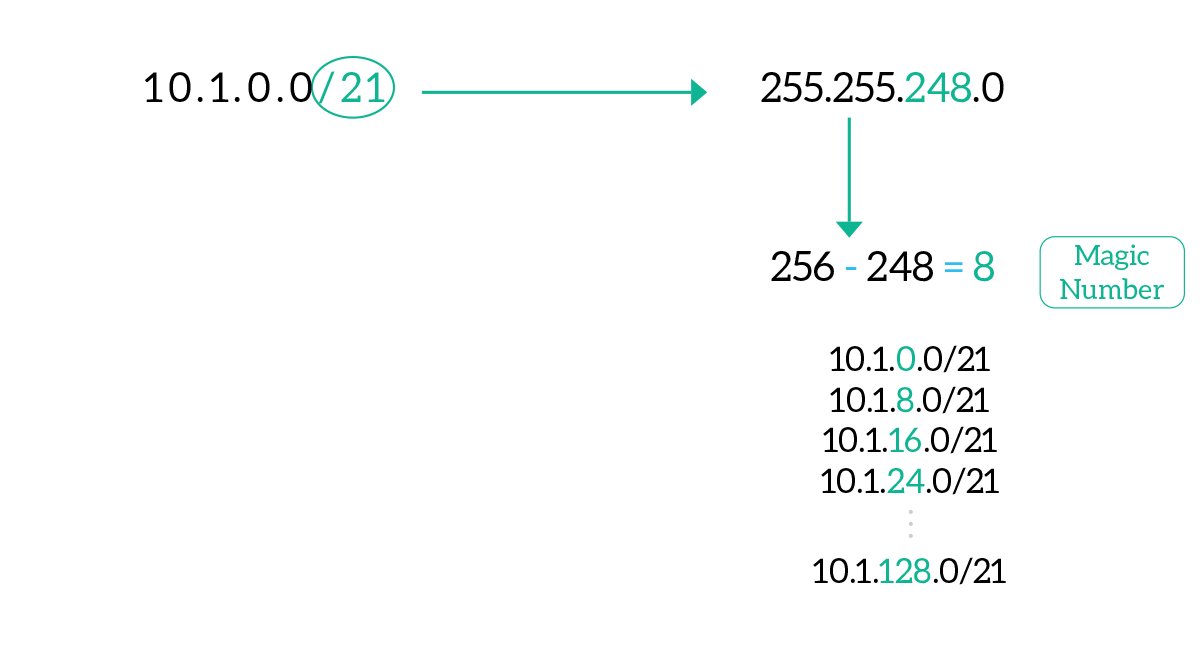
One of the most useful tools you can use to do subnetting faster is the magic number. It is the number in the IP address (in dotted notation) that changes between two consecutive subnets of the same size. It is extremely useful when you have to create several contiguous subnets with the same subnet mask: this way you can get all the subnet addresses without doing all the binary math every time. To obtain the magic number, get the IP address and the CIDR, then obtain the subnet mask in dotted notation. From that, find the octet (byte) which is neither 255 nor 0. This byte is going to be the interesting octet. This is where the number is going to change between a subnet and the other (the third byte in the subnet means that the interesting octet is the third byte of the IP address). To obtain the magic number, we take the value of the interesting octet in the subnet mask and we subtract it from 256, as in the picture. This is the magic number, and you will have to add that value to the interesting octet in the subnet address to get the subnet address of the next subnet, as in the picture below.
If you are working a lot with VLSM, here’s a golden rule: you can always create a subnet of a size equal or smaller than the previous one and attach it just after it. Maybe this is not always possible, depending on the requirements you are asked to satisfy, but as a general rule remember to start doing VLSM from the bigger subnets (the ones containing more hosts) to smaller ones.
And if you really cannot stand doing subnetting all in your mind, you can use the following table that contains all the information you need for each subnet/CIDR. The bold lines indicates where there the subnet is placed on the boundary between two octets in the IP address.
| CIDR | Mask | Host ID Bits | Addresses | Hosts |
|---|---|---|---|---|
| /8 | 255.0.0.0 | 24 | 16,777,216 | 16,777,214 |
| /9 | 255.128.0.0 | 23 | 8,388,608 | 8,388,606 |
| /10 | 255.192.0.0 | 22 | 4,194,304 | 4,194,302 |
| /11 | 255.224.0.0 | 21 | 2,097,152 | 2,097,150 |
| /12 | 255.240.0.0 | 20 | 1,048,576 | 1,048,574 |
| /13 | 255.248.0.0 | 19 | 524,288 | 524,286 |
| /14 | 255.252.0.0 | 18 | 262,144 | 262,142 |
| /15 | 255.254.0.0 | 17 | 131,072 | 131,070 |
| /16 | 255.255.0.0 | 16 | 65,536 | 65,534 |
| /17 | 255.255.128.0 | 15 | 32,768 | 32,766 |
| /18 | 255.255.192.0 | 14 | 16,384 | 16,382 |
| /19 | 255.255.224.0 | 13 | 8,192 | 8,190 |
| /20 | 255.255.240.0 | 12 | 4,096 | 4,094 |
| /21 | 255.255.248.0 | 11 | 2,048 | 2,046 |
| /22 | 255.255.252.0 | 10 | 1,024 | 1,022 |
| /23 | 255.255.254.0 | 9 | 512 | 510 |
| /24 | 255.255.255.0 | 8 | 256 | 254 |
| /25 | 255.255.255.128 | 7 | 128 | 126 |
| /26 | 255.255.255.192 | 6 | 64 | 62 |
| /27 | 255.255.255.224 | 5 | 32 | 30 |
| /28 | 255.255.255.240 | 3 | 16 | 14 |
| /29 | 255.255.255.248 | 2 | 8 | 6 |
| /30 | 255.255.255.252 | 2 | 4 | 2 |
| /31 | 255.255.255.254 | 1 | 2 | 2 |
| /32 | 255.255.255.255 | 0 | 1 | 1 |
Note that network masks /31 and /32 have special uses, with /31 almost not used. You should take some time to read the table and try to remember everything from /16 to /32, because these are the ones you are going to use most of the time.
Private and public IP addresses
Now that we know subnetting, it’s time to have a deeper look at IP addresses. Until now, we knew just that IP addresses exist, however with IPv4 they can be categorized into public and private addresses. Public addresses – the majority of them – are addresses known on the Internet, they are assigned from the Regional Internet Registries (RIRs), that receive them from the Internet Assigned Numbers Authority (IANA).
Private addresses, instead, are managed internally inside enterprises and they are not publicly known over the Internet. An enterprise will use these addresses for the inside traffic, and another enterprise will use the same addresses for its inside traffic, without conflict because they are significant only inside the single enterprise and they are never seen on the Internet. A mechanism called Network Address Translation (NAT) is used to map public addresses to private addresses, we will see it later in the CCNA course. The private IPv4 addresses available are listed in the following table.
| Subnet | Class | Use |
|---|---|---|
10.0.0.0/8 | Class A | Mainly used in enterprises. |
172.16.0.0/12 | 16 contiguous class B | Rarely used in enterprises (sometimes device management use). |
192.168.0.0/16 | 256 contiguous Class C | Used in home networks and off-the-shelf routers. |
169.254.0.0/16 | Class B | This is the APIPA (Automatic Private IP Addressing) range, or link-local. A PC that is unable to get a “real” IP address from a DHCP server will autonomously pick up an address from this subnet. It basically allows no communication. |
There is also another subnet that cannot be used as a public address, and it is 127.0.0.0/8, this is the localhost address. This address range, 127.0.0.1 specifically, represents “this very device”. So, if a device source traffic destined for that address, it won’t even touch the NIC, it will remain inside the CPU. It is sometimes used to allow IP communication between applications on the same device.
The importance of IPv4 subnetting
Subnetting is great and having a precise idea about how is it used and why it will help you learn it. More than that, you will have a more complete understanding of the “big picture”. There are two main reasons to subnet major networks, segmenting and optimizing IP addressing space. Subnetting is used when we plan the infrastructure of a network, and as you can see it do not involve the configuration of devices. Later on, in the deployment process, someone will configure the subnet decided during subnetting on devices.
Segmenting the network is important because you can group devices together according to location or logical functions. A proper grouping (segmentation) will be very useful when we want to restrict some traffic (devices from a group cannot talk to another group or something like that). It will also allow you to have a clean and easy-to-maintain infrastructure.
Optimizing the addressing space is also crucial because addresses are limited and you do not want to waste them. With subnetting, you can use your major network in the best way, creating networks that can contain just the number of hosts needed, using the extra space in other subnets.
With these concepts in mind, now you are starting to become a true network engineer. And now that we have disclosed all the secrets of the IPv4, we are ready to look into the future explaining how IPv6 works. That’s the purpose of the next article.


2 Responses
Keep up the good work, I read few articles on this internet
site and I think that your website is very interesting and has lots of
excellent info.
Glad you enjoy it! I’ll keep it up, and if you have any suggestion just let me know
Comments are closed.