
Communication between VLANs is a mandatory requirement for any network. We know that we must implement Inter-VLAN Routing to do that, and we already explored Router on a Stick technique. However, RoaS is a simple technology that has several limitations, the most important being the throughput. To overcome this, Cisco developed a better alternative: the Multilayer Switch. If you have this device, you can implement Inter-VLAN Routing without using a router. In this article we will present you just that, comparing this new approach to the old-but-gold RoaS.
This article sees you configuring stuff, so it comes with a Packet Tracer lab. As always, use the link below to download it for free! Once you opened it with your Cisco Packet Tracer, just follow the configuration in the article.

Once you are ready with Packet Tracer, jut continue reading.
Inter-VLAN Routing with Multilayer Switch Lab Intro
The Topology
For this lab, we re-used the topology from the previous article. However, we slightly changed it to meet our needs. Instead of having a switch and a RoaS router, we use a single device: a multilayer switch. You can see this new device in the middle (we will explain how it works later).
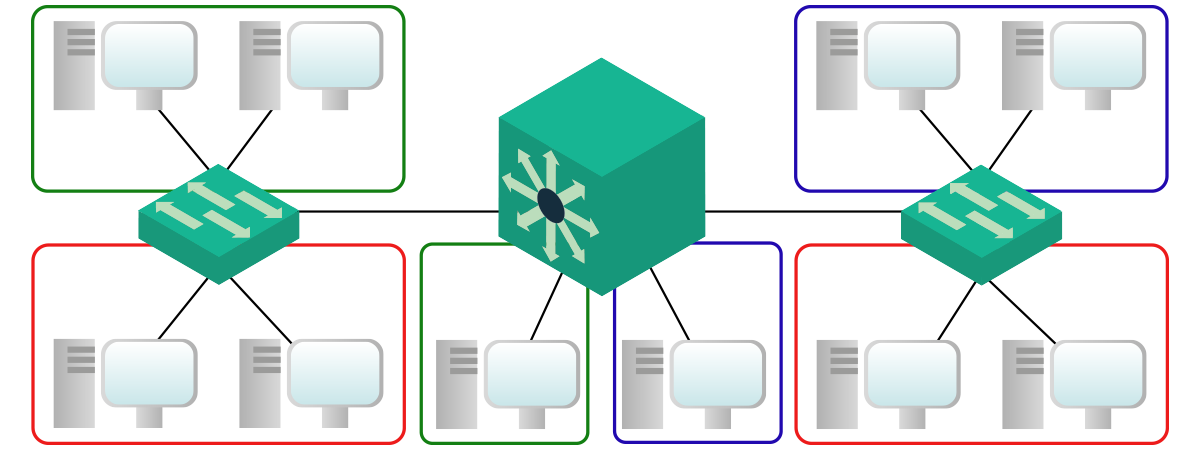
As you can see from the picture, we still have 10 different PCs, distributed in three VLANs. We conveniently named those VLANs red, blue, and green as you may know from the previous article.
The Requirements
For this lab, we are going to focus only on Inter-VLAN Routing. Specifically, we are going to work on the Multilayer switch only. All other devices, including the switches, are ready. Furthermore, we need to configure the multilayer switch only for Inter-VLAN routing. We prepared already everything else, such as trunks configuration.
Before we can dive into this configuration, however, we can benefit from a little bit of theory. In fact, we will quickly present what a Multilayer switch is, and how it works. Once these concepts are clear, you will be able to perform this exercise easily.
Addressing Plan
The addressing plan comes from the previous article. We kept the client configuration identical, as well as the VLAN Configuration. Our ten PCs are inside VLAN 10, 20, and 35.
| Device | IP Address | Switch | Switch Port | Access VLAN |
|---|---|---|---|---|
| PC0 | 10.0.35.10/24 | SW-Left | Fa0/1 | 35 |
| PC1 | 10.0.35.11/24 | SW-Left | Fa0/2 | 35 |
| PC2 | 10.0.10.12/24 | SW-Left | Fa0/3 | 10 |
| PC3 | 10.0.10.13/24 | SW-Left | Fa0/4 | 10 |
| PC4 | 10.0.35.14/24 | MLSW | Fa0/5 | 35 |
| PC5 | 10.0.20.15/24 | MLSW | Fa0/6 | 20 |
| PC6 | 10.0.10.16/24 | SW-Right | Fa0/7 | 10 |
| PC7 | 10.0.10.17/24 | SW-Right | Fa0/9 | 20 |
| PC8 | 10.0.20.18/24 | SW-Right | Fa0/9 | 20 |
| PC9 | 10.0.20.19/24 | SW-Right | Fa0/10 | 20 |
The default gateways are the first addresses of each subnet: 10.0.10.1, 10.0.20.1 and 10.0.35.1.
The Multilayer Switch
What is a Multilayer switch?
A multilayer switch, known also as Layer 3 Switch, is a hybrid device combining a switch with a router. From a physical perspective, multilayer switches are identical to traditional switches. They can have 24 or 48 ethernet ports and some SFP-ready ports. Furthermore, they can be stackable just like a Layer 2 Switch. The real difference is inside the box, both in hardware and software.
Multilayer switches come with powerful ASICs (Application-Specific Integrated Circuits), hardware components that can be used for Layer 3 functionalities. One of the most important ASIC you can find on a Cisco Multilayer Switch is the TCAM, Ternary Content-Addressable Memory. With this equipment, Multilayer switches can perform hardware routing. As a result, they are much faster than routers for that, because they have dedicated hardware for that.
A traditional switch can only have a single IP address for management purposes. Multilayer switches can have multiple IP addresses instead, and they can support static routes and dynamic routing protocols.
Multilayer Switch vs. Router
If Multilayer Switches are faster than routers, why would you use a router at all? We need to explore the key differences between Multilayer Switches and Routers.
Multilayer switches are very specific. Their TCAM is designed to work with ethernet, and ethernet only (both copper and fiber). Router, instead, can work with many different technologies and supports different interfaces. Instead, in a router, you can add some interfaces by inserting the appropriate module. This is not a feature you can find on a Multilayer switch.
Furthermore, Routers are extremely feature-rich. They support a lot of different protocols, fine-tunings, and customizations. Since Multilayer switches try to do everything they can in-hardware, they cannot have this granularity in the configuration, and they offer a limited set of features. These features may be good for the majority of uses, but there are some things that a Layer 3 switch simply can’t do.
Multilayer Switch for Inter-VLAN Routing
With Router on a Stick, our switches sent the traffic to a Router. Then, the router sent back the traffic to the switches after doing the frame rewrite and routing. With a Multilayer switch, everything happens inside the Layer 3 switch.
Multilayer switches support Switch Virtual Interfaces (SVIs), logical interfaces that can perform routing. They behave like a physical interface of a router: they have an IP address, and they insert a connected route into the routing table. However, they are completely virtual. You can have one SVI for each VLAN. When the switch receives a packet in a VLAN, which is intended at Layer 2 for the switch itself (MAC address of the SVI as destination), the switch performs routing.

Since SVIs are logical interfaces, the MAC address associated with them is crafted in software, and not burnt-in into the device hardware. All frame-rewrite operations are performed inside the Multilayer switch. Furthermore, the Multilayer switch has all the features of a traditional switch and can support trunks to connect other traditional or multilayer switches.
Inter-VLAN Routing on a Multilayer Switch
Configuring the Multilayer Switch
Turn on Routing
As stated earlier, the only configuration item we need to touch is the Multilayer Switch. For this lab, we are talking about the device in the middle: “MLSW”. It is a Legacy Cisco Catalyst 3560, the best that Packet Tracer can offer.
The very first step is to enable routing on this Multilayer switch. By default, these multilayer switches comes configured as traditional switches. In case you want to use them as Layer 2 switches, you need to enable this feature with a simple command. To do that, type ip routing in the configuration prompt. This is platform-dependent, some devices may be configured as multilayer switches in the factory defaults. Cisco 3560, however, are not these devices, and need you to manually type this command.
Once you type ip routing, nothing will happen apparently. However, the device has just constructed a routing table and allocated the resources to work with it. This command is effective immediately, you won’t need to do a reboot or anything else: it just works.
Configuring SVIs
Now that the device is ready to do routing, we need to configure the Switch Virtual Interfaces. We can create one per VLAN, simply issuing the interface vlan command followed by the VLAN ID. This way, we are telling the switch that it must create a Logical interface inside that VLAN. As you do that, the logical interface will immediately go into the up/up state.

This SVI will listen for all packets passing on the VLAN 10. That SVI not only can send packets on that VLAN but also receive them and re-route them to other SVIs. However, this is not possible without an IP address. We can easily configure it with the ip address command. In this case, this interface will have an IP address of 10.0.10.1 and a subnet mask of 255.255.255.0. Now Inter-VLAN routing for VLAN 10 is ready. However, if we don’t configure at least another SVI, we won’t be able to test it.
We need to configure a Switch Virtual Interface for VLAN 20, and another for VLAN 35. We can do that with the commands below.
interface Vlan 20
 ip address 10.0.20.1 255.255.255.0

interface Vlan 35
 ip address 10.0.35.1 255.255.255.0
Done! Now, your Packet Tracer score should reach 100%: this lab is completed. But before we can close this topic, we may want to check how to verify everything is working fine.
Verifying the Multilayer Switch
We all know from the previous article how to verify Inter-VLAN routing. As always, we need to check Layer 2 connectivity, such as VLAN presence and trunk configuration. We can check routes with show ip route, or try a traceroute between two PCs on different VLANs. Just like in the previous article, the expected behavior is to see the IP address of the multilayer switch as an intermediary hop.
The new command that the Multilayer Switch brings to the picture is show ip interface brief, which presents the list of interfaces. Among them, we can see our SVIs, with the IP address and layer 1 and 2 status.
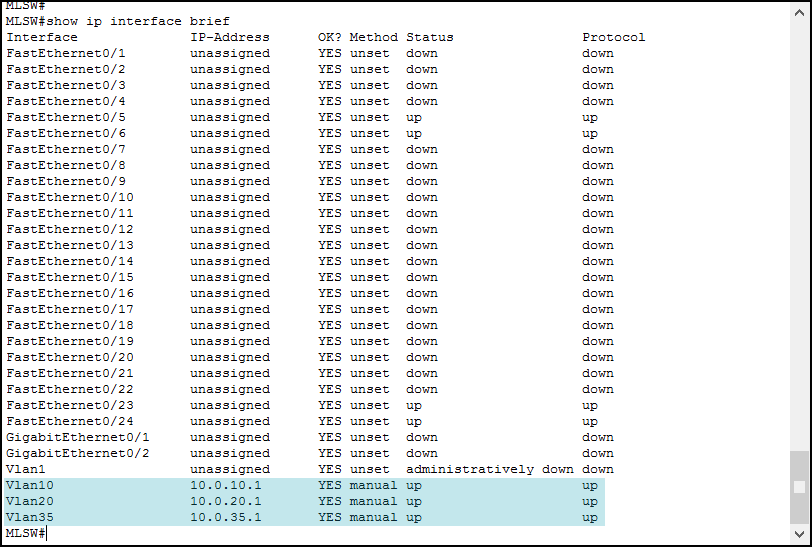
Note that each switch comes with the VLAN 1 installed. You can’t do anything about that, and you can’t remove that VLAN. Therefore, an associated SVI is automatically created, but until you use it (by typing interface vlan 1), it appears as shutdown.
Conclusion
With this article, we presented a better solution to implement Inter-VLAN Routing. With this simple technology, you can enable hardware-based routing between the VLANs of your company at convenient prices, considering that Multilayer switches are affordable now more than ever. All the commands you need are reported below.
ip routingto enable Layer 3 functionalities on a Multilayer Switchinterface vlanto create a Switch Virtual Interface (routing for a VLAN)show ip route,tracerouteandshow ip interface briefto verify Inter-VLAN Routing is working properly
At this point, you know the very basics of switching. Before we can expand our knowledge about switching technologies, we can benefit from some routing and some IPv6 stuff. This is what will come next in our Free CCNA Course. At this point, we are almost halfway to the CCNA certification!


2 Responses
Hello guys,
Would appreciate if you can let me know which best IOS version suits MLS to use in GNS3? I have tried 3640,3725 byt both seems IP ROUTING is not working as this command not showing in Run-Config
Hello Samir,
Working with switches in GNS3 can be troublesome. I believe your best bet is to use IOS On Unix (IOU). However, this requires a little more effort, as you need to run a virtual machine acting as a “server” which provides the emulation for Cisco devices.
Furthermore, 3640 is a quite old platform and frankly I don’t remember if it has those features. Right now we are in the 38xx age!
Let me know how it goes!
Comments are closed.