
Without DHCP, we couldn’t have the flexibility we have in terms of IPv4 addressing. With IPv6, we want to maintain and enhance this flexibility. To accomplish this goal, we have DHCPv6. This new protocol is not a simple “porting” of features from the old stack to the new stack. Instead, we are talking about a complete re-design of its functionalities. DHCPv6 brings more features, enabling an even easier configuration. Furthermore, it has three different flavors: SLAAC, Stateless, and Stateful. In this article, we will see how does it work, and how to implement these technologies.
This article comes with a configuration lab. You can download this Packet Tracer file for free by clicking the link below.

Once you downloaded it, just open the file (you need to un-zip). After that, just continue reading the article, and try the commands you learn in the lab. You will become a master of DHCPv6 in the blink of an eye.
DHCPv6 Lab Intro
The Topology
For this article, we have a fairly simple topology. As you can see from the picture below, we only have one router, one switch, and six computers.
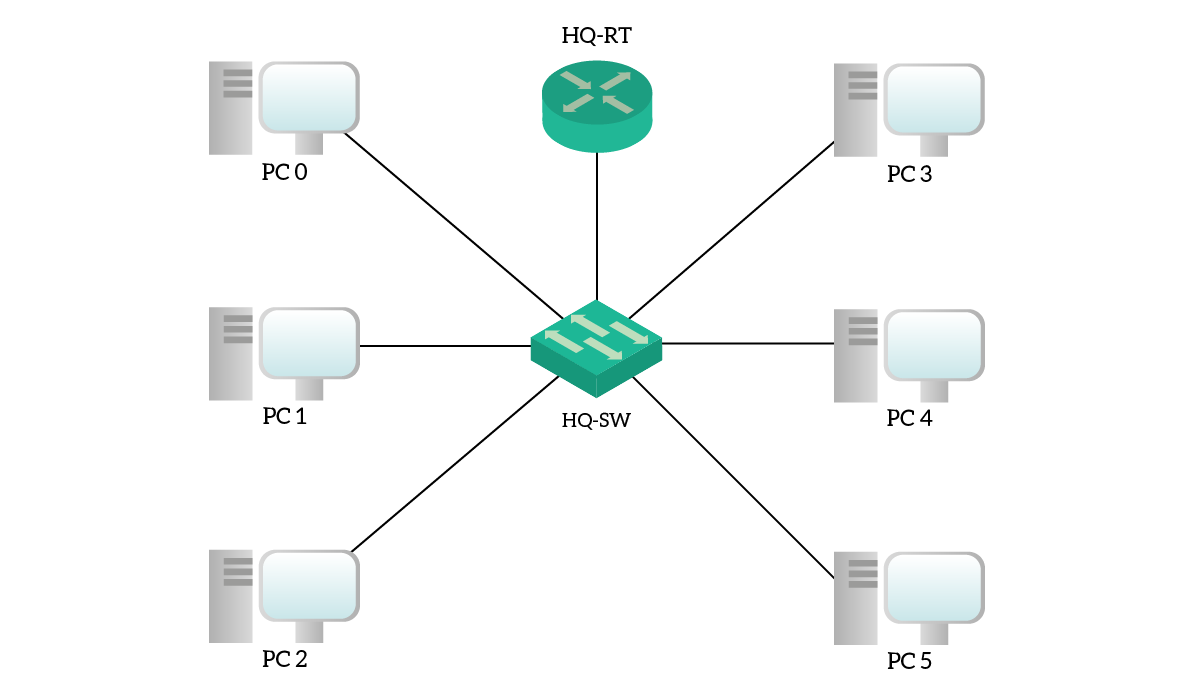
Instead of physical segmentation, we used VLANs to divide the network. Even so, we keep the logical topology quite simple, as we have only two VLANs. PC0, PC1 and PC2 are in VLAN 10, named “Left”, whereas all other PCs are in VLAN 20, named “Right”. As a result, we can implement a different type of DHCPv6 in each VLAN.
The Requirements
Requirements are as simple as the topology. For the “Left” subnet, we are going to use SLAAC, while for the “Right” subnet we are going to use Stateless DHCPv6. Unfortunately, Packet Tracer does not support a clean implementation of Stateful DHCPv6, so we are just going to explain it.
Before we can dive into the configuration part, we will present to you the theory behind all of these DHCPv6 flavors. After that, not only we will configure this technology, but we will see how to troubleshoot them.
DHCPv6 Explained
To understand DHCPv6, you need to understand IPv6 first. If you think you need a refresh, you can check our IPv6 fundamentals article. There you will find everything you need to know about IPv6. Once you feel confident about these technologies, you can just continue with the reading.
Stateless Auto Address Configuration (SLAAC)
SLAAC just means Stateless Auto Address Configuration, but it shouldn’t be confused with Stateless DHCPv6. In fact, we are talking about two different approaches.
SLAAC is the simplest way to give an IPv6 address to a client because it exclusively relies on the Neighbor Discovery Protocol. This protocol, which we simply call NDP, allows devices on a network to discover their Layer 3 neighbors. We use it to retrieve the layer 2 reachability information, like ARP, and to find out routers on the network.
When a device comes online, it sends a Router Solicitation message. He’s basically asking “Are there some routers out there?”. If we have a router on the same network, that router will reply with a Router Advertisement message. Using this message, the router will tell the client some information about the network:
- Who is the default gateway (the link-local address of the router itself)
- What is the global unicast prefix (for example,
2001:DB8:ACAD:10::/64)
With this information, the client is going to create a new global unicast address using the EUI-64 technique. Now the client has an IP address from the global unicast prefix range of the router, and that address is valid over the Internet.
This method is extremely simple and requires virtually no configuration. However, we can’t centralize it and we cannot specify further information, such as DNS settings. To do that, we need to use a DHCPv6 technique. Note that, with SLAAC, we don’t need to use any DHCPv6 packet.
Stateless DHCPv6
Stateless DHCPv6 brings to the picture the DHCPv6 protocol. With this approach, we still use SLAAC to obtain reachability information, and we use DHCPv6 for extra items.
The client always starts with a Router Solicitation, and the router on the segment responds with a Router Advertisement. This time, the Router Advertisement has a flag called other-config set to 1. Once the client receives the message, it will still use SLAAC to craft its own IPv6 address. However, the flag tells the client to do something more.
After the SLAAC process succeeds, the client will craft a DHCPv6 request and send it through the network. A DHCPv6 server will eventually reply with all the extra information we needed, such as the DNS server or domain name.
We call this approach stateless because the DHCPv6 server does not manage any lease for the clients. Instead, it just gives extra information as needed.
Stateful DHCPv6
Stateful DHCPv6 is the exact porting of DHCP into the IPv6 world. With this approach, a DHCPv6 server handles leases and extra information, just like traditional IPv4 DHCP.
The client starts again with a Router Solicitation, but this time the Advertisement in reply contains the managed-config set to 1. This tells the client to not use SLAAC, but DHCPv6 instead. The client will then generate a DHCPv6 request to get both addressing and extra information. The DHCPv6 server will be the one choosing the IPv6 address, not the client.
Configure & Troubleshoot DHCPv6
DHCPv6 Configuration
In this part of the article, we are going to cover how to configure Stateless DHCPv6, Stateful DHCPv6, and SLAAC.
Stateless DHCPv6
We decided to start with Stateless DHCPv6 as this is the most comprehensive implementation. It gives you an overview of the commands for both SLAAC and Stateful. According to the requirements, we should use this approach for the “Right” subnet. All basic IPv6 commands, such as unicast-routing or addresses on the interfaces are already in place. As a result, we can focus on the DHCP configuration.
The interface doing routing for the Right subnet is the GigabitEthernet 0/1.20. To successfully enable Stateless DHCPv6, we need to define a pool with the extra information we want to use, and turn on the other-config flag for that interface. Here’s our step-list.
- Define a pool with the
ipv6 dhcp poolglobal configuration command, calling it “Right”. This will enter the promptRouter(config-dhcpv6)#, where we can configure extra settings. - In the DHCPv6 prompt, enter the DNS server with
dns-servercommand. This must be an IPv6 address, and for this lab, we are using2001:db8:acad:10::15. - Define the domain name with
domain-namecommand, for this lab useright.company.local. - Go to the interface configuration mode, and associate the interface with the pool using
ipv6 dhcp servercommand. - Turn on the
other-configflag for the interface usingipv6 nd other-config-flagcommand, with no extra parameter.
For your convenience, we grouped all the commands you need to enter hereafter.
ipv6 dhcp pool Right
 dns-server 2001:db8:acad:10::15
 domain-name right.company.local

interface GigabitEthernet 0/1.20
 ipv6 dhcp server Right
 ipv6 nd other-config-flag
Your Packet Tracer score should increase, but clients still won’t get the IPv6 address. We need to do something more.
Configuring clients in Packet Tracer
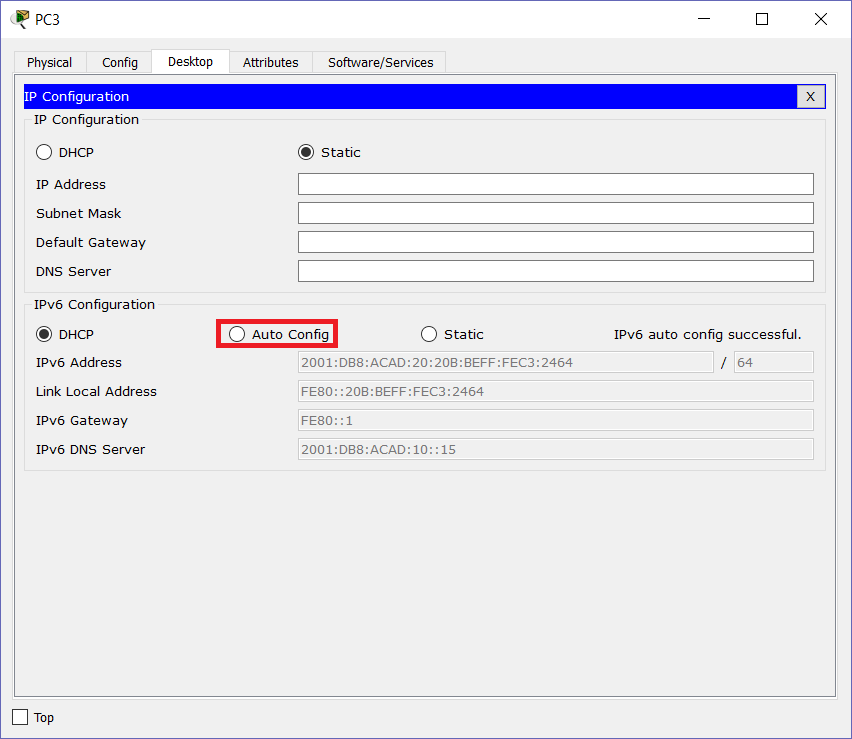
By default, Packet Tracer clients have no IPv6 address. Furthermore, they are set to be static, which is not what we want for this lab. We need to log into the client and change the setting to Auto-Config. To do that, we simply click on the client and go to the Desktop Tab. From there, we select the first icon (“IP Configuration”).
The following window will appear, and we can change the addressing method for IPv6. For this lab, we should set it to Auto-Config on all clients, in order to take advantage of Neighbor Discovery. However, for a Stateless DHCPv6 network, the setting will automatically switch from Auto-Config to DHCP when the client tires to contact the DHCP server.
Apply those settings to all the clients and we are set to go!
Stateful DHCPv6
For this lab, we are not going to configure Stateful DHCPv6. However, its configuration is extremely easy. The first thing we want to do is to tell the pool which prefix is going to manage. To do that, we use the address prefix command in the pool configuration prompt. As a parameter, we need to enter a global unicast prefix, for example 2001:db8:acad:10::/64.
The next step is at the interface level. We need to turn on the managed-config flag in the Neighbor Discovery. This is easily done with ipv6 nd managed-config-flag. The remaining configuration is identical to Stateless DHCPv6.
SLAAC
Unlike DHCPv6, SLAAC is on by default. In other words, every Ethernet interface on a Cisco router with an IPv6 address automatically sends Router Advertisements. As a result, SLAAC is already working on our “Left” subnet: we just need to check clients.
Note: if your clients haven’t obtained the IPv6 address, try to enable the other-config flag on GigabitEthernet 0/1.10. This may be related to a Packet Tracer bug!
Troubleshooting DHCPv6
Cisco always offers us some great commands to check why things went wrong. We have several show commands for DHCPv6 too, and here we present them.
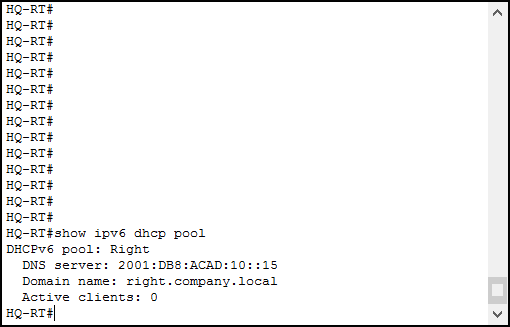
We can use show ipv6 dhcp pool to have an overview of the pools currently active on the router. This command presents the pools by name, with the settings of each. If the pool is stateful, the number of connected clients is shown. Otherwise, “Active clients” will always be zero.
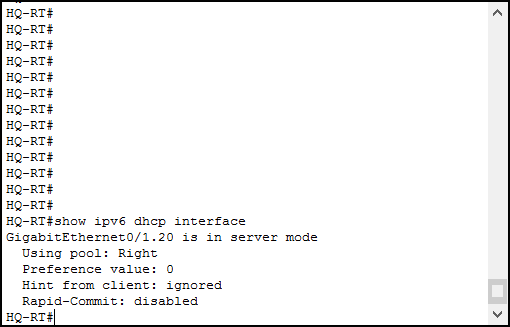
Furthermore, you can use show ipv6 dhcp interface to see all the interfaces with Stateless or Stateful DHCPv6 enabled.
If you enabled stateful DHCPv6, you can check your bindings with show ipv6 dhcp bindings. Furthermore, to truly analyze what’s happening, use debug ipv6 dhcp details. However, this is an advanced command that you won’t need in simple deployments.
Conclusion
With this article and this lab, we learned a lot about DHCPv6. We are now able to understand how does it work, what are its flavors, and how to implement it. Here’s what to remember:
- SLAAC automatically works with a router, while Stateless DHCPv6 gives addresses using SLAAC and extra information using DHCP. The only configuration where the server gives IPv6 addresses is the Stateful one.
- You need to tune Neighbor Discovery flag with
ipv6 nd other-config-flagandipv6 nd managed-config-flagcommands - You can define a pool with
ipv6 dhcp pool, and enter here settings like DNS Server or domain name - Associate a pool to an interface with
ipv6 dhcp servercommand - Troubleshoot with
show ipv6 dhcp pool,show ipv6 dhcp interfaceandshow ipv6 dhcp bindings
Now, it’s time to practice! Try this lab as many times as you need to be able to do it on your own. Then, you will be ready to continue with our CCNA Journey. In our path, we will see how to configure some interesting services, such as NTP, Access Lists, and NAT. Just continue with the Free CCNA Course!

