
If you are looking for a simple tool to identify traffic and create custom rules for that, you are in the right place. This is exactly what Cisco Access Lists – or simply ACLs – do. With this powerful tool, you can identify traffic and use it later in other parts of the configuration. For example, you can create a rule that applies only to HTTP, or FTP traffic. If you truly understand the potential of Access Lists, you will be able to use any other IOS feature easily. Today, we explain how to use ACLs with a focus on traffic filtering: stateless firewalling on routers.
Understanding Access Lists
What is Traffic Filtering?
In Cisco IOS, traffic filtering means stateless firewalling. In other words, traffic filtering permits or blocks traffic based on a set of statically defined rules. This means that you can allow a device to communicate with another, and prevent the communication with a third one. This technology relies exclusively on Access Lists, so it is perfect for explaining them.
With traffic filtering, you tell the router to analyze the traffic received (or to-be-sent) on a specific interface. The router opens every packet and compares it against a set of predefined rules. Based on them, it decides whether to block or permit the packet. Here’s a clear example in the picture.

The rules deciding what will happen to the packet are inside an Access List. Each rule is just a statement previously written by the administrator. As a result, traffic filtering is static and stateless by nature, because the router does not create dynamic entries in an Access List.
Standard Access Lists
A standard access list is a set of rules that evaluates only the source IP address. Based on that – and only that – they decide whether the packet should be dropped or forwarded. As with any access list, a standard ACL can have multiple entries. For each, we have an ID, an action, a source IP, and a Wildcard Mask.
The components
Below, an explanation of the components of a standard access list.
- The ID is just a number the router uses to evaluate the rules in order. Rule 2 will be evaluated after rule 1, and so forth. The router adopts a top-down approach: it analyzes rules from the first to the last until something matches. The first matching rule is executed, and other rules are not evaluated (for that packet). At the end of each access list, we have an implicit rule that blocks all the traffic.
- The action is a simple keyword that tells the router what to do with the packet. “Permit” will allow the packet, while “Deny” will block it.
- The combination of Source IP Address and Wildcard Mask is what we use to determine whether a packet matches. The logic is similar to the one seen in the routing table. However, the wildcard mask is not a subnet mask: it is the opposite. The subnet mask matches where its binary representation is 1, the wildcard mask matches when its representation is zero.
Now that you know the components, we can focus on analyzing an example access list.
Analyzing an Access List
Access Lists are sets of statements with pre-defined fields. Therefore, the best way to represent them is with a table. Below, an example Standard Access List.
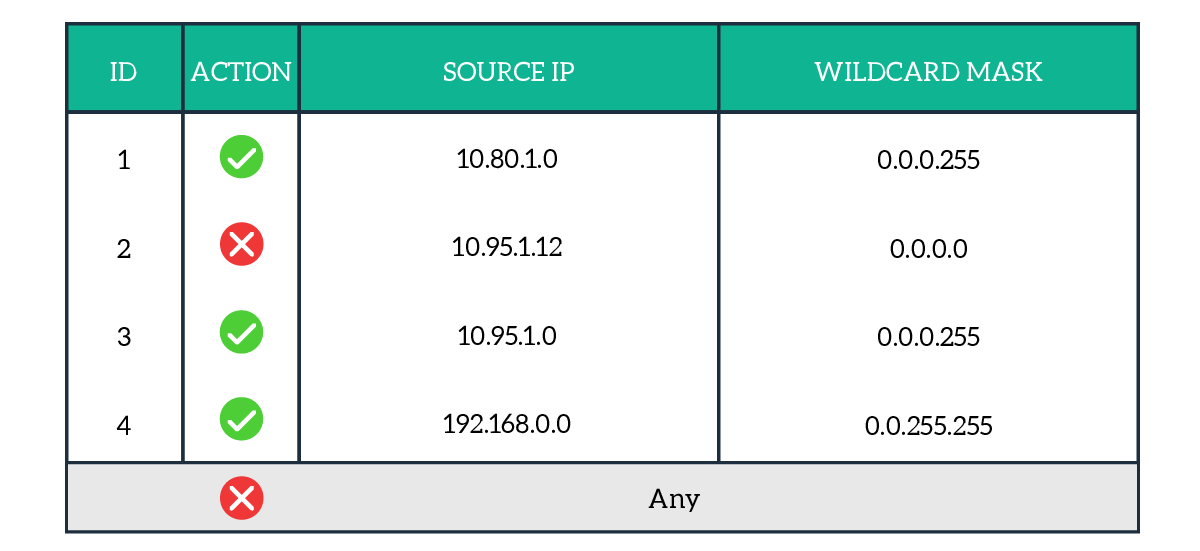
As you can see, we have an implicit deny from any IP address at the end of the ACL. Basically, we are permitting the 10.80.1.0/24 subnet in the first rule. With the second rule, we permit the host 10.95.1.12, and with the third, we deny its subnet (10.95.1.0/24). Finally, we permit the 192.168.0.0/16 network and deny everything else with the implicit deny.
Everything seems straightforward, but we should focus on the second and third rules. The host of the second rule would match also the subnet of the third rule. What happens then? If we receive a packet from this host, the first rule matching will be the second. For any other host in the same subnet, it is the third. If we swap those rules, making the rule matching 10.95.1.0/24 come first, then the router will never execute the host-specific rule. This is because, in Access Lists, the first matching rule is the one to be executed.
You can give your access list either a name or a numeric identifier.
Extended Access Lists
Unlike Standard, Extended Access Lists consider the source and destination IP addresses, transport protocol, and Layer 4 ports. This allows you to create more specific rules, matching a specific type of traffic.
To match source and destination IP addresses, we still use the Wildcard Mask technique. However, in this case, the table has more fields: source port and destination port, and protocol.
- The protocol can be either IP (doesn’t check transport ports), ICMP (ensure that it is ICMP traffic, but does not check transport ports), TCP, or UDP (for these two check the transport ports).
- The port can be either a specific port, a range of ports, a list of ports, or “any port”. The router will check these fields only if the protocol is TCP or UDP.
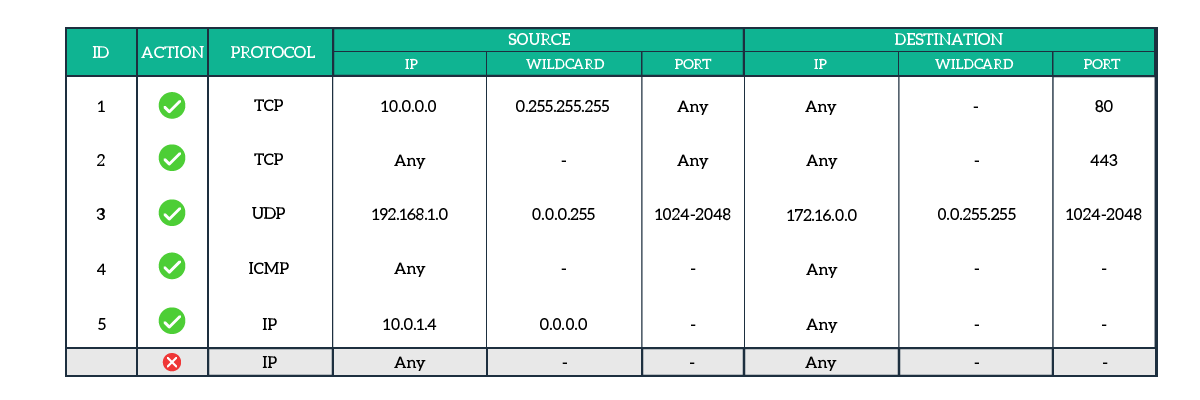
For each entry of the access list, all fields must match for the ACL to match. If the protocol matches, but the port doesn’t, then there is no match. Below, an example of an Extended Access List.
Analyzing the Extended ACL
The first rule allows all the hosts from the 10.0.0.0/8 network to source HTTP requests to any web server. This is because the protocol is TCP, the source port is any port and the destination port is 80. Although this is a standard setup for HTTP, the router will not inspect the payload of the TCP. An attacker could use these ports to send other traffic disguised as web traffic. The second rule allows any host to connect to any other host using port 443, which is Secure HTTP.
The third rule allows the hosts from the 192.168.1.0/24 subnet to connect to other hosts on the 172.16.0.0/16 network. However, for this communication, we allow only UDP traffic with source and destination port ranging between 1024 and 2048 (included).
With the fourth rule, we are permitting any host to send any type of ICMP traffic to any other host. This way, we allow any host to ping any other host. It is always nice to have a rule like this because it allows easier troubleshooting. However, it also exposes the network to reconnaissance from an attacker. In other words, a hacker can have an idea of what’s on your network and what are the IP addresses.
The fifth and last rule allows a specific host, 10.0.1.4, to contact any other host using any layer 4 protocol on any port. We achieved this result by specifying “IP” as a protocol. This way, the router will check for Layer 3 information only. In the end, we have an implicit deny for any traffic that did not match previously.
Applying Access Lists
Access Lists are just sets of rules. If you create an ACL, it will sit there and do nothing. To successfully turn an ACL into a traffic filter, you need to associate it with a router interface. This association is directional. In other words, you apply the ACL on an interface either for incoming or outgoing traffic.

Incoming traffic is the one coming from outside and entering the router. Outgoing traffic is the one the router already processed, and that is ready to exit the router out of that interface. You can apply the same Access List in both directions, or you can have two different access lists: one for “in” and one for “out”. However, you cannot have multiple Access Lists for the same direction on the same interface. Instead, you can apply the same Access List to multiple interfaces.
The Return Traffic
Since Access Lists are directional and stateless, we need to take care of the return traffic. If we allow a device to send traffic to another, we need to ensure that the other device will be able to reply back. Communication is a two-way process, and we need to ensure that both ways are working properly.
To do that, the best approach is to create two access-list: one for direction. In the following picture, we created the return Access List for the Extended ACL described above.
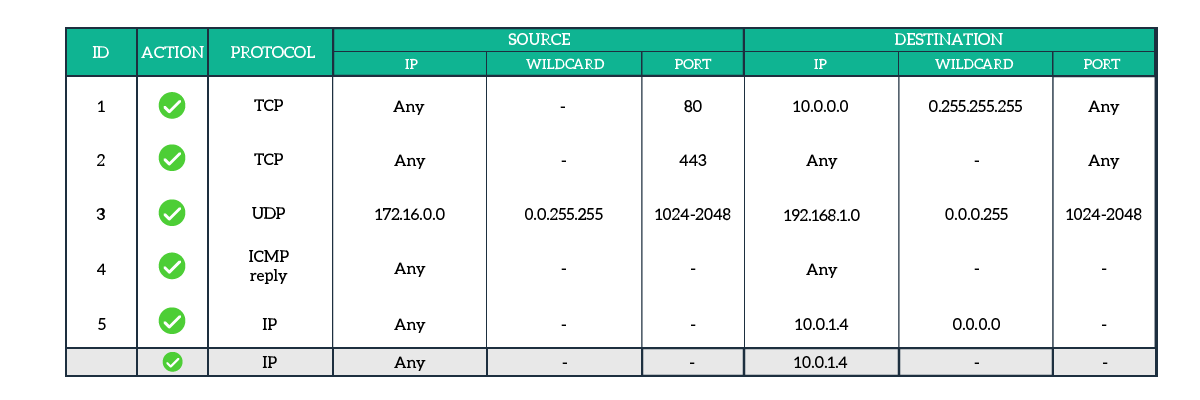
It is time to analyze this ACL. The first rule allows HTTP traffic from any web server to the network 10.0.0.0/8. This way, we are allowing responses to reach our internal hosts. The same goes for the second rule, which allows any Secure web server to contact any other host.
With the third rule, we are allowing the network 172.16.0.0/16 to communicate with any host on the 192.168.1.0/24 subnet, using UDP ports ranging from 1024 to 2048. This is the return rule for the UDP rule we had previously.
Then, with the fourth rule, we are allowing any ICMP Reply to comes it. Note that we are not allowing any ICMP traffic, but only replies. As a result, we will be able to ping from the internal network to the external network, and get replies. However, any ICMP traffic coming from outside which is not a reply will be blocked. This is possible because the ICMP packet contains a field to define which type of message it is.
Finally, the last rule is to permit any device to reach the 10.0.1.4 host. After that, the implicit deny is still in place.
Access Lists logging
Access Lists are a powerful tool to restrict traffic. However, you might want to know if someone is trying to breach your network. To do that, you can turn on logging for specific entries in your ACL. This way, every time an ACL matches a Syslog message will be generated.
Generally, we turn on logging for denying entries. Since you can’t turn on logging for the implicit deny, you might want to override this behavior by creating a custom last rule that effectively denies all traffic. However, to that, you can add the logging feature.
Conclusion
In this article, we covered all the basic knowledge needed to understand Access Lists and traffic filtering. For your convenience, here are the concepts you must take with you.
- Access Lists are a stateless option to identify traffic and permit/block it if applied as traffic filters
- Standard Access Lists can identify traffic based only on source IP address
- extended Access Lists can identify traffic based on source and destination items: protocol, ports, addresses
- ACLs are stateless and applied on interface per-direction
- Each ACL has an implicit deny as last rule
Once you are confident with the theory of Access Lists, you can move to the next article. There, we will learn how to configure them on a Cisco router with a Packet Tracer lab.

