Cisco designs products for large companies and adds technologies that meet their needs. We have seen switching, fault tolerance, advanced routing, and more so far. However, Cisco also has a suite of technologies to enable easy management of networks: enterprise services. In this article, we are going to see a few of them, specifically the ones you need for the CCNA. We are going to see how you can use AAA to login with the same credentials on all devices. Then, we will see how to monitor the network with IPSLA, and how to sniff packets with SPAN.
This article will present a few new configuration commands. Because of that, we are delivering it with a Packet Tracer lab that you can download for free at the link below.

Download the lab, unzip it and open it with Cisco Packet Tracer. You will master everything you learn as you will try on your own.
AAA Lab Intro
In this article, we are going to talk about AAA, IPSLA, and SPAN. However, the current version of Packet Tracer supports only AAA, so we are going to see in the lab only this one.
The Topology
In this lab, we have a simple topology with a router, two switches, and three end devices. You can have a look at it below.
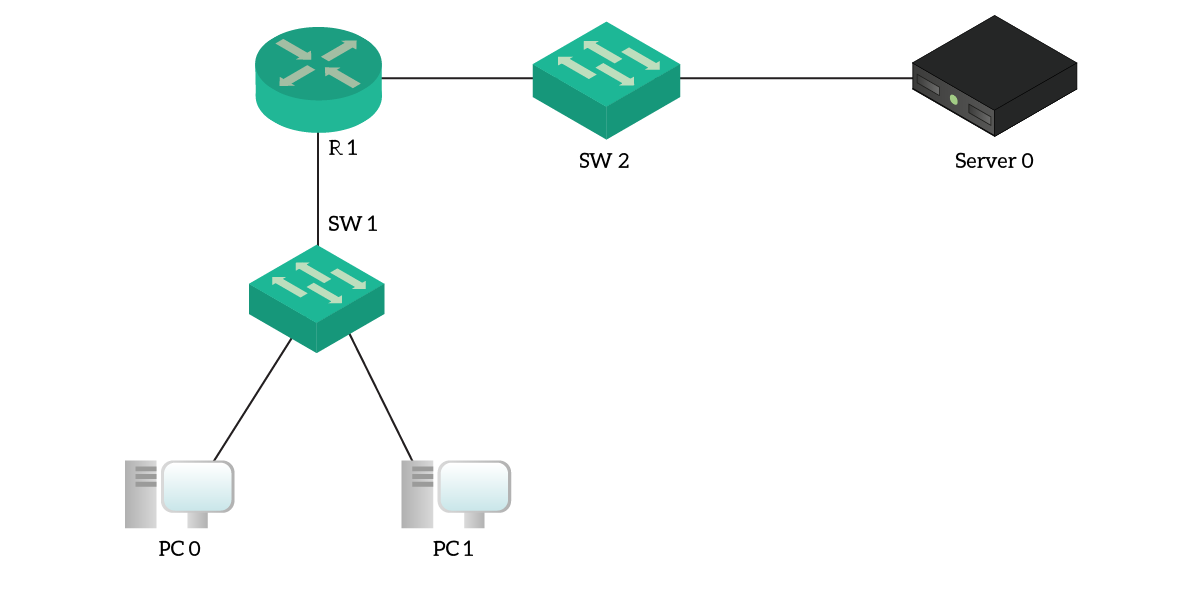
However, the topology isn’t as simple as it might seem. In fact, each router’s leg has two VLANs: a data and a management VLAN. End devices are in the data VLAN, while the switches are in the management VLAN. Furthermore, the server is not a simple server: it’s the AAA server.
The Requirements
Our requirement is simple: we want to log-in to the router via SSH. However, we want to do that by using our credentials that the AAA server is currently holding. We don’t want to create a local user on the router.
To keep things simple, we have already configured SSH and the AAA server. For this lab, we are going to do the binding between the router and the AAA server. The enable password is ictshore, and our user to test will be admin, with a password of ictshore.
Authentication, Authorization, Accounting (AAA)
AAA stands for Authentication, Authorization, and Accounting. Rather than a protocol, AAA is a framework: a standard approach to centralized authentication. With this AAA service, we need to have an AAA server in the network: this server will be in charge of handling authentication, authorization, and accounting for the whole network.
- Authentication decides if a user can access a given network device or not.
- Authorization happens after the user has been authenticated. It decides which specific commands he can perform on the network device.
- Accounting logs on the AAA server everything the user did.
We can often remember the AAA framework as: “Who is the user? What can he do? What did he do?”.
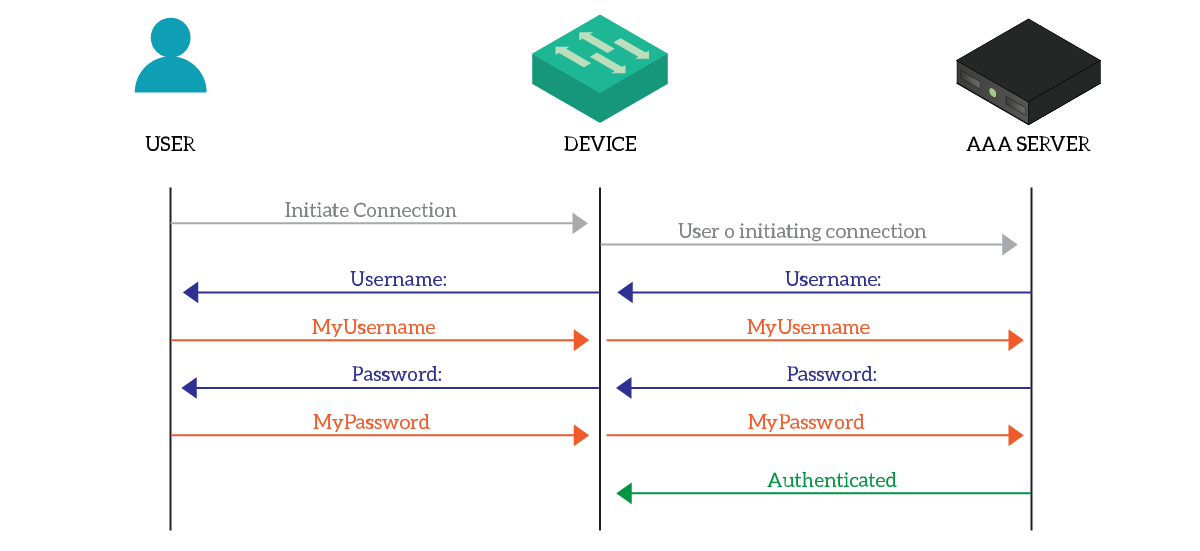
While AAA is a quite complex framework, its behavior is easy to understand. Everything starts with a user connecting to a network device: that device relays the authentication request to the AAA server, which tells the device what to do. In the end, it is the AAA server to perform authentication, as below.
The network device uses a specific protocol to talk with the AAA server. Specifically, we have different alternatives, but the two most popular ones are RADIUS and TACACS+, the latter being Cisco proprietary.
Configuring AAA
Pointing to the server
For this lab, we will configure R1 for AAA using RADIUS. Therefore, our first step is telling the router what is the RADIUS server to use for authentication. Hop in configuration mode and use the command radius-server host to point to the AAA server, as below.
radius-server host 10.0.20.10
By default, it will point to port 1645, which is fine as it is the default one. RADIUS is a security protocol, therefore the communication between the device and the server must be secured. Thus, we need to use a shared secret that the network device and the server know about. In this case, our secret will be “router-secret”, and we will use radius-server key to communicate it to the router.
radius-server key router-secret
Now that the router knows about the AAA server, we need to use it in the AAA configuration. You can potentially use multiple servers in a redundant fashion.
Turning on AAA
Now, we need to turn on AAA by using the configuration command aaa new-model. This will simply enable AAA, but our journey doesn’t stop here. Instead, we need to tell the router that we are going to use RADIUS for the authentication part. To do that, we need to use aaa authentication login configuration commands. To that, we need to add the name of the authentication profile, and the authentication methods. For this lab, we are going to use this:
aaa authentication login default group radius
Default is the name of the authentication profile. By typing default, we tell the router that this is the profile to use when a specific profile isn’t specified. After that, we tell which kind of AAA authentication we want to use. You can have multiple methods in fallback, but that’s not our case. Instead, we will just tell to use the radius server we defined with group radius.
You can specify multiple authentication methods (e.g. Radius, TACACS+, local authentication) in a specific order. The router will try to use the next method only if the first is unavailable, not if the authentication failed. If you have “Radius”, then “Local”, the router will check against local credentials only if the radius server is unavailable.
Authenticating the VTYs
We are almost there. We now need to tell the router to authenticate VTY access (like SSH) with AAA. That’s easier said than done, we just need to use the following commands.
line vty 0 15
 login authentication default
This will tell the router to use the default profile. Congratulations! You completed the lab, you can now try to access the router with SSH at 10.99.0.1!
IPSLA
IPSLA or IP-SLA stands for IP Service Level Agreement, and it is a tool available on all Cisco routers. It allows the router to check the availability of a given service periodically. For example, you can schedule pinging an address, accessing an HTTP website, measuring the jitter, and so on. Based on the result of the tests, you can configure the router to react: turning on a static route, swapping the HSRP active router, or similar stuff.
IPSLA has two core components: the operation and the schedule. The IPSLA operation tells the router what test to do, and with which frequency. You can configure here all test-related stuff. The schedule, instead, tells the router when it should start running the operation, and for how long to keep the operation running. In many cases, the operation should start immediately and last forever.
Configuring IP SLA Probes
After all, a scheduled IP SLA operation is somehow a network probe. To configure it, just type ip sla . This will create a new operation with the given ID, or edit the existing one if that ID already exists. This will enter the Router(config-ipsla)# prompt. From there, you have several options:
icmp-echoto ping a deviceudp-jitterto measure the UDP Jitter of a servicetcp-connect <IP> <TCP Port>to test a three-way handshake
You will see that you have many other options, actually. However, this depends on the router and the IOS version. In most cases, the options above are everything you need. Furthermore, you can tune the frequency of the test and some specific settings. In fact, typing any of the commands above will open a specific prompt.
Now, get back in global configuration and schedule the IP SLA operation with ip sla schedule start-time lifetime . Of course, the ID must match the created operation. If you want it to be always running, set the start-time to now and the lifetime to forever.
The IPSLA Responder
An IPSLA-capable router doesn’t limit itself to probing. Instead, it can also support a remote router while doing probes. In fact, if the target of your IPSLA operation is a Cisco router, you can configure on it the IPSLA responder. These features allows the target router to return a more precise answer about latency, jitter, and related stuff.
This is possible because the IPSLA responder is aware of being probed, and can calculate the time it spends to process the packet before returning the response. As a result, you can get pure latency without considering the IPSLA processing time.
To enable this fine-tuning on a router, use ip sla responder {tcp-connect | udp-echo} ipaddress port , specifying the IP address and port of the router probing.
SPAN
Switch-Port Analyzer, or simply SPAN, will save your day at some point in the future. This features allows you to take all the traffic going in and/or out of a port, and duplicate it to another port. As a result, you can connect a traffic analyzer in this new port and receive all the traffic: this allows you to see what’s happening in the network.
Almost any switch support SPAN. Some, however, will need to shut down a port to take its forwarding resources to do SPAN. This happens only on very old switches.
Configuring SPAN
To configure SPAN, you need to create monitor sessions. Configuring it is as simple as telling the source and the destination. Furthermore, source and destination can be either a physical interface or a VLAN. Here’s what you need to type:
monitor session  source {interface  | vlan }
monitor session  destination {interface  | vlan }
This will put the destination port in the down (monitoring) state. In fact, it won’t accept traffic, it will just send out the replica of the traffic. You can configure that in production safely. However, when you finish, remove the session with no monitor session <ID>.
SPAN implies that you are connected to the same switch of your target device. However, Remote SPAN exists to propagate the replica to another switch in the same switching domain. You can do that safely, but be aware that if you do something wrong with RSPAN you can create loops melting down your data center.
Conclusion
In this article, we covered three important services that will help you a lot in your life as a network engineer. As always, here are a few things to take away.
- AAA is a centralized way to handle authentication, authorization, and accounting for network devices: a server is in charge of granting access to all devices.
- The network device uses RADIUS or TACACS+ to talk with the authentication server. Cisco has a product that does the AAA server: the Cisco Access Control System, ACS.
- IPSLA allows a router to monitor a remote device with ICMP, UDP, and TCP.
- If the remote device of an IPSLA operation is a Cisco router, it can be a responder and offer more precise results.
- With SPAN, you can duplicate the traffic of a port or a VLAN and send it to another port to analyze it
We are almost there, one article away from your CCNA. Now, you will see how to scale your network to a mind-blowing level with Network Programmability, but that’s for the next article!


2 Responses
Please go for CCNP too.
Great explanation, Great tutorials. thanks a lot
Many thanks!
As you know the CCNA course is almost complete, then we will have a few big Packet Tracer labs where you need to use all your skills and technologies together. After that we are going to focus on the right tools to get you started with the CCNA, like how you can setup a GNS3 environment to cover your CCNP studies efficiently.
Comments are closed.