
Containers make our job easier. Like containers changed the world of logistics, they are changing software development now. In fact, they allow you to build self-contained applications. In other words, your software is a container, and that container can run anywhere. We don’t need to worry about dependencies anymore, everything is inside the container. You can see why this got popular quickly. The more containers you have, the more you need to manage them. While we have many options to do that, Kubernetes is one of the best. Not only you can run your Kubernetes infrastructure on your own, you can also run it in the cloud. We all need to learn about that. Minikube is a lightweight version of Kubernetes, that you can use to learn and test your applications. How? Check out this Minikube Tutorial.
Minikube Tutorial
What is Minikube, exactly?
Before we start working with Minikube, we should understand what it is. And, before that, we need to understand containers. A container is a virtual environment with your code and all the dependencies it needs. Of course, a container needs to run on real hardware, real computers. Those computers running containers are the nodes, and minikube is a Virtual machine that acts as a node to run containers.
Since minikube is a virtual machine, we need a hypervisor to run it. Then, we will control it from the command line of our PC with a special tool. We will see that later in this minikube tutorial, but we should install minikube first.
Installing Minikube
The first thing we need to do in our minikube tutorial is the installation of minikube. As anticipated, we need to take care of the hypervisor as well. This might be different depending on your OS. If you are on Windows and have a Pro or Enterprise version, your best choice is Hyper-V. It is already installed on your PC, but you need to activate it. Launch PowerShell as an administrator and use the following command.
Enable-WindowsOptionalFeature -Online -FeatureName Microsoft-Hyper-V -AllIt will ask you to reboot the PC, and once done you will have your Hyper-V installed. You can check other methods to install Hyper-V on Microsoft online documentation. If instead, you are not on Windows Pro, you can opt for VirtualBox, which you can download for free here.
Then, you should download the minikube installer, which you can find easily on GitHub. If on Windows, this will download an executable file. Download it, and browse with the command prompt to its location. Note that you must be running the prompt as an administrator. Then, you can run it from the prompt.
Before we start with that, install also kubectl. It is the command-line utility we will use to give instructions to our kubectl once it has started. To do that, run the following commands in PowerShell.
Install-Script -Name install-kubectl -Scope CurrentUser -Force
install-kubectl.ps1
If, instead, you are on a different OS, refer to the manual.
The vSwitch
If you are on Hyper-V, you cannot start minikube unless you have an external vSwitch configured. So we need to do that as well. Open the Hyper-V by searching the search bar, and then select your PC name. Then, on the side menu on the right, select Virtual Switch Manager. This will open a panel when you can create a new switch. Select External and then click on Create Virtual Switch.
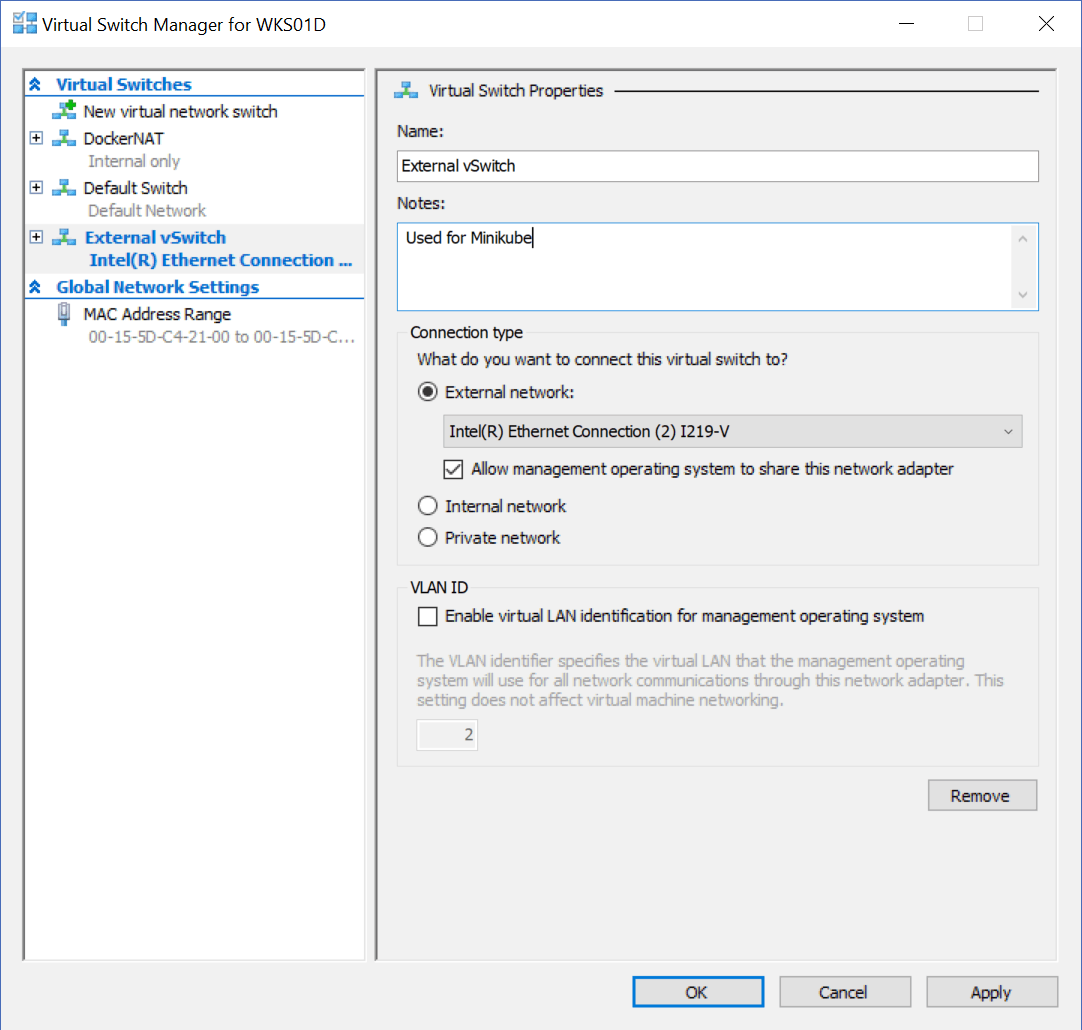
Give your switch a name, select the physical NIC you want to use if you have more than one, and then Apply. Bonus tip, if you want everything to be automatic name the switch minikube.
Launching Minikube
Before we can run containers, we need to start our Minikube virtual machine. That’s the point of this Minikube tutorial when we actually start using minikube. To launch the virtual machine, use the executable file we have downloaded and run it from the prompt as administrator. Instead of using the exe file name, I recommend to put it in a safe location, rename it minikube.exe and add that location to your path. This way, you can control it with minikube command from any place in the command prompt. To launch the VM, type the following command.
minikube startNote that if you see problems in the auto-detection of the hypervisor, you can always tell it manually with --vm-driver option, the default is VirtualBox. If you are using Hyper-V, and your vSwitch is not named minikube, use --hyperv-virtual-switch option to tell the actual name. Starting minikube will produce an output similar to the one below.
C:\Windows\system32>minikube start
o   minikube v0.35.0 on windows (amd64)

!   Ignoring --vm-driver=virtualbox, as the existing "minikube" VM was created using the hyperv driver.
!   To switch drivers, you may create a new VM using `minikube start -p  --vm-driver=virtualbox`
!   Alternatively, you may delete the existing VM using `minikube delete -p minikube`

:   Re-using the currently running hyperv VM for "minikube" ...
:   Waiting for SSH access ...
-   "minikube" IP address is 192.168.1.19
-   Configuring Docker as the container runtime ...
-   Preparing Kubernetes environment ...
-   Pulling images required by Kubernetes v1.13.4 ...
:   Relaunching Kubernetes v1.13.4 using kubeadm ...
:   Waiting for pods: apiserver proxy etcd scheduler controller addon-manager dns
:   Updating kube-proxy configuration ...
-   Verifying component health ......
+   kubectl is now configured to use "minikube"
=   Done! Thank you for using minikube!

C:\Windows\system32>
Now that we launched minikube we are ready to dive into the best part of this minikube tutorial.
Kubectl basics
This is the part of our minikube tutorial where we actually make things work. In fact, having minikube is just like having raw power in your application. We need to direct that power, and we can do that with kubectl, a great utility to control Kubernetes nodes and clusters. Since our minikube is a Kubernetes node, we can use kubectl. To ensure you have kubectl installed, run kubectl version. You should see some JSON output.
The kubectl is a utility that runs on your PC, but that you use to control remote Kubernetes environments. When we launched minikube with minikube start, we automatically configured our kubectl to use our minikube virtual machine.
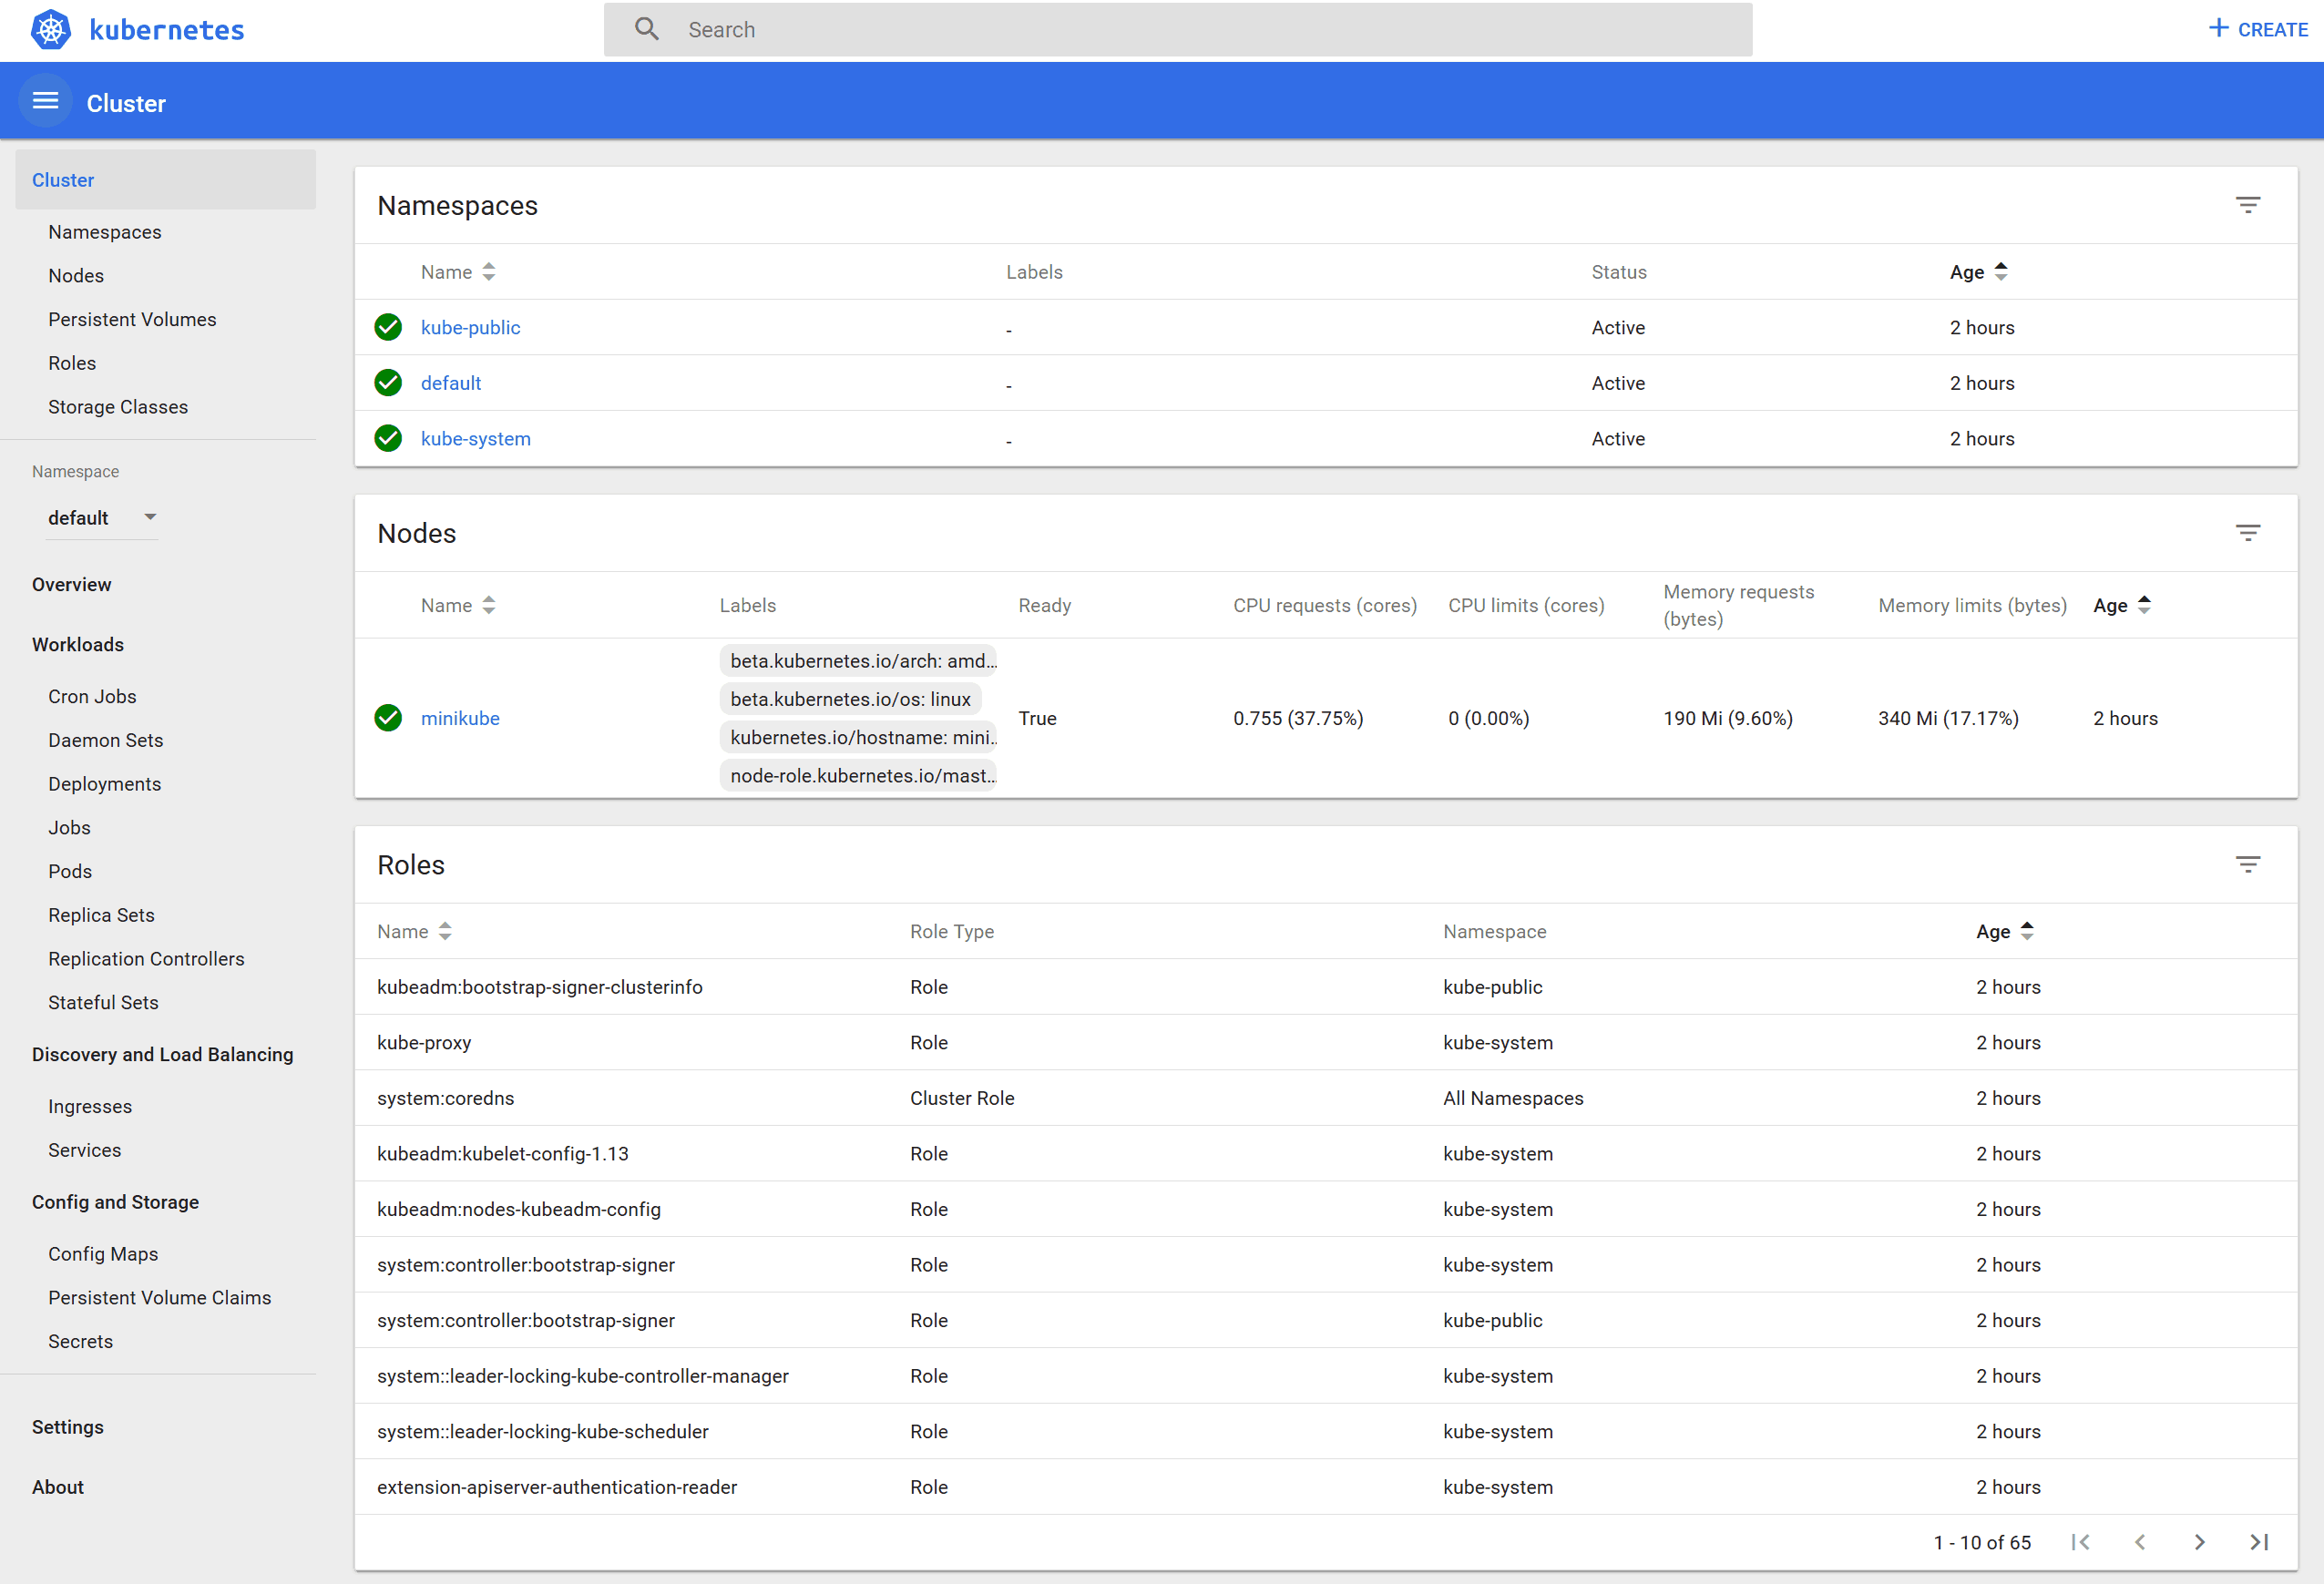
The dashboard
One cool thing we can do straight away is launching the dashboard. This is a web page showing the status of our minikube, the containers it hosts, and some more useful information. More than that, we can provide YAML text to create new resources like containers or pods. To open that, just run minikube dashboard, and after some loading, you will see a web page like the one below.
Running a container
Now that you have minikube started you may want to run containers in it. You can do that with the kubectl run command, followed by the name you want to give to the container. You also need to specify the image of the container, and on which port it will listen. You can run an example web server in a container with the following command.
kubectl run hello-minikube --image=k8s.gcr.io/echoserver:1.10 --port=8080Now, to access our container from outside we need to expose it. We can do that easily with kubectl expose.
kubectl expose deployment hello-minikube --type=NodePortNow, to get the URL on which we have exposed the server we can simply use the kubectl service command with the --url option.
minikube service hello-minikube --urlOn my machine, I got http://192.168.1.19:31783. Surf to the address you get and you will see an ugly yet functional web page.
More kubectl commands
The goal of this minikube tutorial, as you can tell, is to get you started with minikube. Kubectl is a Kubernetes components, and requires way more explanation than we could give here. Nonetheless, here is a quick cheat sheet of commands you may find useful to get started.
| Command | Description |
|---|---|
kubectl get pods | List all the pods and containers. |
kubectl get services | List all the services. |
kubectl run | Run a command inside a container. |
kubectl expose | Expose the ports of a given pod to outside of the host machine (minikube in this case). |
kubectl describe pod <pod name> | Get more details about a pod. |
kubectl delete pod <pod name> | Delete a pod. |
kubectl logs <pod name> | See the logs of a pod (stdout). |
Wrapping it up
In this post, we saw how to use minikube to quickly enable a small and self-contained Kubernetes environment on our machine. We also saw the basic commands with kubectl, enough to get you started working with containers. I encourage you to start using containers, and Kubernetes, to modernize your applications. In fact, Kubernetes has the great advantage of being supported natively and transparently in both Azure and AWS. So, when you are ready to switch to production, you can easily move your containers from minikube to the cloud.
What do you think about minikube and this minikube tutorial? Let me know in the comments.

