In the previous article, we saw how to install F5 BIG-IP. However, having a load balancer in place is just the beginning of the game. The real deal is configuring that device to actually do load balancing, and this is what we will do today. Specifically, we will see how to use the F5 Virtual Server entity to do load balancing.
Introducing F5 Virtual Server
What is an F5 Virtual Server?
When you hear “F5 Virtual Server” for the first time, you will probably think about a virtual machine. Instead, the F5 Virtual Server is simply a configuration item on your F5 BIG-IP device. It represents an entity that the load balancer will expose like it is a single server. In reality, the F5 appliance is leveraging multiple servers to serve user requests. Yet, it exposes all of them like a single server, which is virtual. And that’s the F5 Virtual Server.
An F5 virtual server is the representation of multiple servers to the user as a single server.
More or less, you can see it as a virtual IP acting as a reverse proxy. The appliance receives requests on that virtual IP and based on its intelligence it distributes them to other “real” servers.
A lab for the F5 Virtual Server
Since in the previous article, we started creating an F5 lab inside VMware workstation, we will stick with it. However, we will make some modifications to the topology. You should move the external network, the third network adapter on the BIG-IP virtual machine, to a new LAN segment. Instead, in the previous lab, we configured it for NAT. Then, we deployed two servers in the F5 Backend (existing segment) and a workstation in the F5 Frontend, the new segment. This machine in the new segment is the client we will use to test the requests.
This change will result in the following topology
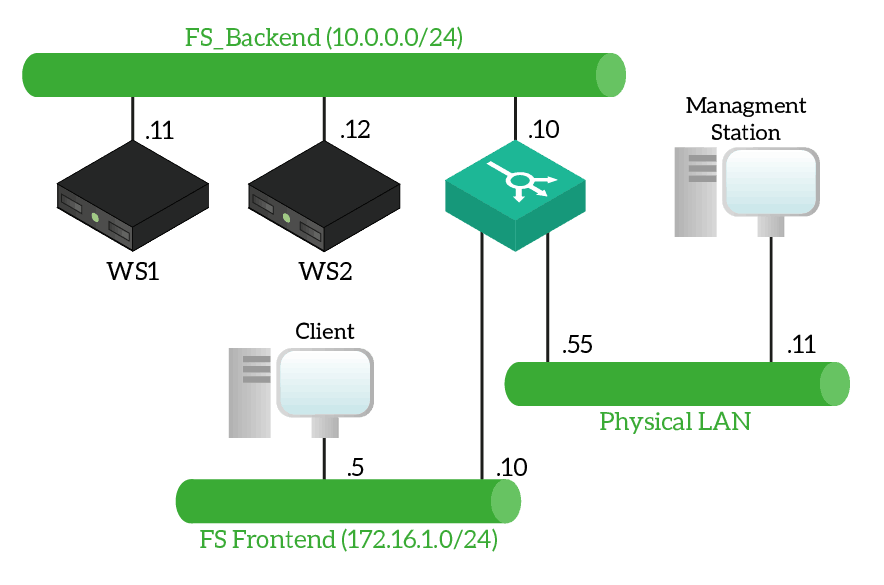
In our case, all our devices are Lubuntu 16.04 with Apache2 installed. However, you can use any server you want. This tutorial works for production environments as well, where you might even have physical devices. The management workstation is our own PC, the one we run VMware Workstation on.
Distinguish between the servers
In our lab, we will serve static web pages. To identify which server is responding to our request, we need to edit /var/www/html/index.html file. Configure it as below in the first web server.
You are served by WS1
The application is up and running!
Instead, on the second web server use the following code.
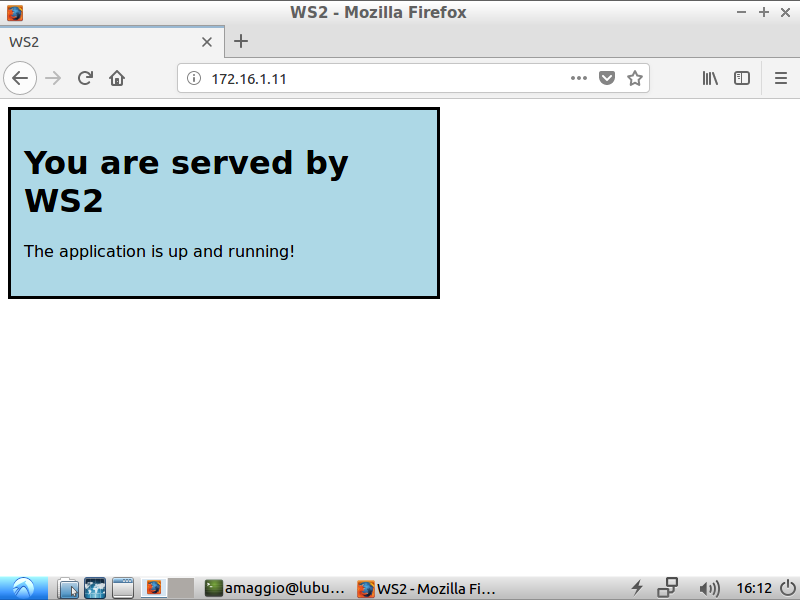
You are served by WS2
The application is up and running!
Great! Now, we are ready to start.
Configuring Load Balancing with F5 Virtual Server
Node, Pool, Virtual Server
F5 load balancing mechanism works with three items that you need to combine: node, pool, and virtual server.
- A node represents an actual server offering a service we can load-balance.
- A pool is a group of nodes that work together to provide the same service to the user. If you have two web servers for the same website for redundancy, you should put them in the same pool.
- As we already explained, the F5 virtual server is a Virtual IP on the F5 appliance that serves user requests. All it does is relaying the requests to the pool you configure.
In the end, when the user makes a request to the F5 virtual server, flow like the one below will happen.
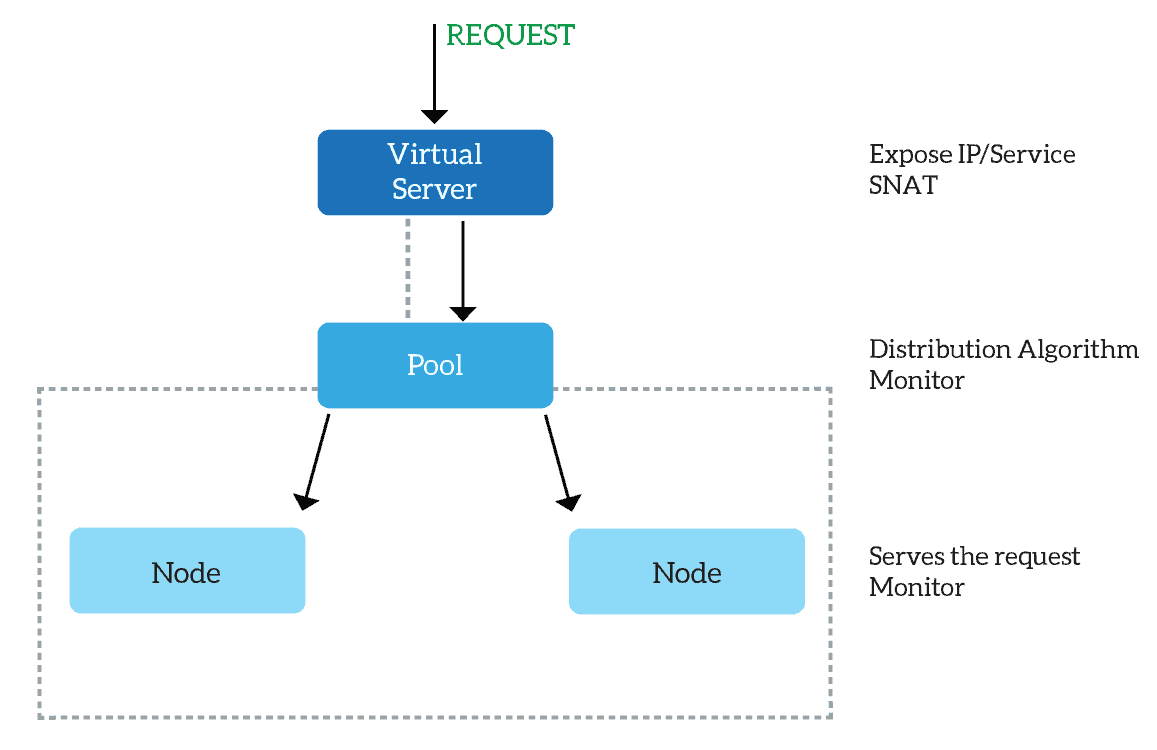
Now, we will see how to transform this picture into actual configuration.
Configure F5 Node
As with many network devices, we need to prepare the configuration from the bottom up. Since the virtual server points to the pool, which then contains the node, we need to start from the node. After all, the node is the only component that we can create without having to create other components first.
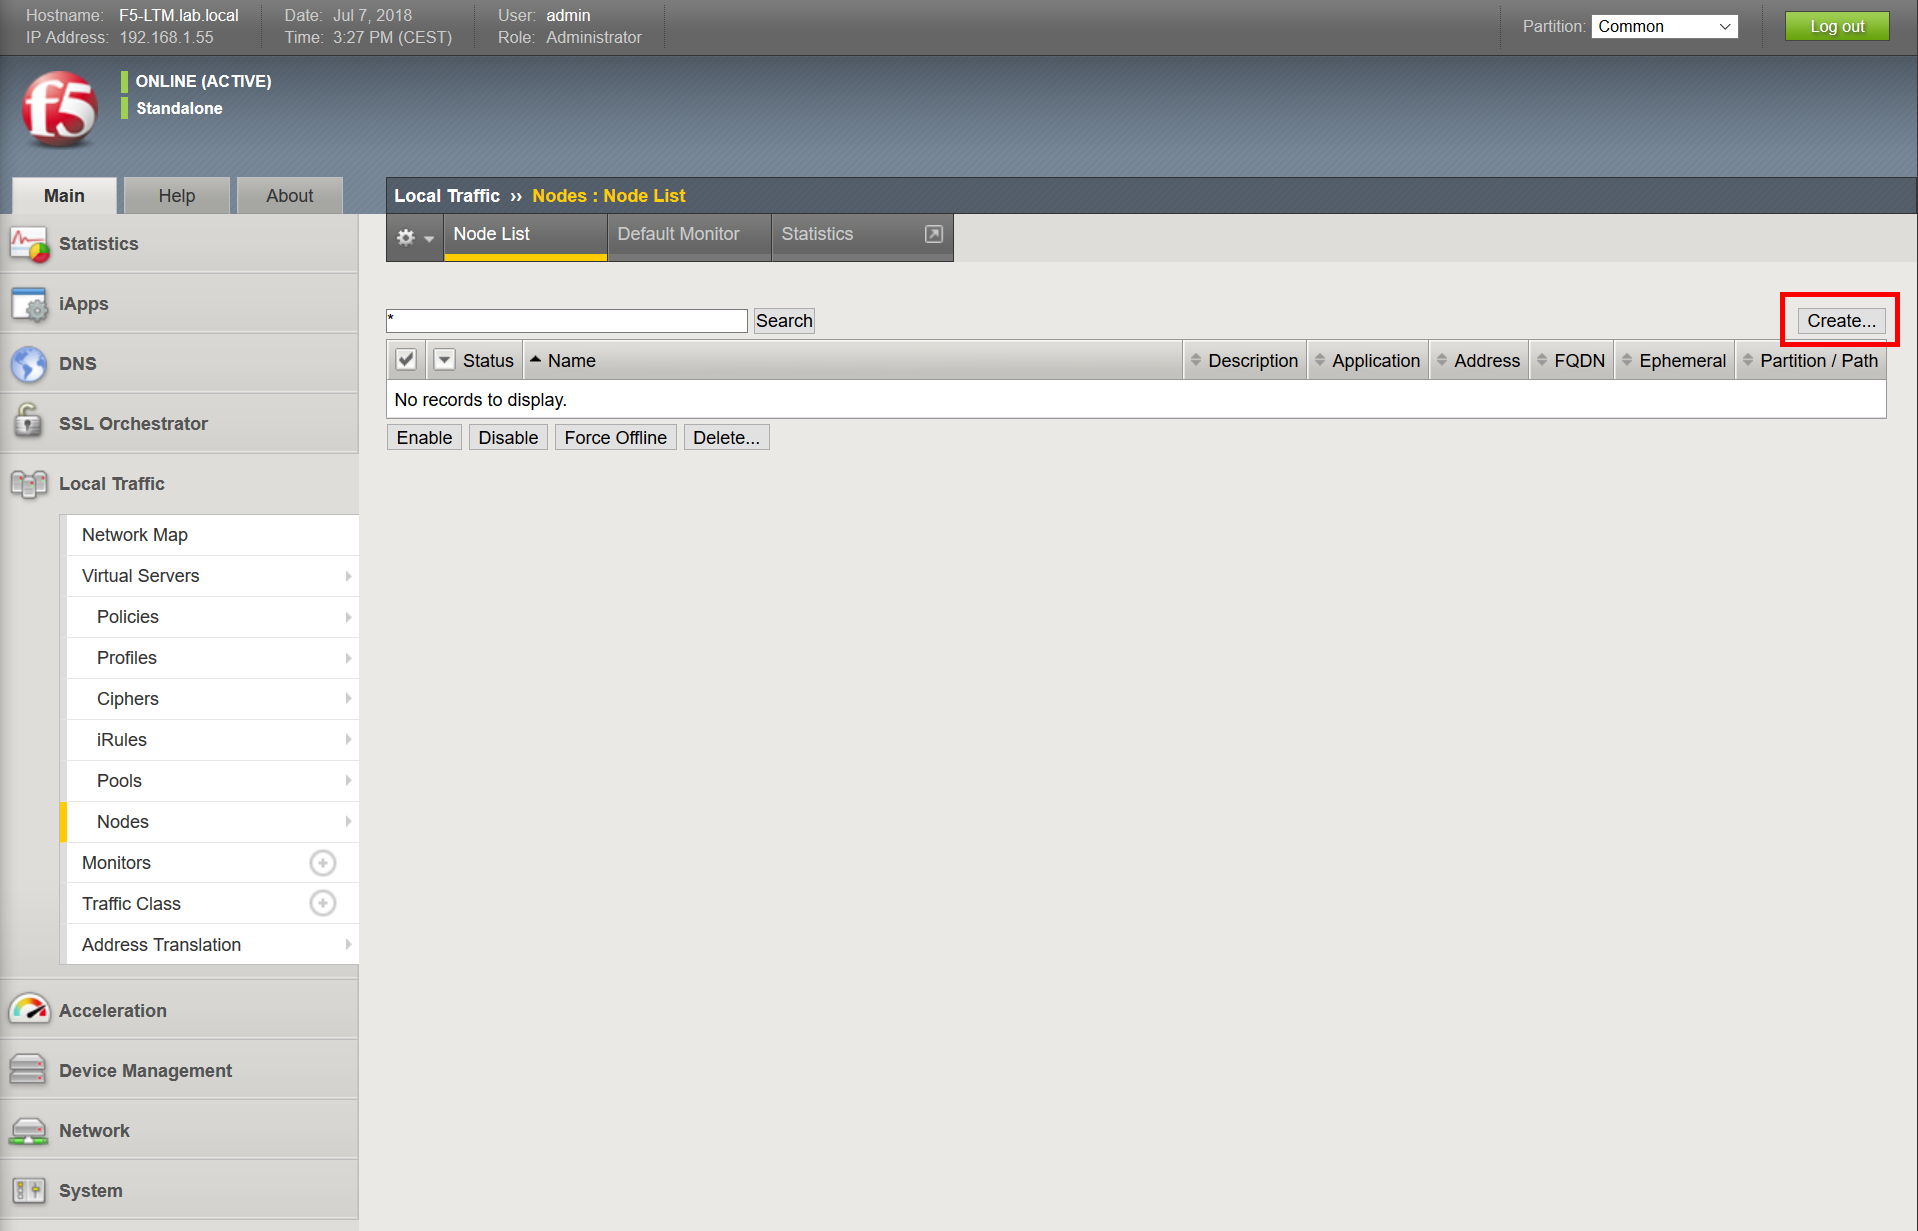
First, login into your F5 appliance web interface with your credentials. Then, navigate to Local Traffic > Nodes > Node List. Here you can see all the nodes you have. Of course, in case of a fresh install, you will see none as we do. On this page, click on Create… on the top-right corner.
At this point, we need to provide our node a name we can remember, and optionally a description. Then, we need to indicate the address of the device providing this service (in our case webserver-1 and webserver-2), and optionally health monitors. With health monitors, F5 will monitor the health of the node and will send the requests to this node only if the health check is positive.
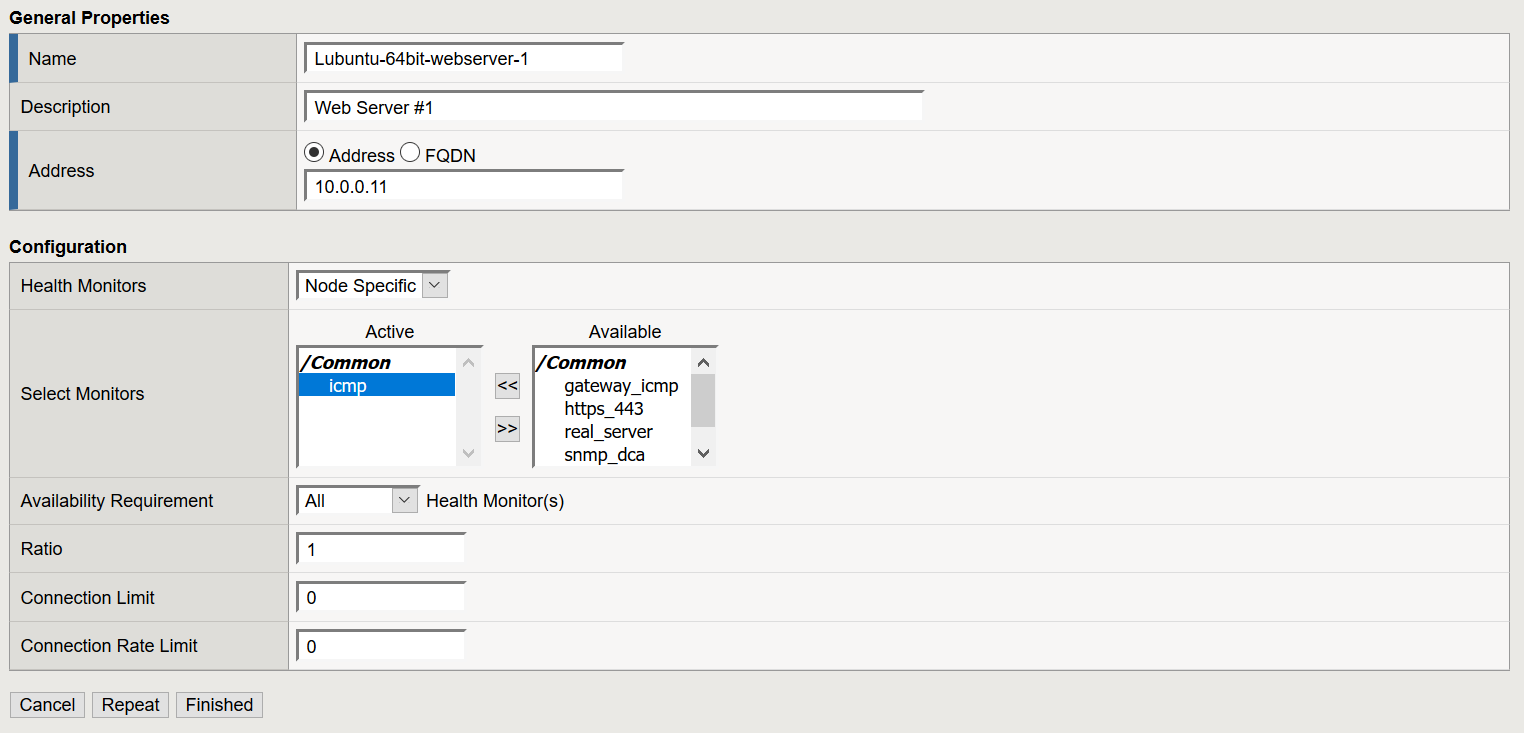
Note that if you don’t set the Health Monitors option to Node Specific, the Select Monitors field will not appear. Once it does appear, move with the arrow the tests you need from the available box to the active box. In this case, we simply ping the server (ICMP).
Once you are good with the configuration, click Finished to confirm or return to the list. In our case, we click on Repeat to confirm the configuration and add a new node. Configure the second server in the same way.
Seeing our nodes
Once you finish the configuration of nodes, you will see them in the list as active (green circle). This is because our ICMP health monitor is telling the F5 device that the servers respond.

Configure the pool
Configuring the pool is probably the simplest step of the three. Go to Local Traffic > Pools > Pool List, and then use the Create… button on the top-right, just like you did for nodes.
Here, you will need to give your pool a name and select the health monitors you want to use. Why do you need to do that, if we configured them on the nodes as well? In reality, a server can offer multiple services, like HTTP, HTTPS, or FTP. In the node part, we simply monitored that the server was running. Instead, here we monitor that our servers are actually accepting HTTP connections. Thus, select HTTP (or the service you are configuring).
For this lab, we will leave the load balancing method as Round Robin. This means that requests will be equally distributed across servers: one to server 1, the following to server 2, then back to server 1, and so on.
Finally, you need to select the nodes that will join this pool. Check Node List, select each server, and configure the port the actual server is listening on. In our case, they are both listening on port 80, the standard for HTTP. After that click Add and repeat for the other server.
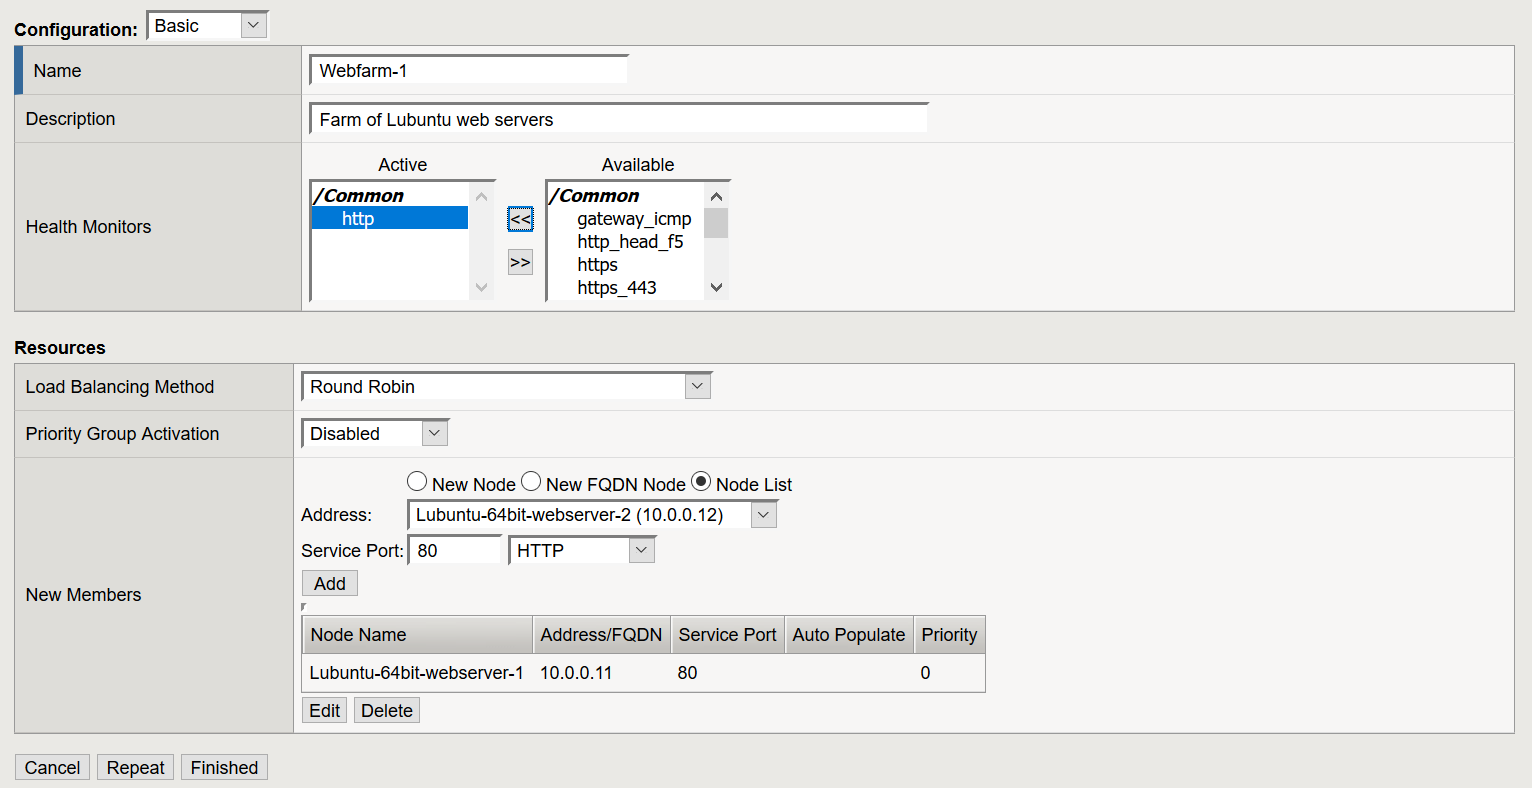
Once you prepare the configuration you need, click Finished. The new pool will appear on the list as nodes did. If you later need to edit the members of the pool, click on the pool from the list and then navigate to the Members tab.
Configure F5 Virtual Server
And now we are at the core of our tutorial. The configuration of the F5 Virtual Server might be the scariest one, but we will see exactly how to make it work. To create an F5 new virtual server, the process is the same as for nodes and pool. Navigate to Local traffic > Virtual Servers > Virtual Servers List, then click Create… on the top-right corner.
Since the configuration here has several parts, we will see each part individually.
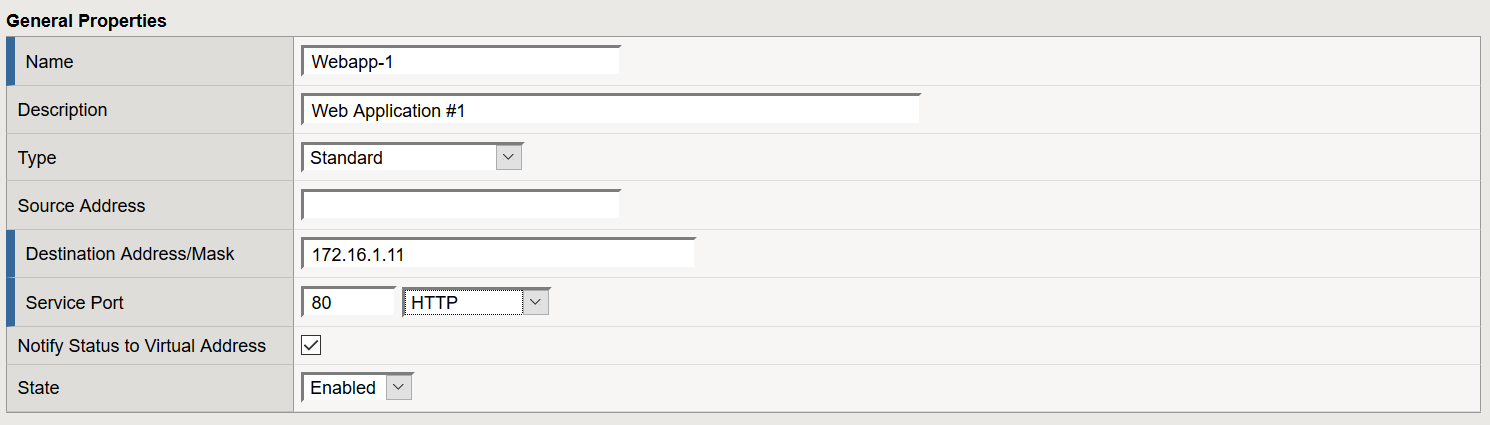
General Properties
Here we start with a name for our F5 web server. Then, we can provide a Source Address: the addresses that can make requests to this virtual server. If you leave it empty, F5 will fill it with 0.0.0.0/0, which means anyone can make requests to our virtual server. This is what we want.
Instead, the important address is the Destination Address/Mask. This is the actual IP address the virtual server will have. If you don’t want to mess with routes, use an address in a network the appliance has a NIC in. You can omit the mask in case of a single address.
Finally, the service port: which port to expose to the users. In the end, the configuration of this part will look like the one below.
Configuration
When preparing the configuration, leave it to basic. Since we are simply working with HTTP, you can leave untouched the SSL Profile part. However, there is a field that you absolutely need to modify. I am talking about the last one, Source Address Translation, which you should set to Auto Map.
By doing so, the F5 will contact the webserver using its own IP address, instead of the address of the user. This is important to avoid the server replying directly to the user. In fact, in our case servers can’t even reach the user, so it is mandatory.
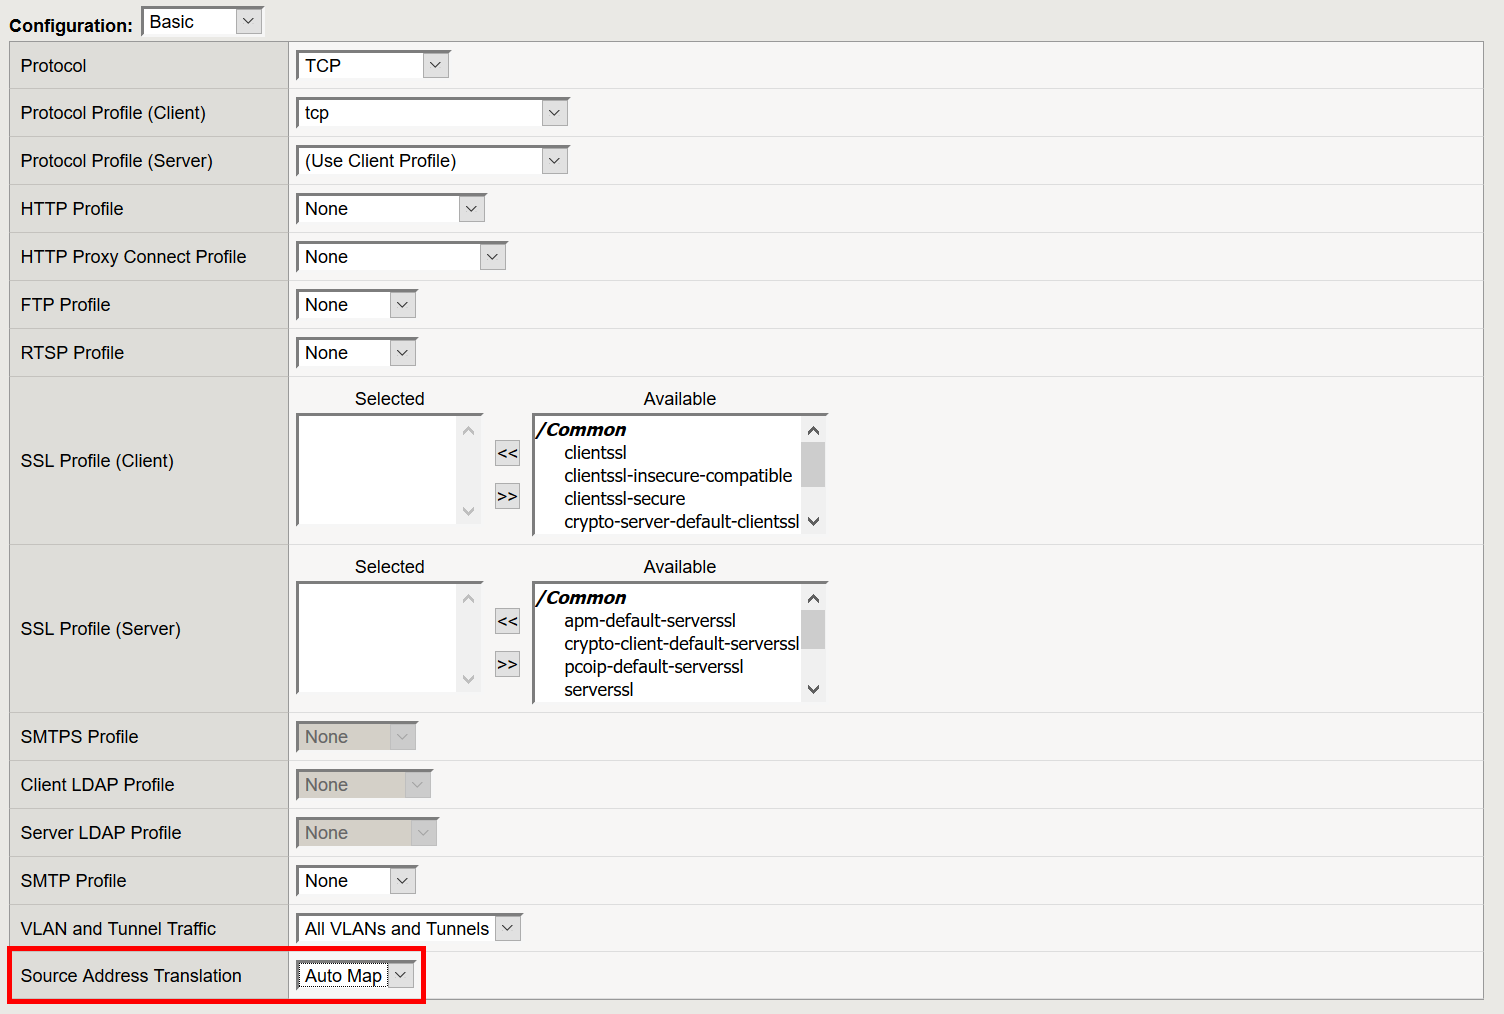
With Auto-map, the F5 will use its own IP address on the exit interface. In a complex and production environment, you may want to dedicate a set of IP addresses for source address translation. This enables better connection management, and you don’t risk running out of ports. You can do that with a SNAT pool, but that’s for another article.
Content Rewrite & Acceleration
For simple deployments, we don’t need to do anything here. Leave untouched both sections and directly move to Resources.
Resources
Here we tell F5 what’s behind this F5 Virtual Server. You guessed it, the pool we configured previously. Simply select the pool from the drop-down from the Default Pool field, and you are good to go.
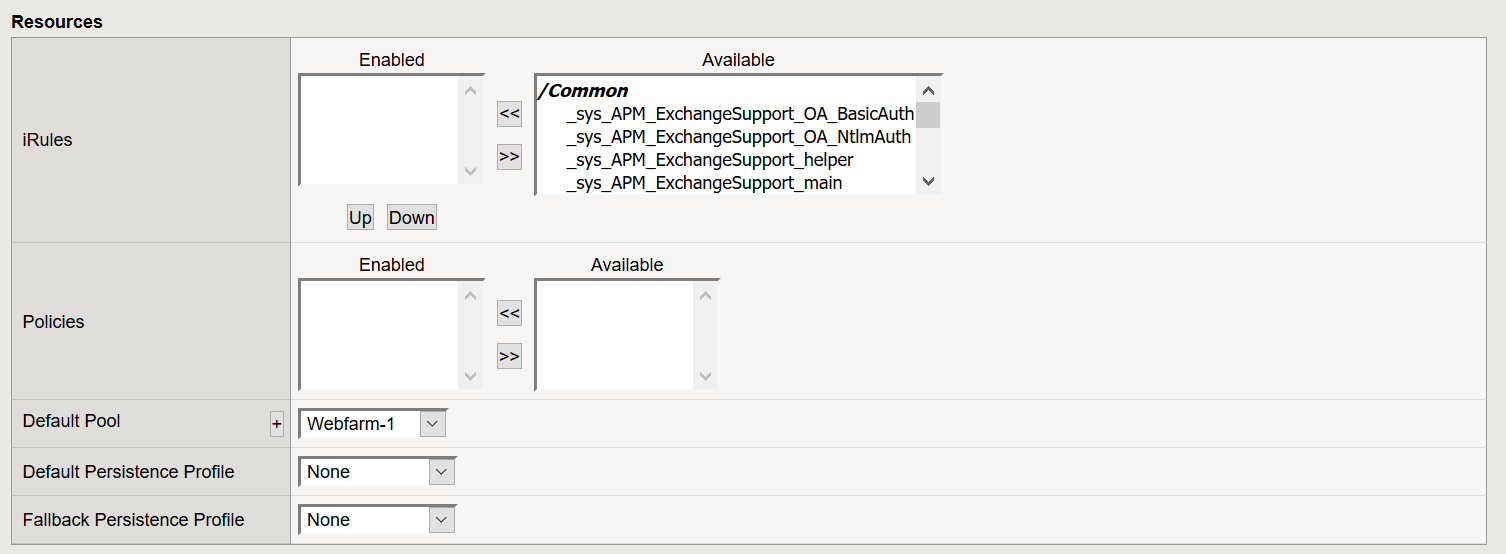
And with this, you can click Finished and effectively create your F5 Virtual Server. Now we just need to test it.
Testing your F5 Virtual Server
To test your virtual server, navigate to the address you gave to it from a machine that can access it. In our case, it is our Lubuntu Workstation inside VMware. Then, hit Ctrl+F5 a few times. You will see the two messages alternating in sequence.
Instead, the page from the primary web server will be green and will tell that WS1 is doing the job.
Now it is your turn!
With this article, you know how to set up an F5 Virtual Server. Now you can experiment with it: try removing nodes from the pool, or simply disabling them. You will see that only the remaining node will serve your requests.
What do you think about F5 Virtual Servers? Let me know your opinions in the comments!

