When you need a load balancer, F5 LTM is one of the best choices. In fact, F5 is the market leader of the segment and offers a variety of load-balancing products. Among them, Local Traffic Manager (LTM), is the one that distributes traffic to servers within a data center. In this F5 LTM Tutorial, we will see how to install it.
What is a load balancer?
A load balancer is a reverse proxy. In other words, clients connect to the load balancer believing to connect to an actual server. Then, the load balancer contact the server providing the required resource. In this way, the load balancer can distribute traffic across multiple servers. If you are curious, we have a whole article about load balancers.
Getting F5 LTM Tutorial
F5 LTM can be installed on a physical F5 device, or on a VMware virtual machine. Today, we are going with the latter option. Since we are doing this for a F5 LTM Lab, we will use VMware workstation. However, the same procedure will work for VMware ESXi, in case you are deploying for production.
In case you have the F5 physical device, all you need is a LTM license. Instead, if you want to go to the virtual route, you need to download F5 BIG-IP Virtual Edition (VE) as well. In both cases, if you do not own a license, you can get a 90 days trial license for free. To get your license and download the software, go to the F5 website Trial page. From there, you will need to create an account and then download the virtual machine template. F5 will mail you the license key within an hour. For this lab, we downloaded F5 BIG-IP 13.1.10. Any later version will work as well.
Preparing VMware
VMware is the virtual environment that will host your load balancer. We need to prepare it in the right way to make this setup work. The virtual machine comes with four virtual NICs, but we are going to use only three of them. The first one is the out-of-band management, and you need to configure there the IP address you wish to manage your F5 on. All the other interfaces will actively send traffic for load balancing, and you can tune them at will. Just note that the management interface must be on a separate network than the production interfaces. This is an important technical limitation.
For our lab, we will have the management interface, an external interface and an internal interface. The external interface will be NAT-ed by VMware on your PC’s IP address. Instead, the management interface will share the same network with your PC: we are effectively working around the limitation described above. Finally, the internal interface is a VMware LAN segment, accessible only to other virtual machines. This is the network where we will add our servers.
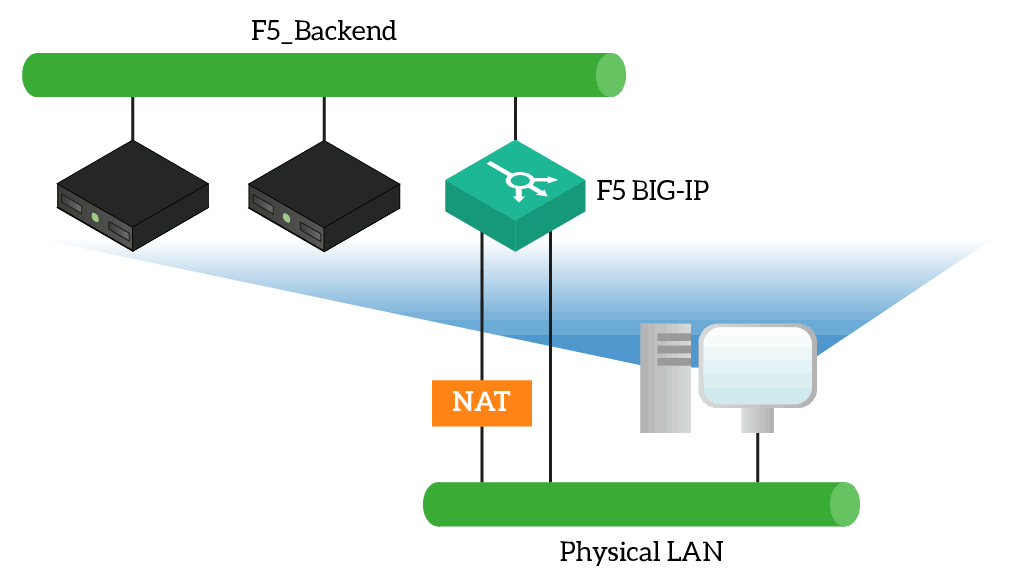
In production, things can get more complex. F5 supports VLAN tagging and can receive and work with multiple VLANs. However, this is for another day.
Importing the OVA
Our F5 LTM Tutorial starts with the deployment of the F5 LTM VE appliance. The file we downloaded from the F5 website is an OVA, a special file format for virtual machines. We can import this file on VMware (or similar hypervisors) and follow a step-by-step wizard for the deployment. To open the wizard, use File > Open, and then select the OVA file.
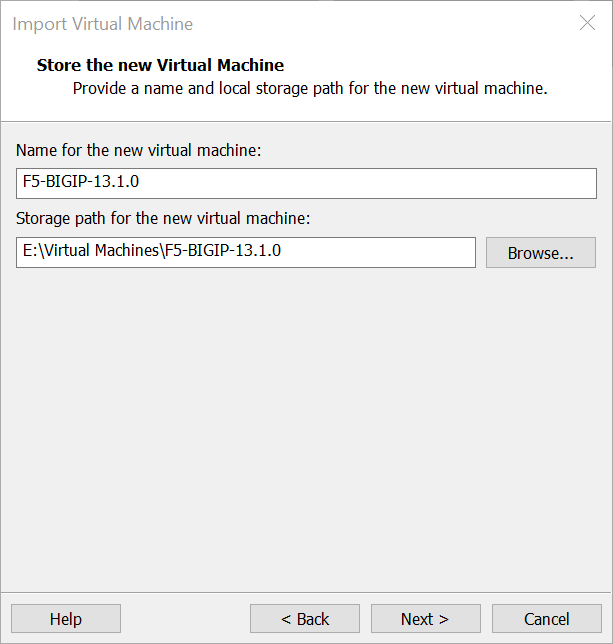
As the first thing, it will ask you how to name your virtual machine and where to save it. You can set both at your liking, but we recommend using the model and version as a name and include the same information in the path as well.
Sizing the VM
Not all load balancers are equals. Depending on what you need to do, you can assign to your load balancer a different number of resources. For a lab, as we are doing, you can select the least amount of RAM and CPU needed. However, for a production environment, you need to verify your actual needs.
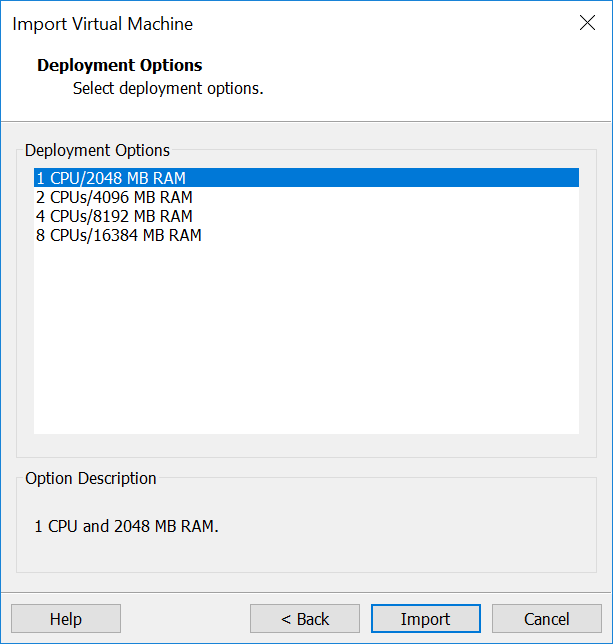
Since this is a lab, we are going to opt for the least demanding deployment. Once you decide, click Import to continue.
Edit network settings
A load balancer is a networking device, thus the network is one of the most important parts of its configuration. This means we need to edit the Network Adapter settings of the virtual machine. Depending on your version of VMware, the following window may not pop-out automatically. In case it doesn’t, finish the import and then right-click on the VM and select “Edit Settings”.
As we mentioned, the first interface is the management, the others are for production. You should use at least the management interface and one production interface, however today we are going with two of them. You should configure the interfaces according to the following table.
| F5 Interface | Adapter Name | Configuration |
|---|---|---|
| Management | Network Adapter | Bridged |
| Production 1 | Network Adapter 2 | Connected to a dedicated LAN segment. If this is not possible, connect to a custom virtual network like VMnet3 or VMnet8. |
| Production 2 | Network Adapter 3 | NAT |
| Production 3 | Network Adapter 4 | Any configuration is okay, we won’t use this interface. |
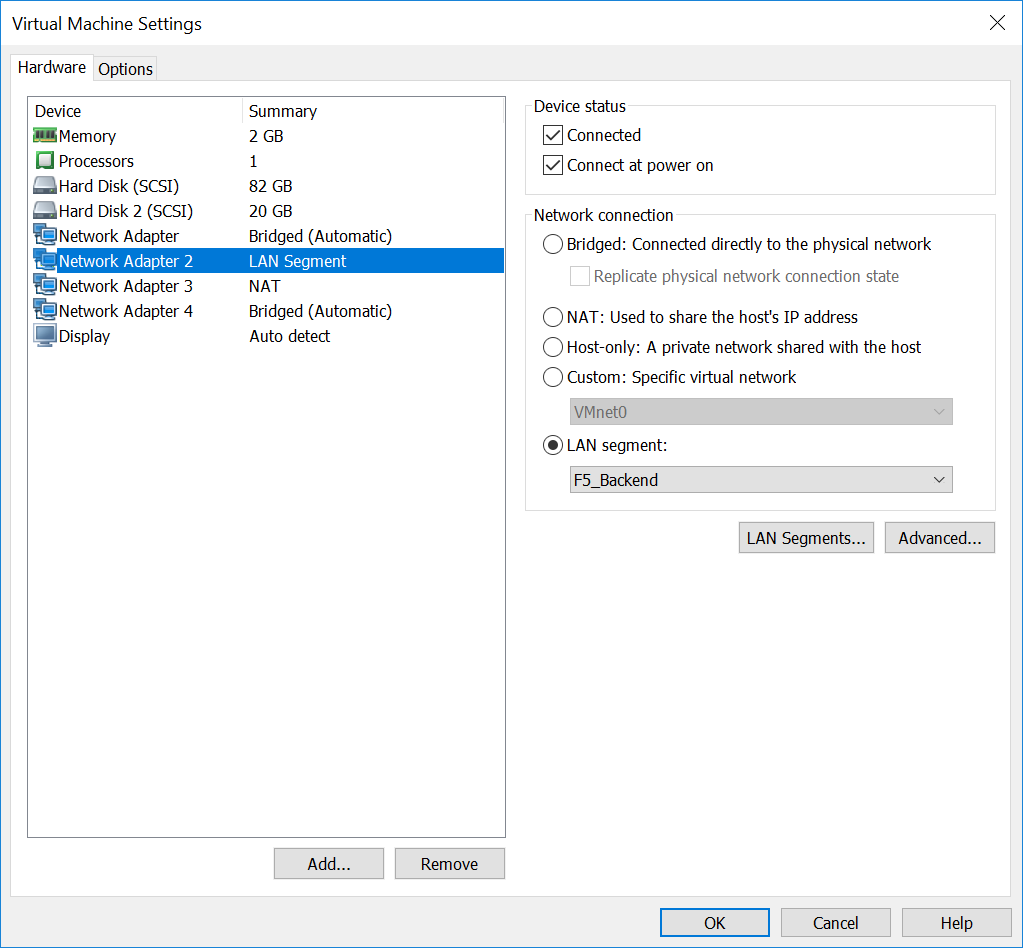
A little point of attention is the configuration of the Network Adapter 2. We will use this adapter for internal traffic, and this is why we are creating a LAN segment. This LAN segment is a virtual network that only VMware virtual machines on your PC will see. You won’t be able to access it directly. To create a new segment, as we did, click on LAN Segments, click Add and write a name. This new name will appear in the drop-down for all virtual machines.
In case your version of VMware does not support LAN segments, use a virtual network. Those offer the same functionalities as LAN segments, but you can’t name them the way you want.
Once you finish editing, simply click OK.
Review your configuration
Before we continue our F5 LTM Tutorial, we should review our configuration. If you select your VM inside VMware, you should see a summary page similar to the one below.
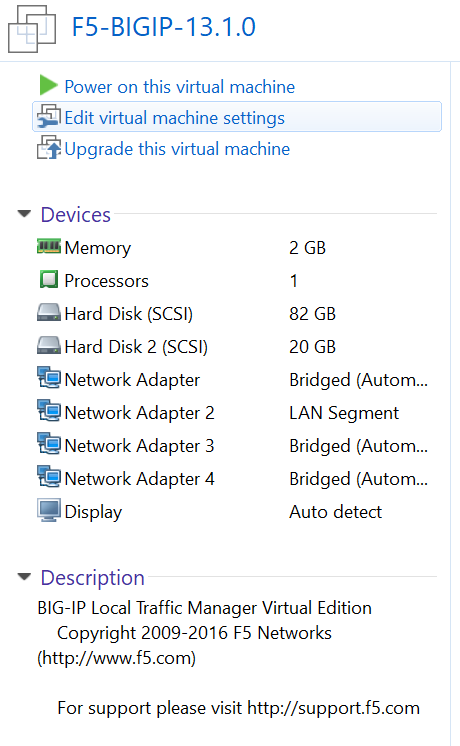
F5 is sized to occupy up to 100GB on your system. However, these are not preallocated. In other words, the VM will increase in size as it grows, only if it needs it. After the initial deployment, it should not exceed 10-12GB.
Installing F5 LTM Tutorial
Now we get into the real action. Our F5 virtual machine is ready to start, and we are ready to configure it. As we will see, we will do part of the configuration from the CLI, and part from the web interface.
Launching F5
To launch your F5 virtual machine, select Power on this virtual machine from VMware. Then, a window with the screen of the virtual machine will appear, and within a minute you will see this.
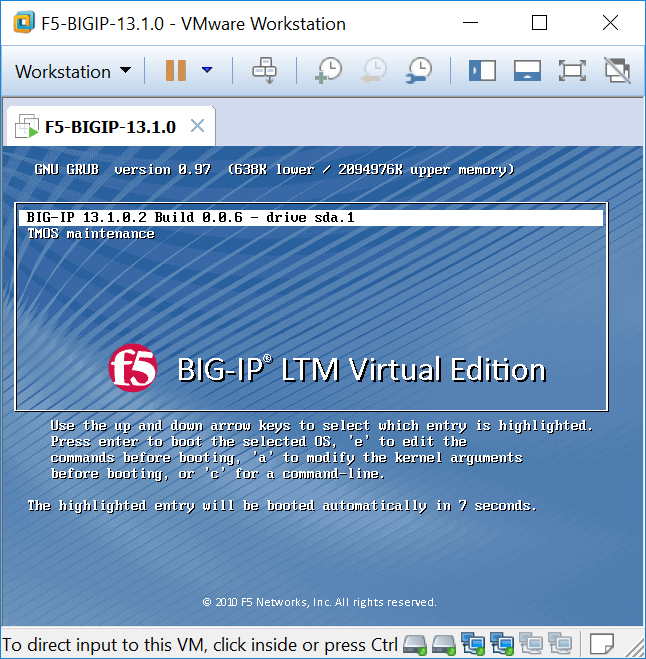
Here you can select if you want to boot BIG-IP or the maintenance utility. Of course, we want to boot F5 LTM, so you should select the first option. In case you don’t do that, the option selected will launch in about 10 seconds. This means that, if you do not touch the VM during the boot, it will always launch in F5 BIG-IP mode.
At this point, you will see the machine loading in terminal mode, and after a few minutes, you will be prompted with a login.
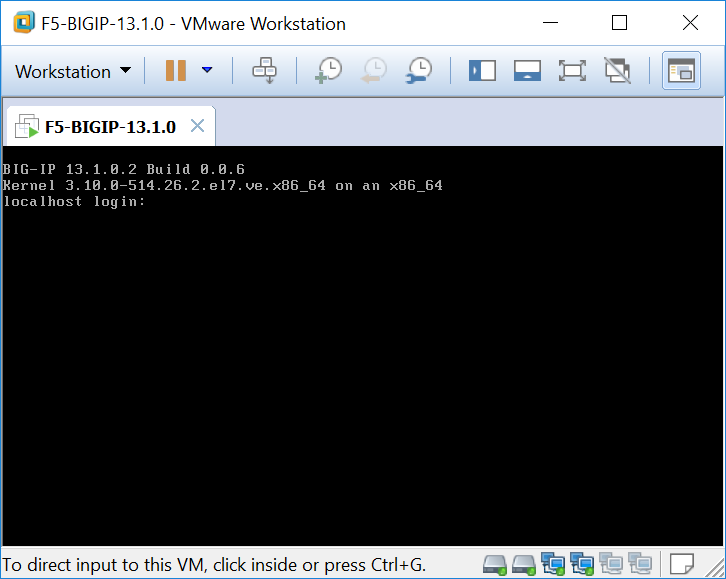
F5 BIG-IP has two default users, as we will see in this F5 LTM Tutorial. Here you need to access with the CLI user, which is root. The default password is simply default.
Configuring Management address
At this point, you should enter the F5 console. From there, you can configure the basic settings of the device. The first thing we need to do is give our management interface an IP address. This way, we can access our F5 appliance from a web interface and continue the setup. To do that, simply use the config command in the CLI. This will open a quick wizard.
As a first thing, the wizard will tell us we need to configure an IP address on the management interface, with a banner similar to the one below.
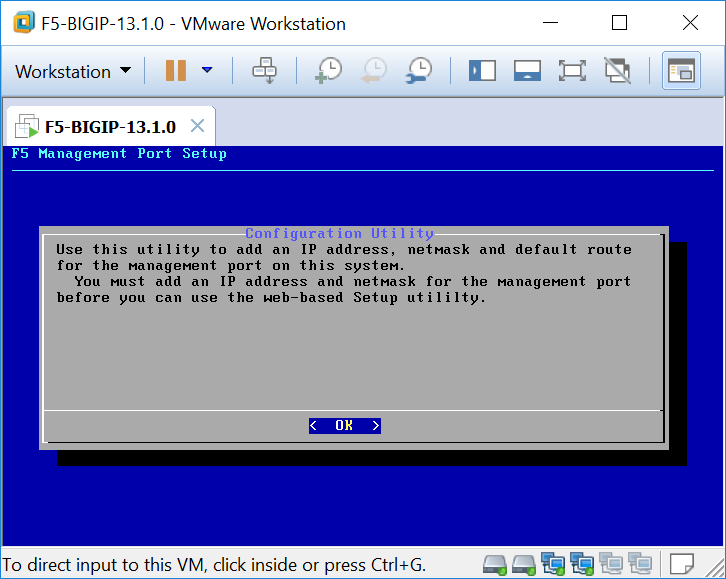
Here, all you need to do is select OK with Enter. In case “OK” is not highlighted, hit tab until it is. After that, you will see the IP address configuration of the management interface or VMware NIC “Network Adapter”. If this NIC is in a network with a DHCP server, F5 will get the configuration from the DHCP server and will ask you to confirm. Since for this lab, we are using a bridged adapter for this interface, if you are in a home network like me you will see an address got from your router. If you aren’t, you will have to enter it manually.
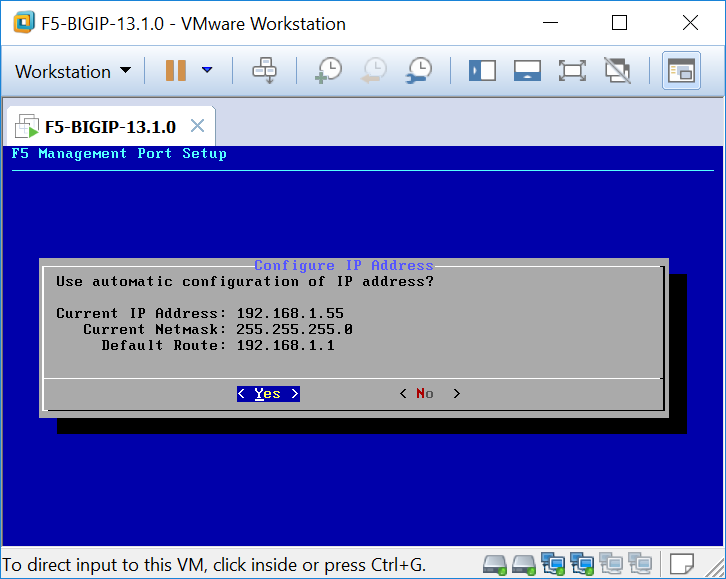
If you don’t like the default configuration, select No and enter the configuration manually. Once you are satisfied, select Yes. Note the IP address, we will use it to access the web interface.
Configuring production interfaces
Once you finish with the management IP wizard, you will get back to the CLI. Since we are there, we can configure the production interfaces as well. First, we need to add a network to each interface. Each network is a VLAN, and you can have multiple of them on each physical interface. However, since we are not using 802.1Q, we will tell F5 that this network is untagged. For our lab, we can create two networks, named internal (the LAN segment) and external.
tmsh create net vlan internal add { 1.1 { untagged } }
tmsh create net vlan external add { 1.2 { untagged } }
Then, we need to create a Self IP on each network. This is an IP of the F5 device in each network. We can use it to expose load-balanced services, and we can have more of them on each interface. We will start with two.
tmsh create net self 10.0.0.10 address 10.0.0.10/24 vlan internal
tmsh create net self 172.16.1.10 address 172.16.1.10/24 vlan external
Beside the F5_Backend LAN segment, all the rest of the network is behind our PC. Thus, we need to create a default route to go outside.
tmsh create net route Default_Gateway network 0.0.0.0/0 gw 172.16.1.1Finally, we can save the configuration.
tmsh save sys config
exit
Accessing the GUI
Now we have done the tricky part, now it’s all smooth sailing. With a browser on your PC, navigate to the IP address of the management interface in HTTPS (HTTP won’t work). Ignore the certificate warning, and the F5 LTM login page will appear.
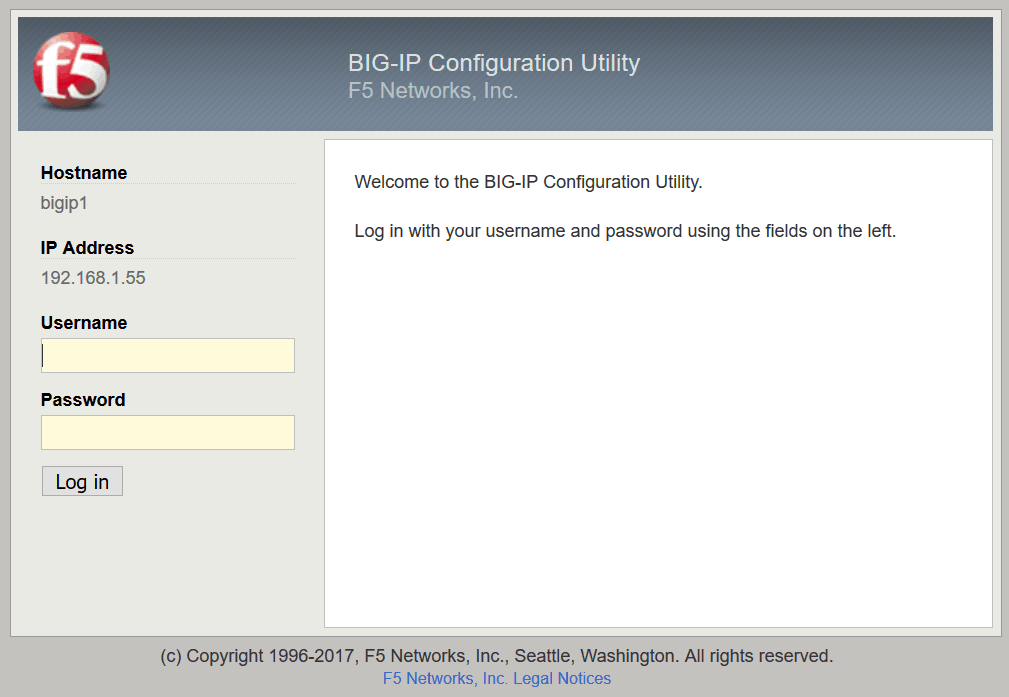
Here, credentials are different. In this case, the default user is admin, and the password is admin as well. Once you complete the login, you will start with a configuration wizard like the one below. Here we can configure all the settings to make our F5 device operational.
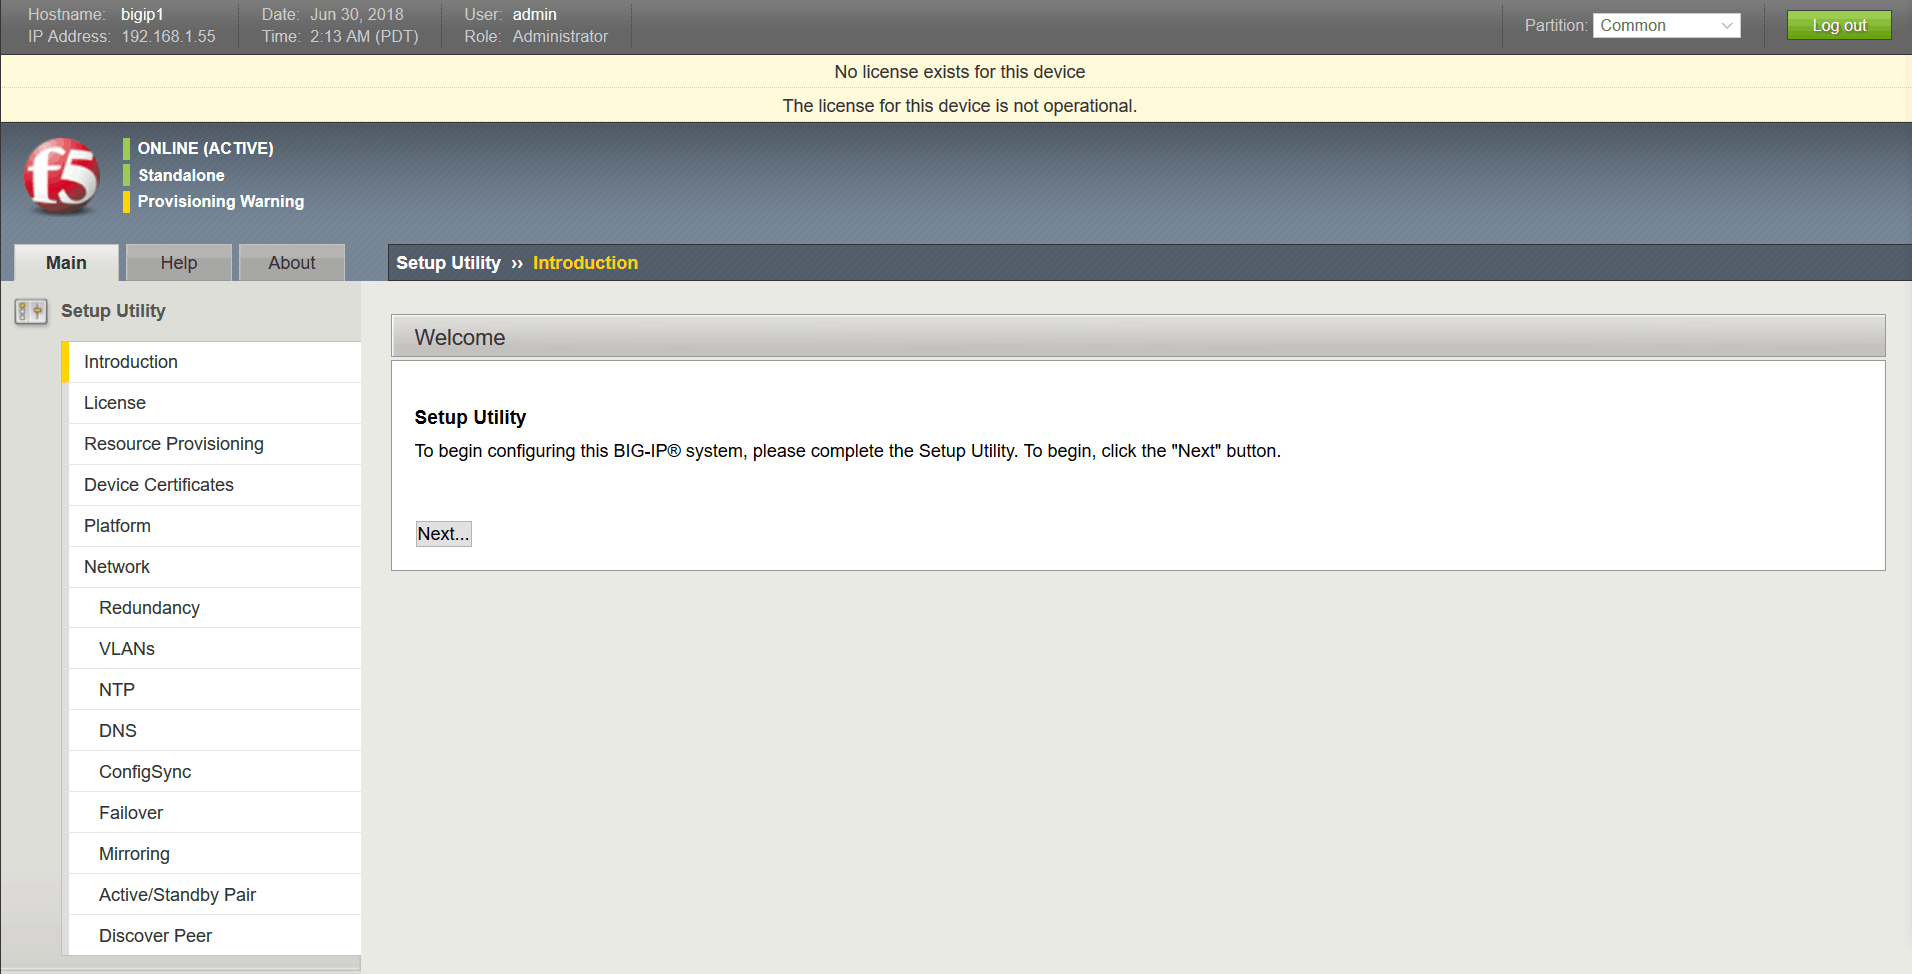
Here, click Next to launch the setup utility.
Configuring the license
This is the part of our F5 LTM Tutorial where we need to enter the license. In fact, this is the first thing F5 will ask as part of the setup. All you need to start is your license code, you should have received it via email.
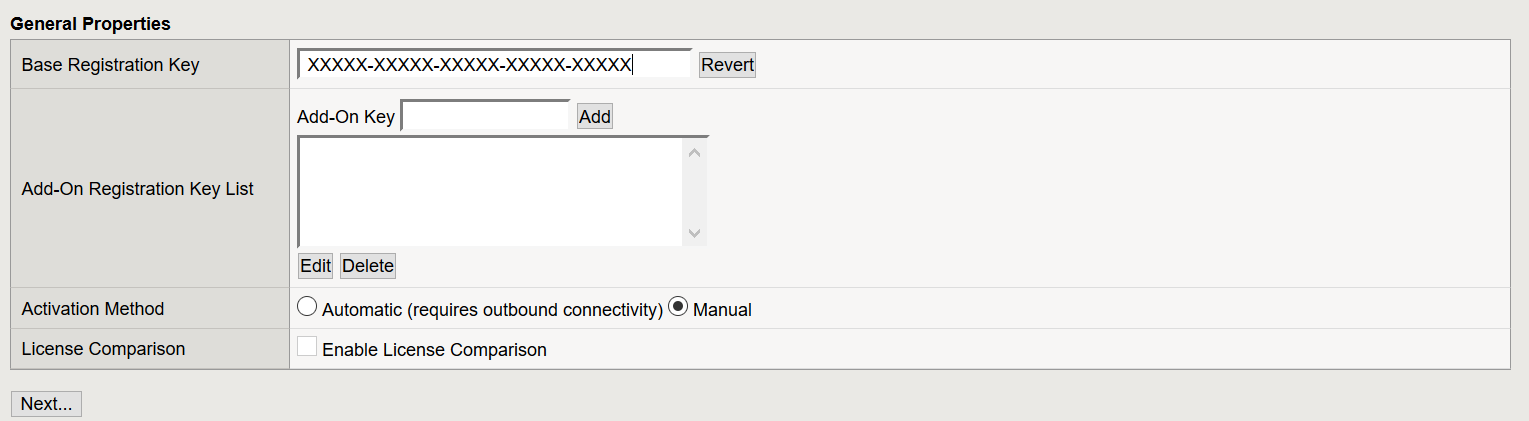
Paste your registration key in the “Base Registration Key” method. Then, if your F5 appliance has Internet connectivity (as it should in this lab), you can use the Automatic Activation Method. In case it doesn’t, proceed with Manual as we are doing and click Next.
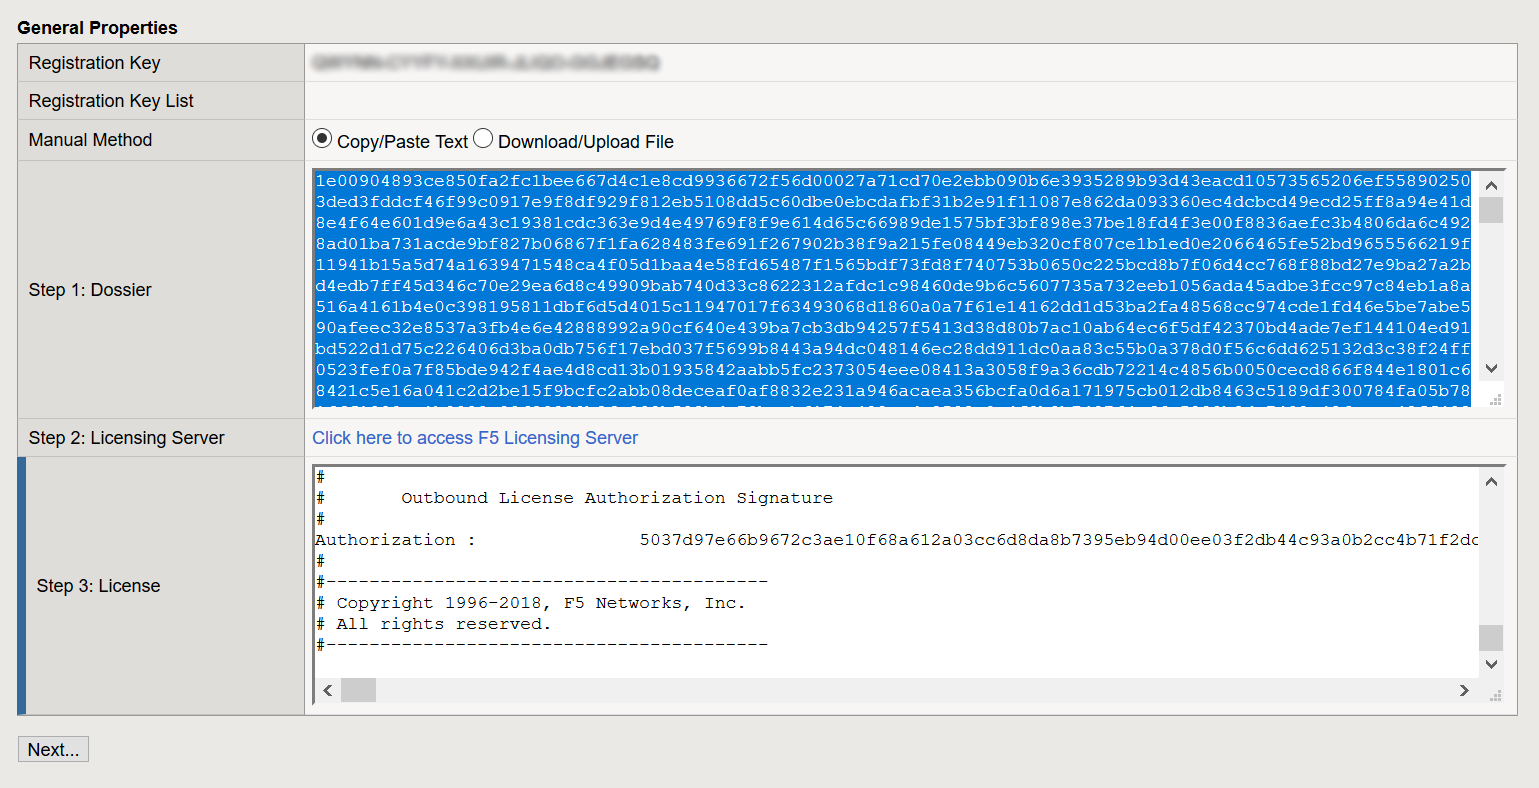
If you are going manual, the F5 will generate a big text. You need to copy this text and paste it on the F5 Licensing Server. To access it, simply click on the link mentioned in Step 2. The F5 website will generate a license text, and you will have to past in the box on the bottom (“License”). Once done that, click Next to continue.
Resource Provisioning
In this F5 LTM Tutorial, we have seen the BIG-IP and LTM terms for quite a while. What is the difference, in practice? BIG-IP is the device itself, the virtual appliance we have installed. This BIG-IP can do several things, based on the modules it has. The module for load balancing is LTM, and we need to allocate some resources of our BIG-IP Virtual Machine to LTM. This is what the next screen tells us.

The default settings are good for a lab. For your information, Nominal indicates that we launch LTM with the bare minimum and increase the resources as we need them. With Minimum, BIG-IP allocates the minimum resources the module needs to operate, and no more than that: resources will never increase. Finally, with Dedicated, BIG-IP allocates all the resources to this module. You won’t be able to use other modules on this BIG-IP appliance if you use this.
Certificate provisioning
Since F5 management is available only in HTTPs, it needs a certificate. By default, this certificate is self-signed, but you can use a custom certificate if you need to. In the Device Certificates part of the configuration wizard, you can add one.
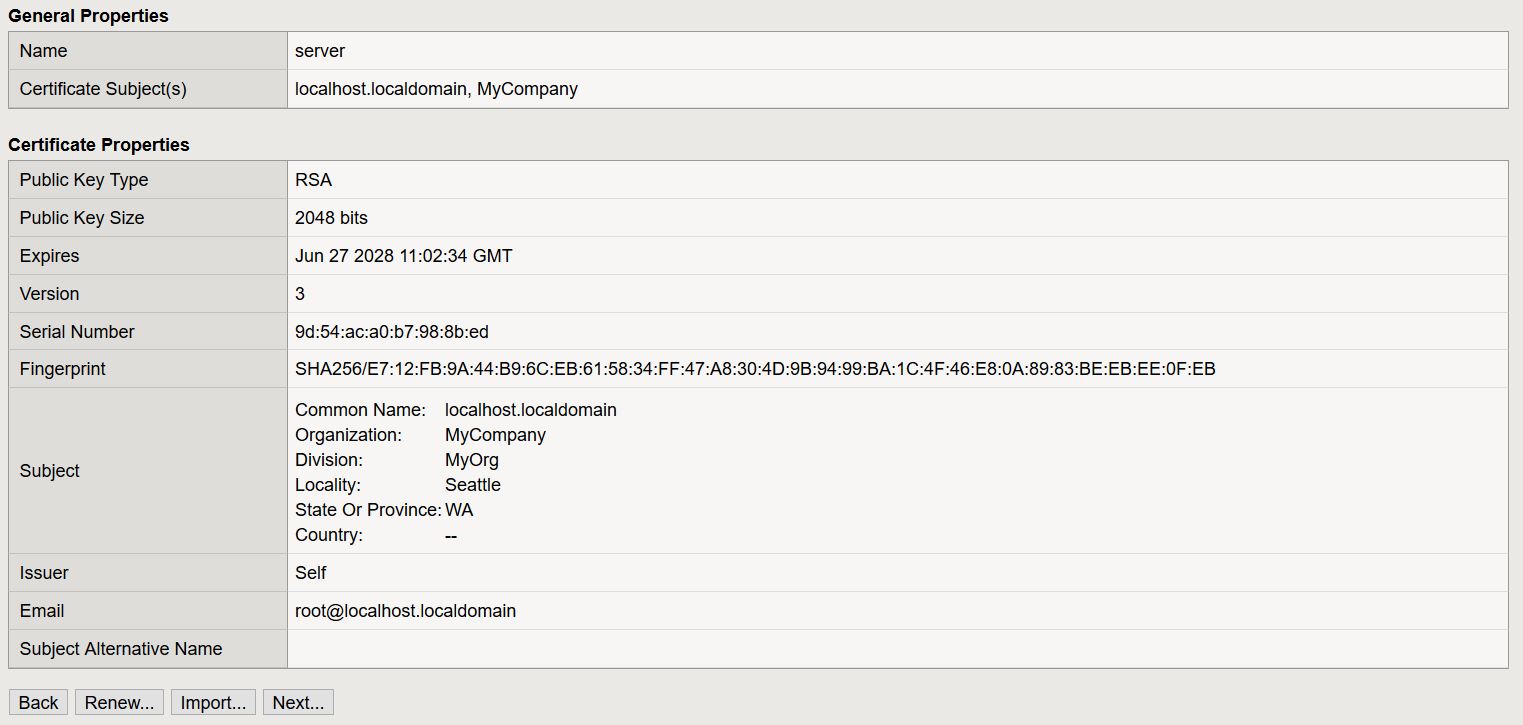
Since this is a lab, we can leave everything as it is. Since F5 BIG-IP LTM has SSL offload capabilities, you can upload more certificates to expose SSL-based services. Don’t worry, we can do that in the future if we need to. For now, click Next.
The Platform Settings
At this point, we can configure the platform. Here we can change the hostname and the password of the default users.
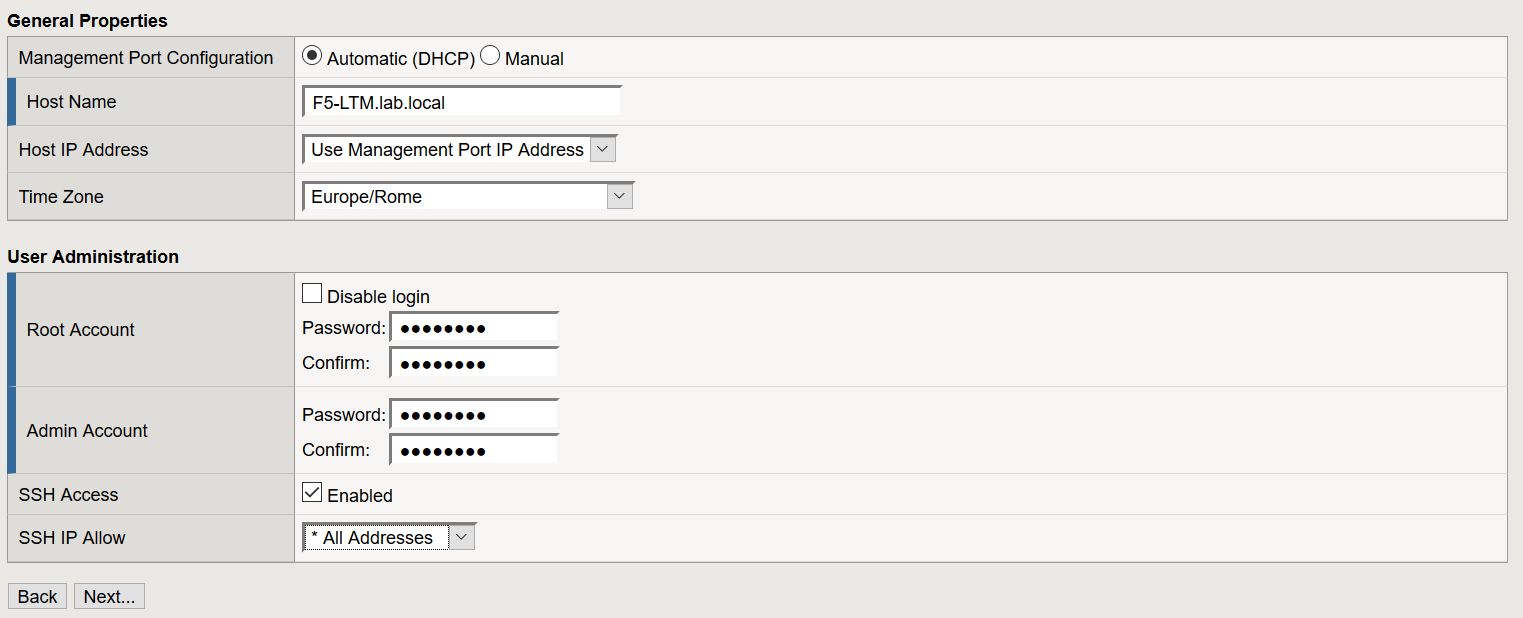
So far so simple. On this page, there is just one thing you might want to consider, and it is the hostname. You need to provide a Fully-Qualified Domain Name (FQDN), and not just a name. You can of course use a local hostname, as we are doing. Once it’s all set, click Next.
Skip the Network Wizard
At this point you may enter the network wizard where you configure all networking stuff like Redundancy. However, the Wizard is a little bit too rigid, and our machine is ready. Thus, I recommend skipping the wizard and going in the actual device configuration to configure what we need.
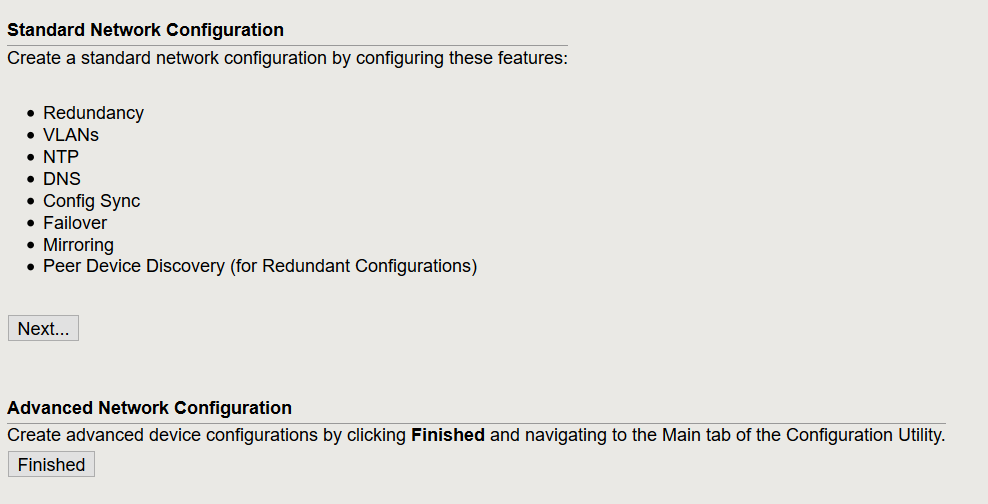
To skip this wizard, simply click on Finished.
All set!
Congratulations! At this point, your F5 BIG-IP appliance is ready to work as LTM device, and we can configure everything we need. If you did things right, the management page will look something like the one below.
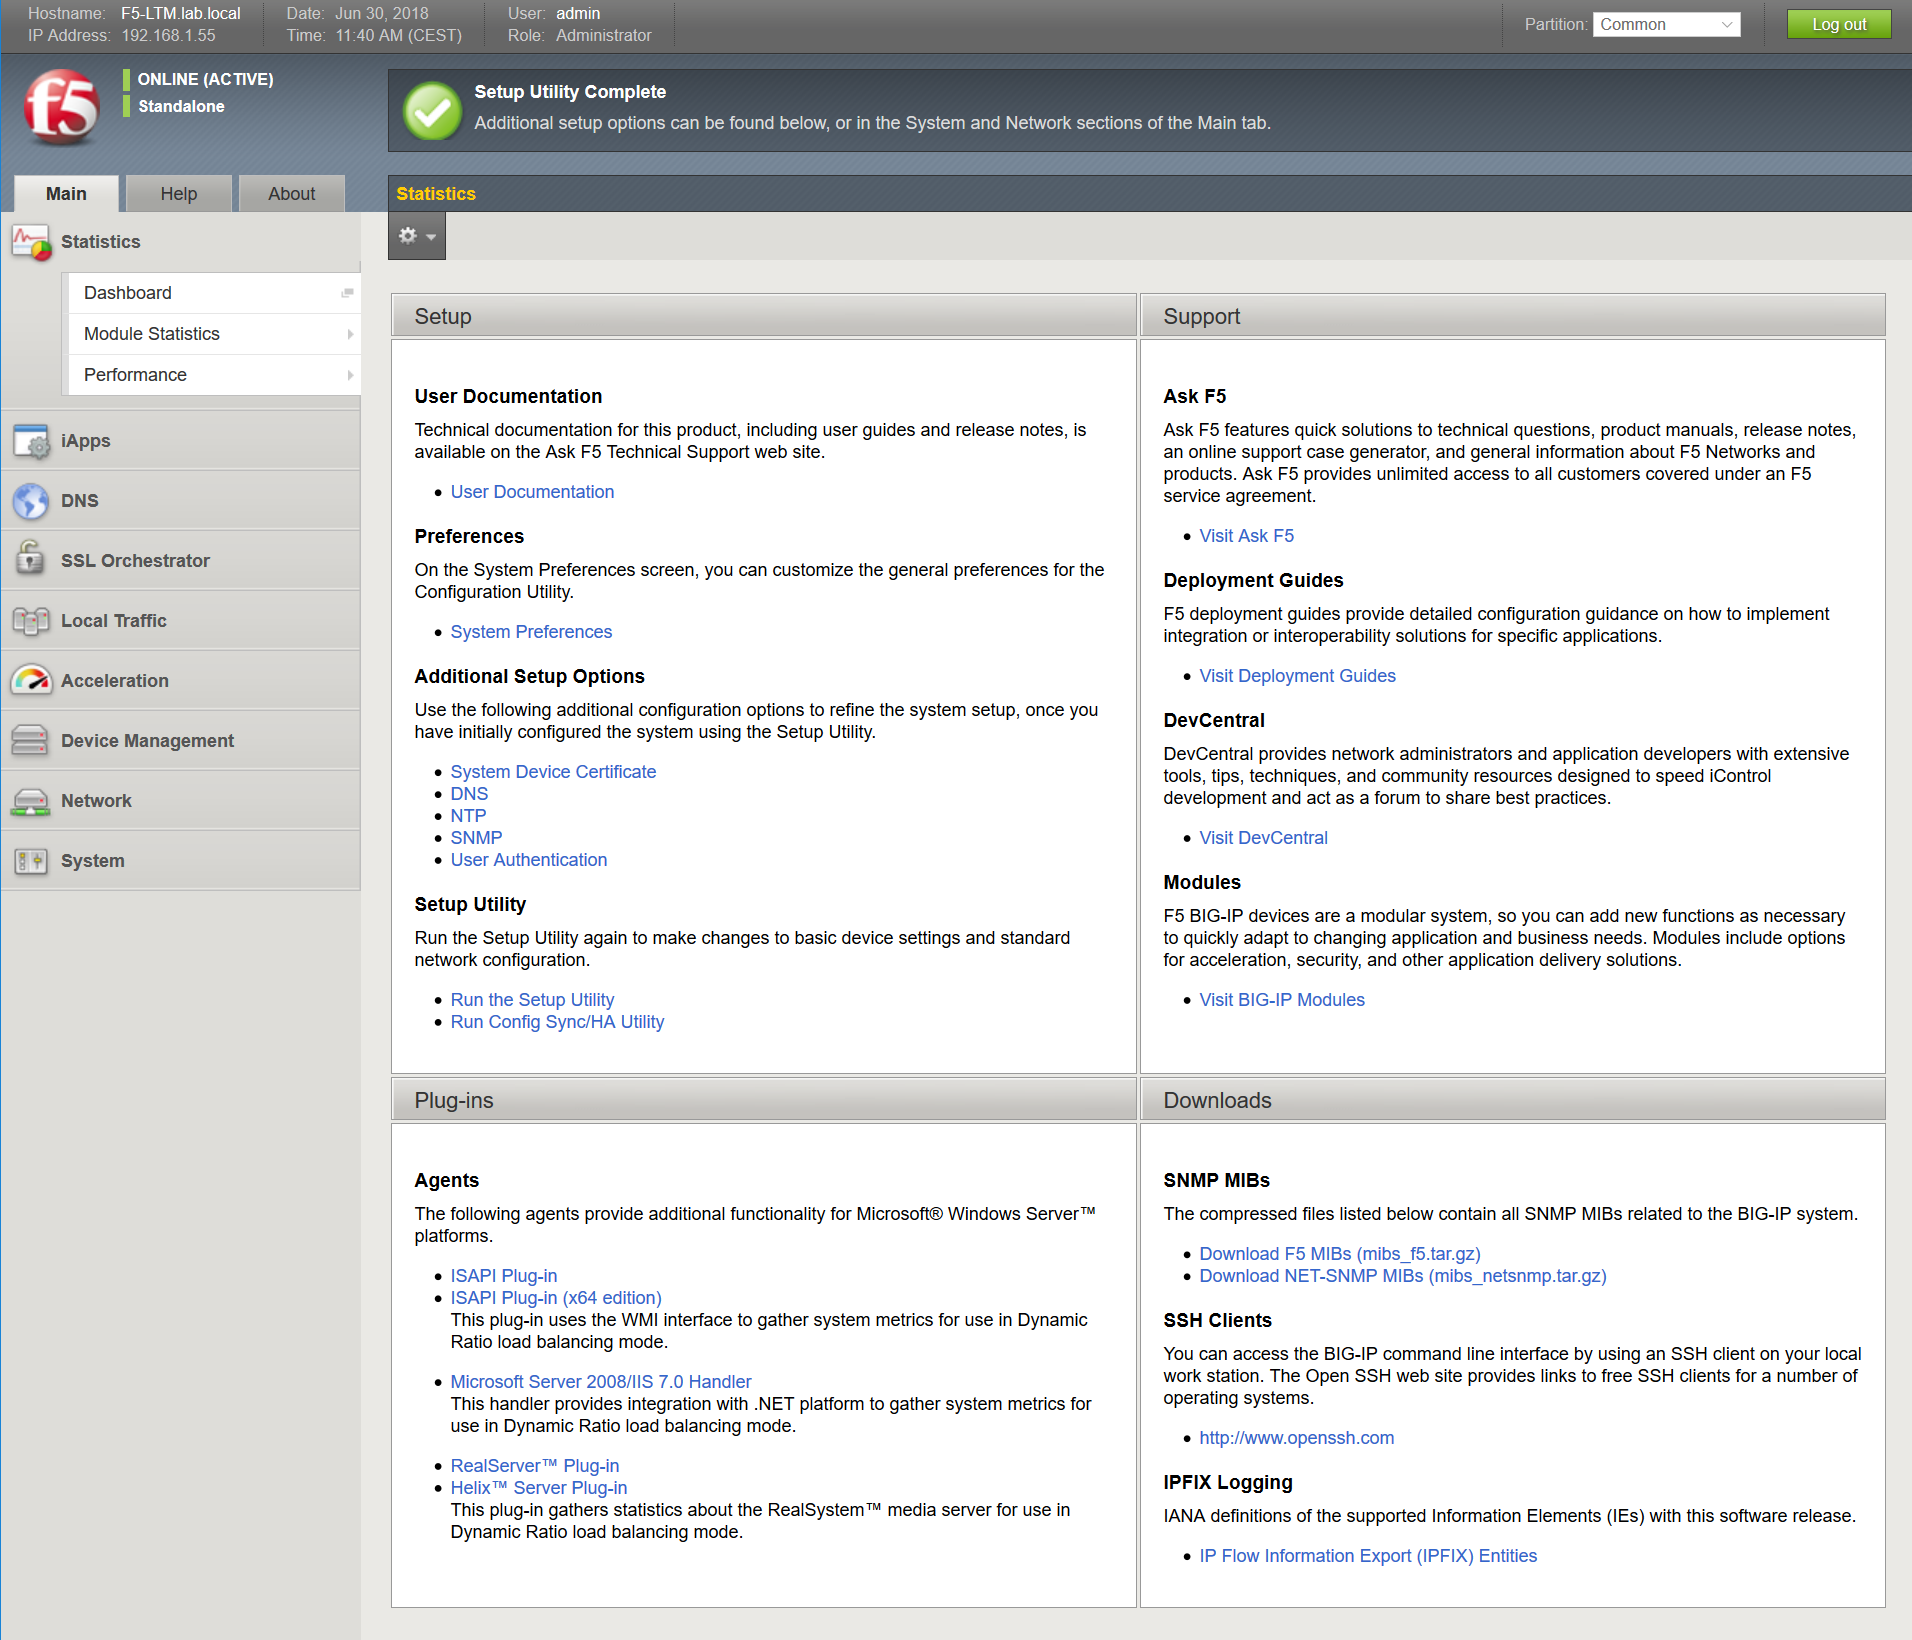
You can see on the left that we have the LTM Module configuration page (Local Traffic). If you install other modules, they will appear here.
Wrapping it up
Now you have a BIG-IP F5 Appliance ready to load-balance whatever your need. Use this tutorial as a reference on the deployment.
What do you think about F5 BIG-IP LTM? How do you see yourself using it? What items do you wish to see in deeper detail? Let me know your opinions in the comments below.

